-->
DISCLOSURE: This blog contains Google Adsense ads and affiliate links to Creativebug via which potential commissions are earned when visitors click through.

Search This Blog > > >

Showing posts with label organizers. Show all posts

Saturday, 14 February 2026

Upcycling Jeans with Ute Jensen [Pt 2]

Ute Jensen Turtle Basket crafted by eSheep Designs
A charming turtle basket made out of an old pair of jeans!
Happy Valentine's Day and welcome to part two of my adventure in jeans upcycling, courtesy of the unique creativity of Ute Jensen. Back in November, I posted about the first project that I made with one of her patterns, a whale shaped pencil pouch.

Today I present to you a charming turtle shaped basket made out of a pair of old jeans.

In my first post, I mentioned how potentially challenging it is to handle a heavyweight denim. Not everyone making these projects will have to deal with the same fabric weight, however, so while I had the same issues with this turtle, your mileage might vary if you decide to attempt this.

Ute Jensen Turtle Basket crafted by eSheep Designs
Definitely a satisfying project, despite challenges...

While I have no real desire to make this again, I totally appreciate that this is one of the more functional uses to which you can put an old pair of jeans. The basket that results is quite roomy and – as you can probably assume – it's durable beyond belief. Not to mention that it's cute as heck!

No matter what whining I may do in the ensuing paragraphs, I highly recommend this project. Particularly if (like me) you have it in mind for a gift, it is well worth your time and effort.



I mentioned in part one how the designer's creativity extends beyond merely using old jeans as the material of choice, and even beyond the creation of a recognizable "creature" in the process. I repeat, while several people might be able to use old denim to sew a turtle shaped basket, the attention to detail here – in terms of using what already exists on a pair of jeans – is remarkable.

Ute Jensen Turtle Basket crafted by eSheep Designs
The designer's use of specific parts of a pair of jeans is quite ingenious...

For instance, take a look at the head of this turtle. An existing inside seam from a leg – positioned so that it is centered along the back of the head – adds visual interest, while making use of fabric around seams that might otherwise be trimmed away and discarded.

In the photo below, the interior pockets are all cut from (in my case, anyway) back pockets that I had left over from previously taking apart jeans for the boat tote. (Other locations where these pocket pieces would be harvested from is along the bottom of the pant legs.)

Ute Jensen Turtle Basket crafted by eSheep Designs
The lining side of the body, interfaced with remnants of an old fleece blanket...

By the way, the only interior pocket that's required is one for the turtle's head. Of the other five, the maker can decide whether or not to include them. In my mind, more pockets is always better when it's an organizer. Deciding to go full bore with all six pockets (as well as an additional coin pocket that was sewn on top of the pocket for the head piece), however, does amp up the trickiness due to the thickness factor.

In this area, I must give kudos to my vintage Kenmore (which is coming up 49 years old – in my possession – this April). It sailed quite smoothly over most of these bulky seams.

Ute Jensen Turtle Basket crafted by eSheep Designs
This is the outside of the body...

For the turtle body exterior, I followed the designer's suggestion to center the template over an outside leg seam. The result is that each of the six segments is embellished by a double stitched seam down the middle. (Again, this is making use of fabric close to edges of seams that otherwise might not get used at all.)

To make this a complete recycling project, I reused remnants of a fleece blanket as interfacing. Opted to sew it in for the side panels, but used glue on the bottom piece and it held up to my rough "man-handling." The piece of cord for the mouth came from my scraps pile and I used two buttons for the eyes – coloured in the middle with a Sharpie – instead of Kam snaps and felt.

Ute Jensen Turtle Basket crafted by eSheep Designs
Turned upside down, it is indeed a turtle!

The worst part of the man handling was turning the body part right side out. (Turning the arms and legs right side out was no picnic either, but I had expected that given my experience with the whale tail from the first project.) It took a long time and at one point, I was afraid that the raw edges were going to fray away from all my pulling and yanking. Not fun at all!

One final part that I want to highlight is the attachment of the head. Recall that at least one interior pocket is required; its function is to accommodate the neck and head. As you can obviously see, this piece is stuffed with polyfil – not a whole lot at the base of the neck, but it's not nothing – so the sewing at this final juncture is to push this thick assembly underneath the presser foot and secure it to the body by stitching through many layers. I had to physically lift the presser foot up as far as it would go – as well as lower the feed dogs – but I did manage to get everything underneath and ultimately use my sewing machine to do this... yay for my Kenmore again! (I cannot see the alternative of hand sewing this part to be any easier, to be honest.) 


Check out crafty classes at Creativebug!

[affiliate link]


For the sewers among us, this basket would be ideal for keeping notions close at hand. For the photo shoot, I crammed in some of my favourite "finds" of 2025: Barefoot Venus body care products.

Ute Jensen Turtle Basket crafted by eSheep Designs
No end of uses for a basket this big...

We received a Barefoot Venus gift box filled with lotions, creams, bath salts and body wash for Christmas 2023 and both hubby and I loved them. I knew they were on the pricier side of such things, however, and originally did not anticipate making any other purchase after we had used up our box.

Made in Canada Barefoot Venus products
Months later, after repeated attempts to undermine our country's identity and economy by forces across the border, I was actively on the hunt for Canadian products. When I finally got around to looking up the company's history, I was surprised to discover that Barefoot Venus actually originated in my home city and is currently comfortably ensconced in the Okanagan Valley. 

Several orders later, I am a customer for life. Ironically, few of my readers are actually Canadian, but to those very few, if you're looking for a homegrown business to support, I highly recommend Barefoot Venus. (And no, they are not paying me to say this.) You are guaranteed to fall in love with how well they work and perhaps unexpectedly — with how they smell! I'm not usually one to care about fragrance but something about these scents is quite enticing and addicting. In the photo above, you can see various samples of their product line, including a (coconut) lip balm, a (vanilla) perfume oil, an (apricot brandy) argan oil, a (gingerbread) hand repair cream, a (peppermint) foot balm, and my fave fragrance: a lemon freckle hand lotion.

And if you're actually reading this on Valentine's Day, maybe go on over to their website and treat yourself to something special at a discount.

'Til next... 🇨🇦🍁
Saturday, 1 November 2025

Upcycling Jeans with Ute Jensen [Pt 1]

Ute Jensen Upcycled Jeans Whale Pencil Case crafted by eSheep Designs
Old jeans turned into a whale of a pencil case!
Are you having a pleasant fall (spring) season where you are? We have managed not to see any snow yet, which is always a plus this far north. But it's clear that daylight hours are dwindling as we approach the "shorter" days of late autumn, especially with the switch back to standard time later tonight.

Gotta be honest: not a fan of this time of year. But I digress...

Approximately six months before it closed down, Makerist held another of its unfathomable $2 sales. I picked up a couple of patterns by a German designer named Ute Jensen. She specializes in projects that involve upcycling old jeans, and she does it in a rather effective manner. Not satisfied with merely using denim, she quite craftily identifies elements from a basic pair of jeans that can be featured in various ways to create personality in her patterns.

Check out this whale shaped pencil case. (It can be put to myriad other uses apart from holding pencils, of course.)

Ute Jensen Upcycled Jeans Whale Pencil Case crafted by eSheep Designs
Reverse view...

Notice the clever positioning of an upside down front pocket with its requisite rivet to create the top of the head for this (blue? sperm?) whale. I mean, perhaps many people can sit down and think of a way to create a pouch in the shape of a whale, but to do it with old jeans and have it be so representative takes a certain talent, don't you think?


The project isn't exactly easy, however, given the contortions that you have to go through when working with potentially heavyweight denim. My other half's old jeans all appear to be made out of thick denim with a weave that seems to defy cutting. (God knows how he managed to get holes in them!) Whether with scissors or rotary cutter, cutting was just difficult.

Ute Jensen Upcycled Jeans Whale Pencil Case crafted by eSheep Designs
Here's the template for the front pocket that forms the head of the whale...

Causing an additional problem for me was the requirement to adhere to a non-traditional seam allowance of 0.3" (or 0.76 cm). In the PDF, she refers to this as the width of her presser foot but that's obviously not a universal thing; at least, none of mine are sized like that.

In most cases, if you're consistent with using a fixed seam allowance when sewing something, you shouldn't run into issues. In this case, however, my use of a 1/4" seam allowance on the fins caused them to turn out wider than called for, which made it essentially impossible to sew the front head piece to the back piece with a regular seam (where you see the green pin in the picture below).

Ute Jensen Upcycled Jeans Whale Pencil Case crafted by eSheep Designs
Not following the unconventional seam allowance made the fins too big... 

Rather than redo the fins, I opted to overlap and zigzag stitch the two pieces together, leaving an exposed raw edge. Given the overall look of this, I didn't feel as though having a couple of frayed areas would detract from the finished project.

Ute Jensen Upcycled Jeans Whale Pencil Case crafted by eSheep Designs
Turning out this tail is not for the faint of heart!

The tail gave me fits, even before the sewing and turning. Again, cutting was a challenge, given the precise angles of the template and its relatively small size. Of course, the seam allowance on this piece was scant (i.e., definitely not 0.3"), meaning that turning and poking out the ends had to done extremely carefully lest you poke right through. As it was, my hemostat created a hole in the fabric just from its grip and my pulling. You may or may not be able to see the mishap in the photo above; I eventually quilted the whole thing to hide the issue.


Check out crafty classes at Creativebug!
[affiliate link]


The zipper installation went pretty much as expected. If you have experience with zippers, this one won't cause you any concerns. Let me say here that while the instructions are a bit odd in some sections due to language translation, the whole pattern is very well documented with photos. (Also – if you don't have a pair of old jeans to sacrifice and you still want to make this – there are instructions for making it with "regular" fabric.)

Ute Jensen Upcycled Jeans Whale Pencil Case crafted by eSheep Designs
View of underbelly...

Notice how the designer makes use of both sides of the denim to create contrast. (Confusingly, I recall the English translation uses the term "left side" when describing the wrong side of the fabric.) Oddly enough, some of hubby's discarded jeans are of the light wash variety: both sides look pretty much the same in terms of offering up a lighter shade of blue.

Ute Jensen Upcycled Jeans Whale Pencil Case crafted by eSheep Designs
In use as a pencil case...

The pouch is capable of holding many writing instruments, if that is your desired function for the finished item. (I don't need any more pouches myself, so this is going to be a gift for a lucky little someone who might actually use it for its intended purpose.)

The lining fabric that you see was gifted to me ten years ago. In keeping with the upcycling theme, however, an old shirt that's no longer in favour might be something to consider for a lining.

Ute Jensen Upcycled Jeans Whale Pencil Case crafted by eSheep Designs
All in all, a cute way to repurpose old jeans...

Unlike most other sewing projects that I've taken on in the past, this one was started, set aside, picked up, re-started, and then finished leisurely. None of the pacing was intentional; that's just how it turned out. I'm thinking that this might be the way of most of my future sewing... slow, with no defined schedule for completion. It's not like I have a lot of projects waiting in a queue; not much of what I see these days "calls" to me.

Ute Jensen Upcycled Jeans Whale Pencil Case crafted by eSheep Designs
One last addition to highlight: after I took all of the photos, it occurred to me to use the zipper remnant as a zipper pull extension.

I saw this idea on a wine bottle cozy many years ago in a book that I borrowed from the library. Since I don't have any actual extra zipper pulls to put onto small remnants of #3 zippers that get chopped in projects like these, any other use that I can put them to is a plus.

While Makerist is no more, you can find Ute Jensen's patterns by searching Etsy for her shop, Jotdotshop. (Maybe you can take a look through and guess which of her other projects will be featured here in part two.)

'Til next... 🇨🇦🍁


Saturday, 4 March 2023

An Origami-ish Basket

Origami-ish Basket crafted by eSheep Designs
View of the interior of my new basket...
Last week, I previewed today's project by running a "clip show" of past projects I've done that started with a circle. The variety represented by that list surprised me.

Generally speaking, I love sewing projects that start off simply and then get transformed in unexpected ways. Most projects that start with a circle grab my attention in that sense.

I also love origami, so to find a project that starts off with a circle and is somewhat origami-ish, well, how could I resist? (And aren't you happy that I couldn't resist, so that I could have a topic for a blog post??)


All kidding aside, I was drawn to this project by the opportunity to do my own thing with it. (Sort of like how I made the magic box pouch my own.) So while I give full credit to Ae PooiM on YouTube for her tutorial (search for New idea!.. Make a Basket from a piece of circular cloth) from August 3, 2021, I did make several changes to her version in arriving at the basket shown here, which I think has its own charm.

Origami-ish Basket crafted by eSheep Designs
Quilted and riveted...

For one thing, it's quilted. And for another, it's finished off with rivets. I also wanted it to be bigger, so I cut my fabric circles to 20" in diameter instead of the stated 45cm (which is under 18") in the video. (In fact, I will provide my adjusted measurements in old fashioned imperial for those of you still stuck in the dark ages. ಠ‿ಠ)

Origami-ish Basket crafted by eSheep Designs
Only a portion of the (exterior side) circle is quilted...

While I encourage experimenting with patterns to make them your own, I will always remind that it takes planning to be able to do so successfully. After I'd watched this video a couple of times, it occurred to me that quilting just the exterior front and back would be relatively easy if I established what the divisions were for the cone shaped pockets before sewing.

As in, the area not used for the pockets would end up being the front, back and base of the basket. This part of the exterior side would then be interfaced with some fusible fleece and quilted. (Why not quilt the whole thing? Those little cone pockets would get too thick to handle.)

Don't know if you can see it clearly, but the fusible fleece in the quilted area was pieced together from large scraps left over from my Christmas table topper project. (I don't know about you, but I hate to waste interfacing!)

Origami-ish Basket crafted by eSheep Designs
This was one continuous free motion squiggle...

I hadn't done any free motion quilting in quite some time — and therefore will likely never get good at it — so I gladly welcomed this opportunity to practice. I will admit, however, that I did not use my free motion quilting foot; it had seriously been a while since I used it and I didn't trust that I'd be able to do it well enough over such a large area. By using a regular presser foot, however, I wasn't able to make small movements, so my quilting is just a series of big squiggles.

But at least it was done in one continuous stretch of stitching, with only one small hiccup (which I can't even find anymore on the finished item).

Origami-ish Basket crafted by eSheep Designs
First project using my new extension table!

The DIY extension table performed wonderfully in its first real use. I felt in total control of the large piece that I was quilting, able to swing it back and forth with no dragging issues at all.


Watch live classes for FREE at CreativeLive! Sign Up at CreativeLive
[affiliate link]


This project is actually a very "simple sew", except when you get near the end and are required to sew the inside edge of the cones to the outside edge of the basket (where the four clips are in the photo below). Just from watching the video, I knew it would be a challenge to get "in there" with my sewing machine. 

Origami-ish Basket crafted by eSheep Designs
Preparing to finish off the pockets in a different way...

When I got to this point, I decided to do a combination of hand sewing and rivets to secure those pockets. (The clips holding the two pairs of cones together is where I hand sewed; the tutorial leaves them separated.)

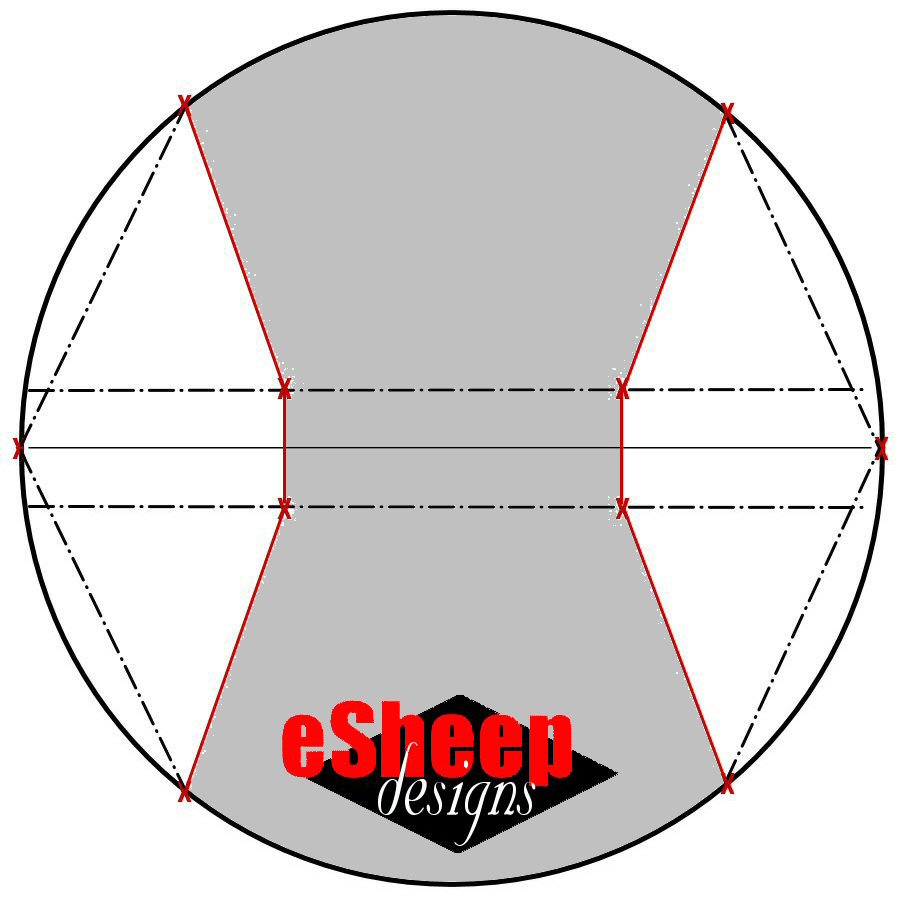
Now, back to my promise to provide you with some imperial measurements, refer to the following diagram if you want to make my version of this project.

Origami-ish Basket crafted by eSheep Designs
Adjusted measurements for larger version of this project...

I found that it was quite unnecessary to draw most of the lines that you see. All you need to make are the markings that I've indicated in red (on each half of the circle, of course); i.e., the six "X"s and the two diagonal lines joining a couple of those "X"s. Those will actually end up being sewing lines.

For quilting purposes, the area in gray below is what you need to cut for fusible fleece. Fuse it onto the exterior fabric and quilt as desired. (Note that whenever you quilt something, it will shrink a bit. To deal with this, you may need to adjust the other circle of fabric to make it match when you sew them together later.)
Origami-ish Basket crafted by eSheep Designs
Template for fusible fleece...

Some kind of Vilene interfacing was used in the video for the exterior fabric. I decided to use my supply of Decor Bond for extra firmness. However, fused Decor Bond tends to wrinkle and crease when handled excessively (like when you turn something right side out), so if you choose to use it, do what I do and fuse it after turning. (I gave instructions for how to do this in my Collapsible Christmas Tree tutorial.)

Finished size is about 9" in "diameter" across the top, and about 6" tall. The base is approximately 3" x 6". For me, it's a nice size that's not too large and not too small.

Origami-ish Basket crafted by eSheep Designs
Giving an idea of size...

The YouTube video provides excellent instructions for what to do, so apart from the above, I have no other advice to add about making this. It's very straight forward.

Origami-ish Basket crafted by eSheep Designs
Front/back view...

Installing the rivets took a bit of pounding, as there are two quilted layers to go through, plus the pocket. All went well, however, with the largest rivets from my rivet kit being just the right size for the job.


Check out crafty classes at Creativebug!
[affiliate link]


The fabrics used here are two selections from a purchase made five years ago from old Craftsy. They are part of a collection designed in 2013 by Ann Kelle called Remix Metallic for Robert Kaufman. My decision to go with a 20" circle meant that I couldn't use a fat quarter; these are some of my (relatively rare supply of) complete yardage fabrics.

Origami-ish Basket crafted by eSheep Designs
Side view...

I've had these fabrics for so long that it's definitely time to use them up. Seeing the finished basket, however, if I had it to do over, I would probably choose a different fabric for the lining. The navy chevron doesn't provide enough contrast.
 
Origami-ish Basket crafted by eSheep Designs
Base is rectangular...

That said, I really like the gold toned accent on these; definitely adds a touch of elegance. 

Oh, and for what purpose do you think I'm using this origami-ish basket? Might you recall me stating that hubby started an indoor garden this winter? (For which I got him a book this past Christmas.) Well, when I'm called upon to lend a hand with said garden, I take this with me.
Origami-ish Basket crafted by eSheep Designs
It's my gardening bag!

It fits right inside the top of this sturdy paper bag. The bag itself carries discards and trimmings back home to our organic waste bin. The fabric basket on top is for any actual harvests. In the above photo, there are a couple of stalks of rapini (one of which flowered way too quickly) and some carrots. I've used the little cone pockets to carry sprigs of basil, green onions and arugula.

It wasn't my intention to make the basket for this purpose, but it's always nice to find a purpose for whatever I make!

'Til next...


Saturday, 14 May 2022

Quasi-Tutorial: Any Size Square Storage "Box"

Simple Square Storage Box by eSheep Designs
My new scraps container...
Over the past year, I've come to realize that my chosen container for storing fabric scraps is no longer meeting my needs.

Despite scrunching everything down, it's overflowing. Several months ago, I saw one of Don Kim's (YouTube) videos for making a simple box — there are at least two — and knew that it was going to be the basis of my solution.

If you want to join me in today's simple project, I recommend using reclaimed material. I've typically avoided making "big things" like this because of the fabric requirements. However, if sacrificing an old bed sheet or some other item of used clothing, it becomes less of an issue.

In my case, the duvet cover set that I've previously used for one of my first purse designs, my ironing mat and my sewing machine cover is still able to yield material for me to complete more than one of these, so yay for recycling!

I used ribbon to bind the top raw edge, but straight cut binding out of the same fabric will also work.

The type (and amount) of interfacing chosen will affect how well the box is able to stand up upon completion. I used only fusible fleece and the result is somewhat floppy, particularly because of the large size. A combination of Decor Bond and fusible fleece would definitely provide more body; adding interfacing to the lining would also improve stiffness. Keep in mind also that if your intention is to have this box filled, that alone will add structure.


Don Kim's versions of this project result in a 24cm square box, which is just under 9.5". I wanted my box to be closer to 12" so I used metric measurements for the first time — primarily because I had to adjust his original dimensions and didn't want to add another level of complexity to the process — and decided on a 30cm box.

Then I came up with this graphic to help you "design" your own size box, regardless of what scale you use.
Any Size Square Storage Box by eSheep Designs
This math should be simple to understand...

What follows here is a tutorial where you can make a box whatever size you want. Or make several in different sizes and have them be stackable.

To show you how the formula works, I wanted 30cm — which is pretty darn close to 12" — as my desired size. So my value for A was 15cm (or 6"); i.e., desired size divided by two. Value for B was 30cm x 2 = 60cm, plus 1cm seam allowance x 2 = 62cm total. (Or, in Imperial, it would be 12" x 2 = 24", plus 1/2" seam allowance x 2 = 25" total.)

Value for C was simply 30cm + seam allowance of 1cm = 31cm total. (Or, in Imperial, 12" + seam allowance of 1/2" = 12.5" total.) Value for D was 30cm plus seam allowance of 1cm x 2 = 32cm total. (Imperial would be 12" plus seam allowance of 1/2" x 2 = 13" total.)

Simple Square Storage Box by eSheep Designs
Four pieces of fabric, two backed by fusible fleece or your choice of interfacing...

Using your measurements, cut four pieces of fabric (two for the exterior and two for the lining), along with however many pieces of interfacing you want. Again, I only interfaced two (would have been the exterior) pieces of fabric with fusible fleece, but you can interface them all for a stiffer structure.

Simple Square Storage Box by eSheep Designs
Create seams along the three short edges...

The sewing part is extremely simple. Stack each pair of pieces right sides together and sew along the three short sides (the two Cs and the D from my original diagram above). Press open the seams if you can.

Simple Square Storage Box by eSheep Designs
Box the exposed sides and sew two more seams...

Box the bottom seams by bringing together the raw edges of the cut out corners, i.e., matching one end of the D seam with one of the C seams and the other end of the D seam with the other C seam.
 
Simple Square Storage Box by eSheep Designs
Do the same with the interfaced pieces...

What you want to end up with is the D seam across the middle of the bottom of the box.

Simple Square Storage Box by eSheep Designs
Sew together the boxed edge seams of the lining and exterior...

Finally — and I consider this one of the best tricks that I've learned over the past year — secure the lining to the exterior by sewing them together along the two boxed seams. (Both should be wrong side out, bottom against bottom, when you do this. I should have taken a photo showing both pieces extended, but imagine that the top openings of both are at opposite ends and the joined bottom seams are in the middle.)

This ensures that the lining will never pull away from the bottom of the box once it's completed.


Watch live classes for FREE at CreativeLive! Sign Up at CreativeLive
[affiliate link]


Turn it right side out and pin or clip the top edge together. Baste all the way around.

Simple Square Storage Box by eSheep Designs
Clip the top edges together and baste...

For binding the top edge, I used some 1.5" ribbon that I found in my stash. (I pressed it in half first so that it had a crease along its length, making it easier to wrap against the edge.) Otherwise, I would have made some 2" double folded binding for the job.

Simple Square Storage Box by eSheep Designs
Bind with regular binding or your choice of ribbon...

If you do make your own binding, you can use straight 2" fabric strips; i.e., they don't have to be cut on the bias since the edge is not curved.

Simple Square Storage Box by eSheep Designs
Measure out the corners...

After binding, measure out the distance of A from the center seam, in both directions. Do this around the top edge, close to the bottom, and somewhere in the middle. Mark with pins at each point.

Simple Square Storage Box by eSheep Designs
Pin along the vertical edges of the "corners"... 

Pinch each corner along the pins and replace them with clips if you have them. You will sew lines here to form the corners of the box.

Simple Square Storage Box by eSheep Designs
Sew along corner edges...

Sew about 3mm or 1/8" away from the edge, down the length of each corner, starting and stopping about 3cm (a little over an inch) from the top and bottom.

And that's it!


Check out crafty classes at Creativebug!
[affiliate link]


Tips and variations?

Sew the lining with a slightly larger seam allowance to ensure a snug fit. (The improvement will be particularly apparent if you're making a smaller box.)

Simple Square Storage Box by eSheep Designs
Finished interior...

If you don't mind some wastage, for faster and easier cutting and fusing, you can cut entire rectangles — measuring B x (C+A) — first, fuse on the required interfacing and then cut away the A x A squares.

Simple Square Storage Box by eSheep Designs
Soft, but still stands up...

You can easily add handles to this project. My preference would be to use rivets to add them after the fact, but they can also be incorporated into the top binding without the need for additional hardware.

Simple Square Storage Box by eSheep Designs
View of the bottom...

This fall, it will be ten years since I re-started sewing. (Wow!) I think I've been pretty darn good with my fabric usage to have only accumulated this many scraps in a decade.

Simple Square Storage Box by eSheep Designs
Should be good for some time to come...

What will you use your box for?

'Til next...