-->
DISCLOSURE: This blog contains Google Adsense ads and affiliate links to Creativebug via which potential commissions are earned when visitors click through.

Search This Blog > > >

Showing posts with label fabric origami. Show all posts

Saturday, 21 October 2023

Math in Sewing [Pt 2]: How to Make a Fabric Icosahedron

Make your own icosahedron by eSheep Designs
An icosahedron (ai·kow·suh·hee·druhn)...
"Without mathematics there is no art."

So said Luca Pacioli, the fifteenth century mathematician who worked closely with Leonardo da Vinci, the renaissance artist widely assumed to have employed the golden ratio in both his science and art creations. Because this is a sewing blog and not a math class, I am not going to go into any deep explanation of what the golden ratio is, except to say that it's an irrational number equal to 1.6180 (...); visually, it's similar to the rule of thirds that's often recommended for good composition in photos and art.

If you're actually interested in the math, look up phi and the golden ratio. Back in August, I picked up a (e)book by Gary B. Meisner called The Golden Ratio: The Divine Beauty of Mathematics and am finding it quite fascinating. (The author's musings can be found on goldennumber.net.)

image courtesy of The Golden Ratio: The Divine Beauty of Mathematics by Gary Meisner
Illustration of Platonic solids from The Golden Ratio:
The Divine Beauty of Mathematics by Gary Meisner

When I saw the above diagram in the book, I felt a strong pull to make that twenty-sided polyhedron, because... well, why not? It reminded me of origami and I was taken with the idea of being able to sew a 3D object that had its basis in the golden ratio.

Thus begins part two of my series about math in sewing. (My stats last week showed a 29% drop in click-throughs from the week before. Obviously many readers weren't/aren't interested in the topic... LOL... which is too bad because there's so much more to come!)



An icosahedron is made up of twenty faces, each one being the same size equilateral triangle. There are twelve vertices, each formed by five triangles coming together. (Apparently if you're into role playing games, you'll recognize the shape as that of a twenty-sided die.)

It's actually not all that difficult to make out of fabric scraps (you can actually use as few as three different fabrics and not have any same touching, but you'll have to work out the "how" of that by yourself), as long as you also have some single-sided fusible Peltex to spare. You'll also need some clear glue.

Make Template (Using Math!)

But first you need a triangle template, preferably made out of lightweight cardboard. (I glued my paper template onto a piece of a tissue box.) Go with whatever size you want, but all sides must be equal.
 
How to draw an equilateral triangle
Follow the method shown here to draw an equilateral triangle.

Start by drawing the base horizonal line. (I made mine 8cm long, which is just a tad over 3".) Mark the midpoint of this line (in my case, at 4cm) and draw a vertical line up from there. Then place the bottom of the ruler at one end of the horizontal line and let the other end of the ruler cross over the vertical line. Measure out the required length (again, 8cm in my case) and swivel the ruler so that the length is correct right where it touches the vertical line. This marks the second side of your triangle. Repeat the process to draw the third side.

Cut Peltex Triangles

Once you've got your template made, put a bit of double-sided tape on the back of it – to keep it from sliding around – and use it to trace twenty triangles onto the Peltex.

Make your own icosahedron by eSheep Designs
Make twenty triangles...

I managed to find twelve scrappy pieces of Peltex that fit my needs; the remaining eight were cut from a larger piece.

Fuse Fabric and Cut

Fuse the triangles onto scraps of fabric, let cool and cut away the excess. Arrange as desired, in five groups of four as shown above. Take a photo and get ready to sew.

Sew Pieces Together

You'll use a zigzag stitch to join the pieces together.

In each grouping of four triangles, butt one piece up against the next adjacent piece and sew together with a medium wide zigzag stitch. Don't bother stitching right to the end points, as the resulting vertices need to be somewhat flexible.

Make your own icosahedron by eSheep Designs
Zigzag stitch the pieces together...

Refer to your photo if necessary as you sew. Once you have five individual strips of four triangles, join them all together as shown above and below.

Make your own icosahedron by eSheep Designs
All sewn up in flat format...

You should now be able to play with this piece and know how it fits together to form a 3D shape.


Watch live classes for FREE at CreativeLive! Sign Up at CreativeLive
[affiliate link]


Here is where it gets a tiny bit more challenging.

Make your own icosahedron by eSheep Designs
Sew as many other edges together as you can manage...

You probably already know that sewing by hand is required to finish this. To minimize that, see how many other edges you can join by machine. I managed to sew six more (I think), to get to the point where it looked like a clamshell.

Embellish

Before closing it all off, however, you can add some embellishments. I added a couple of brads (to piece #5 and #17 — they are opposite one another on the finished polyhedron).
 
Make your own icosahedron by eSheep Designs
View of the interior after embellishing with brads and rivets...

On pieces #6 through #15, I installed small bronze coloured rivets. If you have a lot of flat buttons, they would also be appropriate to use as decorations.

If you want to add centered embellishments, take your original triangle template and add two other lines to it: from the midpoint of each of the other two edges to the opposite corner. The intersection of all three lines is the middle of the triangle. Punch a hole in that spot and then you can use the template to make marks on the desired faces of your icosahedron. (See bottom right corner of next photo.)

Finish

Begin by sewing a long basting stitch to pull the final edges of the icosahedron together.

Make your own icosahedron by eSheep Designs
Baste before final hand sewing...

Use a basic slipstitch to close off the remaining edges and then remove the basting thread. Hand sewing through Peltex isn't all that enjoyable; go slowly, take breaks, and use a thimble.

Make your own icosahedron by eSheep Designs
This brad shows a snippet from a page of a book...

When the sewing is done, use a pair of detailing scissors to snip away any untidy thread ends. Dab some clear glue to each of the vertices and to any edges that you feel could use some extra stabilizing.

And there you have your own icosahedron!


Check out crafty classes at Creativebug!
[affiliate link]


For those of you who are interested in how the triangles make up the twelve vertices, here is the "layout" per the numbering format that I added to one of the photos above.

icosahedron layout
The unique arrangements around the twelve vertices...
(Spot the mistake! Fifth up from bottom, one of those 16s should be a 6.)

Using my 8cm (close to 3") triangles, the finished icosahedron is about 5.5" (13.5cm) high and 6" wide. (Kind of hard to measure accurately.) It's a nice size, both in terms of being scrap friendly and for turning out an object that's not too big and not too small; it can be held comfortably in one hand. Oh, and the reason for mixing imperial and metric is because I'm a Canadian of a certain age. ʘ‿ʘ

Make your own icosahedron by eSheep Designs
This is about 6" measured between widest points...

I made this as a memento of my decade of blogging. Each of the fabric scraps used to create this very cool polyhedron represents a specific memory for me. (No more space to recount those memories in this post, but maybe sometime in the future!) But you can probably see how if you were to choose some coordinating fabrics – i.e., not random ones like I did – this could be a very pretty item. (And by the way, as a die, it rolls very smoothly.)

Did you enjoy this? Well, whether you did or not – ◔ ⌣ ◔ – I'll be back with part three of this series in a couple of weeks. I'll be sharing a more traditional sewing project, but still one that relies on the principles of mathematics.

And now, it's time to do some math of a different kind; as in, starting a...


As of next Saturday, I am officially down to my final ten weekly entries for this blog. Yes – as I've strongly hinted at for some time now – my regularly scheduled involvement with this platform is coming to an end. The past ten years have zoomed by at a clip. On the one hand, I remember the uncertain beginning like it was just yesterday, but on the other hand, so much has happened since then that it's quite clear that many years have indeed passed.

An important lesson learned along the way is to compare yourself only to yourself. (Because comparing yourself to others only makes you miserable and envious or prideful and supercilious.) In that sense, what I've managed to do here this past decade has brought me happiness and a tremendous sense of accomplishment. There were surprises galore and feedback from perfect strangers like none I ever dared to expect.

When I completed my first term as a teacher, one of my students – who was actually older than me – came up and said, "It's been a slice." What apt words for me to close out this chapter of blogging.

'Til next...

Saturday, 4 March 2023

An Origami-ish Basket

Origami-ish Basket crafted by eSheep Designs
View of the interior of my new basket...
Last week, I previewed today's project by running a "clip show" of past projects I've done that started with a circle. The variety represented by that list surprised me.

Generally speaking, I love sewing projects that start off simply and then get transformed in unexpected ways. Most projects that start with a circle grab my attention in that sense.

I also love origami, so to find a project that starts off with a circle and is somewhat origami-ish, well, how could I resist? (And aren't you happy that I couldn't resist, so that I could have a topic for a blog post??)


All kidding aside, I was drawn to this project by the opportunity to do my own thing with it. (Sort of like how I made the magic box pouch my own.) So while I give full credit to Ae PooiM on YouTube for her tutorial (search for New idea!.. Make a Basket from a piece of circular cloth) from August 3, 2021, I did make several changes to her version in arriving at the basket shown here, which I think has its own charm.

Origami-ish Basket crafted by eSheep Designs
Quilted and riveted...

For one thing, it's quilted. And for another, it's finished off with rivets. I also wanted it to be bigger, so I cut my fabric circles to 20" in diameter instead of the stated 45cm (which is under 18") in the video. (In fact, I will provide my adjusted measurements in old fashioned imperial for those of you still stuck in the dark ages. ಠ‿ಠ)

Origami-ish Basket crafted by eSheep Designs
Only a portion of the (exterior side) circle is quilted...

While I encourage experimenting with patterns to make them your own, I will always remind that it takes planning to be able to do so successfully. After I'd watched this video a couple of times, it occurred to me that quilting just the exterior front and back would be relatively easy if I established what the divisions were for the cone shaped pockets before sewing.

As in, the area not used for the pockets would end up being the front, back and base of the basket. This part of the exterior side would then be interfaced with some fusible fleece and quilted. (Why not quilt the whole thing? Those little cone pockets would get too thick to handle.)

Don't know if you can see it clearly, but the fusible fleece in the quilted area was pieced together from large scraps left over from my Christmas table topper project. (I don't know about you, but I hate to waste interfacing!)

Origami-ish Basket crafted by eSheep Designs
This was one continuous free motion squiggle...

I hadn't done any free motion quilting in quite some time — and therefore will likely never get good at it — so I gladly welcomed this opportunity to practice. I will admit, however, that I did not use my free motion quilting foot; it had seriously been a while since I used it and I didn't trust that I'd be able to do it well enough over such a large area. By using a regular presser foot, however, I wasn't able to make small movements, so my quilting is just a series of big squiggles.

But at least it was done in one continuous stretch of stitching, with only one small hiccup (which I can't even find anymore on the finished item).

Origami-ish Basket crafted by eSheep Designs
First project using my new extension table!

The DIY extension table performed wonderfully in its first real use. I felt in total control of the large piece that I was quilting, able to swing it back and forth with no dragging issues at all.


Watch live classes for FREE at CreativeLive! Sign Up at CreativeLive
[affiliate link]


This project is actually a very "simple sew", except when you get near the end and are required to sew the inside edge of the cones to the outside edge of the basket (where the four clips are in the photo below). Just from watching the video, I knew it would be a challenge to get "in there" with my sewing machine. 

Origami-ish Basket crafted by eSheep Designs
Preparing to finish off the pockets in a different way...

When I got to this point, I decided to do a combination of hand sewing and rivets to secure those pockets. (The clips holding the two pairs of cones together is where I hand sewed; the tutorial leaves them separated.)

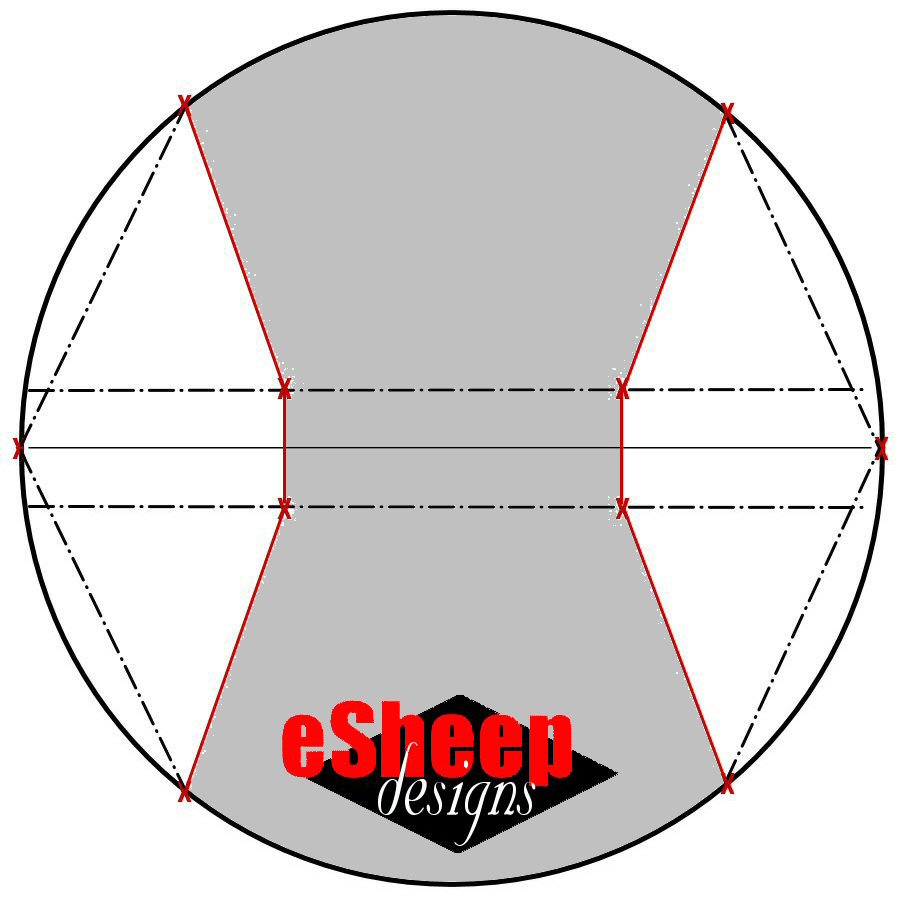
Now, back to my promise to provide you with some imperial measurements, refer to the following diagram if you want to make my version of this project.

Origami-ish Basket crafted by eSheep Designs
Adjusted measurements for larger version of this project...

I found that it was quite unnecessary to draw most of the lines that you see. All you need to make are the markings that I've indicated in red (on each half of the circle, of course); i.e., the six "X"s and the two diagonal lines joining a couple of those "X"s. Those will actually end up being sewing lines.

For quilting purposes, the area in gray below is what you need to cut for fusible fleece. Fuse it onto the exterior fabric and quilt as desired. (Note that whenever you quilt something, it will shrink a bit. To deal with this, you may need to adjust the other circle of fabric to make it match when you sew them together later.)
Origami-ish Basket crafted by eSheep Designs
Template for fusible fleece...

Some kind of Vilene interfacing was used in the video for the exterior fabric. I decided to use my supply of Decor Bond for extra firmness. However, fused Decor Bond tends to wrinkle and crease when handled excessively (like when you turn something right side out), so if you choose to use it, do what I do and fuse it after turning. (I gave instructions for how to do this in my Collapsible Christmas Tree tutorial.)

Finished size is about 9" in "diameter" across the top, and about 6" tall. The base is approximately 3" x 6". For me, it's a nice size that's not too large and not too small.

Origami-ish Basket crafted by eSheep Designs
Giving an idea of size...

The YouTube video provides excellent instructions for what to do, so apart from the above, I have no other advice to add about making this. It's very straight forward.

Origami-ish Basket crafted by eSheep Designs
Front/back view...

Installing the rivets took a bit of pounding, as there are two quilted layers to go through, plus the pocket. All went well, however, with the largest rivets from my rivet kit being just the right size for the job.


Check out crafty classes at Creativebug!
[affiliate link]


The fabrics used here are two selections from a purchase made five years ago from old Craftsy. They are part of a collection designed in 2013 by Ann Kelle called Remix Metallic for Robert Kaufman. My decision to go with a 20" circle meant that I couldn't use a fat quarter; these are some of my (relatively rare supply of) complete yardage fabrics.

Origami-ish Basket crafted by eSheep Designs
Side view...

I've had these fabrics for so long that it's definitely time to use them up. Seeing the finished basket, however, if I had it to do over, I would probably choose a different fabric for the lining. The navy chevron doesn't provide enough contrast.
 
Origami-ish Basket crafted by eSheep Designs
Base is rectangular...

That said, I really like the gold toned accent on these; definitely adds a touch of elegance. 

Oh, and for what purpose do you think I'm using this origami-ish basket? Might you recall me stating that hubby started an indoor garden this winter? (For which I got him a book this past Christmas.) Well, when I'm called upon to lend a hand with said garden, I take this with me.
Origami-ish Basket crafted by eSheep Designs
It's my gardening bag!

It fits right inside the top of this sturdy paper bag. The bag itself carries discards and trimmings back home to our organic waste bin. The fabric basket on top is for any actual harvests. In the above photo, there are a couple of stalks of rapini (one of which flowered way too quickly) and some carrots. I've used the little cone pockets to carry sprigs of basil, green onions and arugula.

It wasn't my intention to make the basket for this purpose, but it's always nice to find a purpose for whatever I make!

'Til next...


Saturday, 21 May 2022

Quick Craft Mondays: Tea Cup Cozy

Tea Cup Cozy crafted by eSheep Designs
A quick and elegant project...
Today's "quick craft Monday" project is probably one of the simplest things that I've sewn in quite some time.

When I saw it on HandyMum Lin's YouTube channel (uploaded May 5, 2022) as a potential Mother's Day gift, it immediately caught my eye with its quasi fabric origami look.

Seeing the little tea cup also made me nostalgic.

One of the things that hubby and I have not done since before the pandemic is go out for dim sum. It used to be almost a monthly thing for us to go and have nibbles of dainty dumplings and drink jasmine tea out of small cups.

So not only did this tea cozy project appeal to my fabric origami leanings, it reminded me of simpler times that have still not returned to normal. 


While you can go to YouTube and watch Lin sew this, it's really rather simple. Take two 6" (15cm) squares of fabric and pin them right sides together. (These are still my Robert Kaufman mystery box selections from Craftsy!)

Tea Cup Cozy crafted by eSheep Designs
Use different coloured pins to mark your start and stopping point...

Sew them together, leaving a small turning gap.

Tea Cup Cozy crafted by eSheep Designs
Press open the seams before turning...

Trim the corners as shown and turn right side out. Slide your choice of tool along the inside seams and gently poke out the corners. 

Press well and stitch up the opening with a ladder stitch.

Tea Cup Cozy crafted by eSheep Designs
Fold two opposing corners to the center on opposite sides...

Find the center of the square by folding diagonally twice (i.e., making an "X"). Then take one corner and fold it so that its tip touches the center point; pin. Flip it over and do the same with the opposite corner. 


Watch live classes for FREE at CreativeLive! Sign Up at CreativeLive
[affiliate link]


Hand stitch each corner down onto the top layer of fabric only. Be careful; you don't want to have to do it all again just because one stitch happened to catch both layers!

Tea Cup Cozy crafted by eSheep Designs
Carefully sew the corner down onto the top layer of fabric...

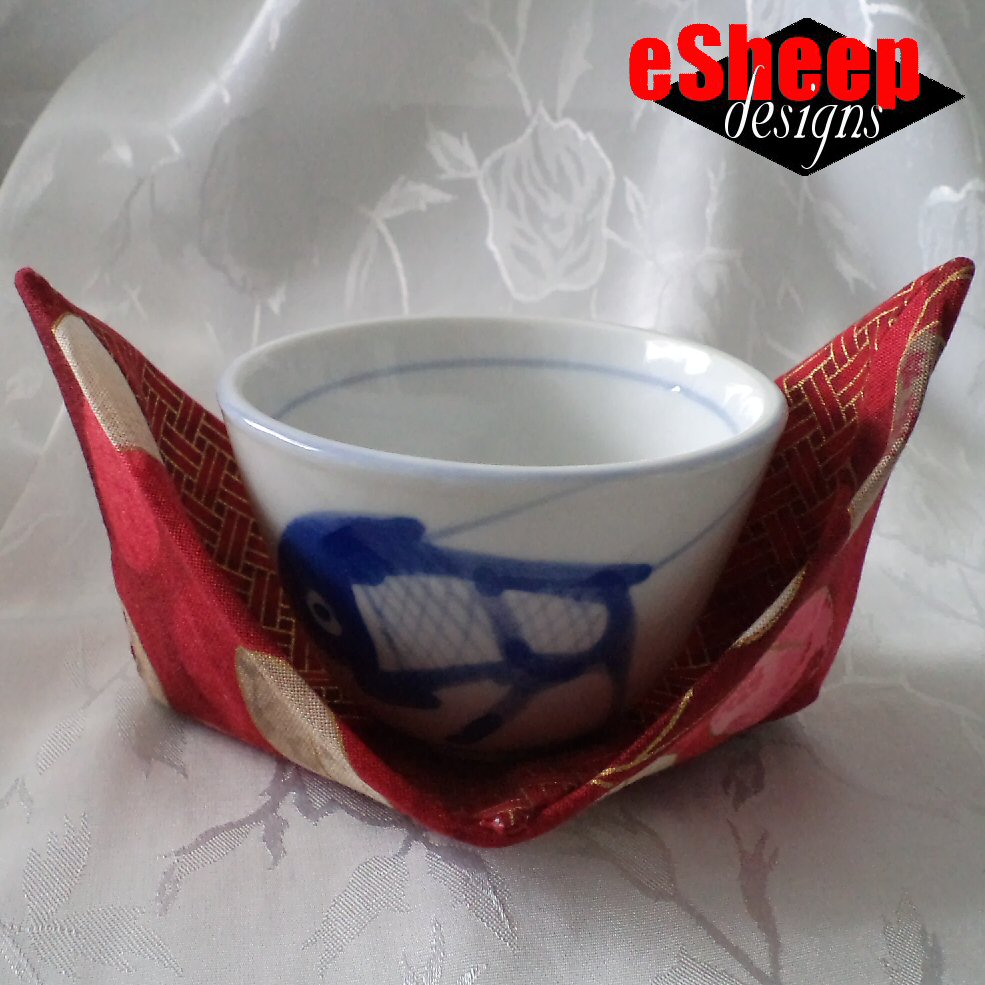
Once both corners are sewn down, pull apart the two layers so that the corners form the base of a boat like shape.

Tea Cup Cozy crafted by eSheep Designs
It's a boat!

You may want to press it at this point; it's done and your tea cup cozy is ready to use!

Tea Cup Cozy crafted by eSheep Designs
Makes an elegant addition to your tea service...

Now you can serve hot tea in these handle-less cups and have some protection for your fingers.


Check out crafty classes at Creativebug!
[affiliate link]


I have ramekins that also fit into this. So an alternate use for this tea cozy would be for serving warm or cold desserts.

Tea Cup Cozy crafted by eSheep Designs
End view...

Hope you've noticed that this is totally reversible, too. 

Isn't it a unique way to use up some of the prettier selections in your scrap pile?

'Til next...


Saturday, 26 March 2022

Hacking a Shupatto Styled Bag

Skirt to Shupatto Bag by eSheep Designs
Shupatto styled bag...
I know I'm repeating myself, but one of my favourite sayings is "necessity is the mother of invention". Those words have been immortalized in several previous posts, with good reason: many of my past projects owe their existence to solving a specific need of mine.

Apparently, the folks at Shupatto had the same problem when they turned their energy towards developing an eco shopping bag that would be easy to fold and carry.

How many of you can identify with this situation: you're going grocery shopping and before entering the store, you do your part and grab a bunch of reusable shopping bags to take along. This action has become second nature.

However, when out for a day of non grocery shopping or just browsing at the mall, do you have a reusable bag with you? If you do carry a bag, is it easy to store?

Shupatto folds
The secret behind the Shupatto bag... (image courtesy of shupatto.com)

The designers at Shupatto noticed that with most existing eco bags, people were continually looking for the original crease lines when putting away their bags after use. Obviously, what was needed was a design that incorporates permanent fold lines. And what does that bring to mind?

Well, as you may have surmised, this is a Japanese company and of course, their solution involves origami.


It's been almost two years since YouTubers began putting up tutorials showing how to DIY a basic Shupatto bag. I must admit I mostly missed the original deluge and have only recently discovered the numerous renditions of how to make one of these "auto fold" shopping bags.

Skirt to Shupatto Bag by eSheep Designs
My finished (still folded) bag made from an old skirt...

The bag is amazingly simple and can actually have a fashion forward vibe to it depending on what material is used. Convenience level is also dependent on material used. If you go for a thin poly or nylon, it will roll up into a tiny bundle, enabling it to be secured with a self tie elastic and tossed into your purse.

The choice that I made — by returning to my closet and digging out a midi skirt — results in a lovely bag, but it doesn't exactly roll up into something small and inconspicuous.

Skirt to Shupatto Bag by eSheep Designs
A bag for my bag...

Which meant — of course — that I had to sew a little storage bag for it, out of the remains of the fabric. (The tag came from the skirt and has special meaning to me.) Done on the fly, it's just a boxed bottom slip case with a single seam, which I oriented down the middle on top.  

There are just three basic parts to a Shupatto inspired bag: the accordion folded body, the straps, and the side "bindings" that hold the folds in place. In the numerous YouTube videos that I've seen, body sizes vary quite a bit; I think I ultimately cut my fabric to 28" x 43" (about 71cm x 109cm).

Skirt to Shupatto Styled Bag by eSheep Designs
Button down placket serves as the underpinning of the bag's straps...

For the straps, I harvested both sides of the buttoned front placket of the skirt. With the addition of some of the suede like material from the waist band — mainly to cover up the button holes — I was able to fashion a couple of sturdy straps.

After seaming the fabric at both short ends, the next step was to encase the straps. There are a couple of ways to do this, with the method that I used being the simpler one, since it doesn't involve cutting and sewing additional pieces of fabric. I merely folded the edge of the fabric up over the strap and then sewed it down where you see the white pins and left a gap between the orange pins.

Skirt to Shupatto Styled Bag by eSheep Designs
Installing the straps...

For the folding part, if you don't go by someone's pattern, it has to be "trialed and errored". I marked the middle and worked my way in from both ends, using clips to hold the folds in place along the sides as I progressed. When that was finally done to my liking, I went back to the yoke of the skirt for more of the faux suede fabric to use for the side bindings.


Watch live classes for FREE at CreativeLive! Sign Up at CreativeLive
[affiliate link]


By the way, it's necessary to work with a hot iron to set those creases. And depending on one's fabric of choice — in my case, a polyester — it might have to be protected with a pressing cloth.

Skirt to Shupatto Bag by eSheep Designs
For an idea of scale...

The Shupatto snap has to be experienced to be believed. You really can just grab the ends and "snap" the whole contraption back into its folded form.

Skirt to Shupatto Bag by eSheep Designs
Pulling out the strap handles...

Another advantage of the bag's style is how easy it is to use. It opens up flat and wide and doesn't require you to have an extra hand to load stuff. It would be a perfect beach tote. 

Skirt to Shupatto Bag by eSheep Designs
An easy to load bag...

One wouldn't assume that a design based on accordion folds would look anything other than utilitarian, but this bag has true style. 

Skirt to Shupatto Bag by eSheep Designs
Side view...

It's certainly not hard to look at and can be used as an everyday purse by those who prefer simplicity. (This one fits over my shoulder.) As a shopping bag, I like that it's an upscale option compared to the standard boxy totes.

Like the Bouquet Bag from AGF Studios that I posted about last week, this is a good one to leave in your car for unexpected shopping excursions. 

Skirt to Shupatto Bag by eSheep Designs
Front/back view...

Shupatto has another version of this design in a "drop" style. Essentially it's the same bag, but on its side. (I've also seen a YouTube video with a DIY for it.)

Variations on this bag include adding a zippered closure and of course, incorporating an elastic of some kind for self tying. (While it's not as elegant, you can always just use an elastic band to keep the folded bag together too.) I wouldn't worry too much about adding a zipper; once the bag is cinched up, the opening is pretty narrow. 


Check out crafty classes at Creativebug!
[affiliate link]


In 2017, I posted about Canada losing its Sears. Up until then, they had a line of clothing called Together. The style was so identifiable that while flipping through their catalogs, I would come across the pages dedicated to Together and know that that was what I was looking at, without even seeing the name.

Skirt to Shupatto Styled Bag by eSheep Designs
Another memory filled recycle...

The clothing line was decidedly free-spirited and feminine, with pieces featuring fancy tone on tone embroidery, floral lace overlays and crocheted accents. While I managed to collect several items, I always had to wait for them to go on sale because they were priced a little on the high side for Sears.

This skirt was one of my favourites back in the 1990s. It hasn't been worn in a long time, but now instead of taking up space in my closet or being pitched into my donation bag, it has new life as a useful item.

I'm glad I saved it.

'Til next...