-->
DISCLOSURE: This blog contains Google Adsense ads and affiliate links to Creativebug via which potential commissions are earned when visitors click through.

Search This Blog > > >

Showing posts with label Sew4Home projects. Show all posts

Saturday, 14 October 2023

Math in Sewing [Pt 1]: How Math Makes Sewing Easier

without mathematics there is no art - luca pacioli
"Without mathematics there is no art"
Somewhere in all these blog posts, I've shared the fact that I abandoned art school after one year – due to being given the impression that there are rules on how to "make art" – and subsequently ended up with a career in IT.

In between those events, I pursued a double major at university, with one of those majors being math. It was a subject that I had excelled at in high school.

Even though post secondary level mathematics ended up being much more difficult, I never lost my appreciation for the beauty behind the art of math. It is a precise, exact and unbending science and yet can be so organically malleable at the same time. Who would have thought that, decades later, I would be thankful for being able to apply math to sewing?

Don't worry, while math is the topic of today's post, it's not going to be front and center in any "computational" form.... not until the very end!


Are you someone who wants to ask the pattern designer: how do I change this to be this high and that wide? A few simple calculations are usually all that's needed to work it out, and yet for some people, it's impossible to do.

Obviously, math is integral to sewing, especially for things that are sewn from "scratch". Pattern designers need to have a certain amount of mathematical ability in order to do what they do successfully. Those of you who use patchwork and quilt patterns can appreciate the effort that goes into figuring out what the various pieces are – and how they need to be sewn together in a certain order – to get the desired result.

Remember this? It's a fabric interpretation of iris folding. All forms of folding – including, of course, origami – are very much based in mathematics. Projects like this can be quite intricate.

Table mat by diy HandyMum Lin tv
image courtesy of diy HandyMum Lin TV...

But even at the simplest level, to sew anything of a certain size, you have to be able to take and translate measurements and understand how to add seam allowances. And then it's a matter of knowing how best to lay out and cut the fabric so that you don't waste any of it. Sometimes it's easy, like making a rectangular drawstring bag. Other times it's much harder, like when I cut up two jackets to make a duffle bag. For that, I had to come up with a plan to turn various small pieces into bigger pieces before I could even contemplate using any sort of pattern to make the bag.

So a common problem is that even if you have a pattern to follow and you intend to make whatever the same size as the pattern calls for, if your fabric allotment doesn't match, you have to make do, and making do will often involve math.

Recently, regular reader Marie corresponded with me about this post back in September. After sharing pics of her customized sewing challenge, I thought the work she did would be the perfect example to highlight for this blog post. So I did a quasi "Q&A" with her via email.

Marie R's Sew4Home Inspired Spun Stripes Pillows & Cushions
Marie's fabulous handiwork...

First of all, by way of an explanation, her project was to make some outdoor pillows (and seat cushions) based on a pattern using striped fabrics. Due to fabric constraints, however, it was not a straight forward approach, since the stripes needed to be fussy cut.

Q: Describe the inspiration for this project (as found at Sew4Home, under the title of Spun Stripes Pillow Trio).

image courtesy of Sew4Home
The three designs for the Spun Stripes Pillow Trio by Sew4Home...

A: This pillow project had three layout designs — each consisted of four fabric blocks, using three of one color and one of an alternate color. I used the pieced design for both the front and back of my pillows instead of having a plain back like the original project called for.

Marie R's Sew4Home Inspired Spun Stripes Pillows & Cushions
Both sides of Marie's pillows feature the pieced layouts...

Q. You said that you had similar fabric as the Sew4Home samples, but not in the right amounts. What exactly did you have?

Marie R's Sew4Home Inspired Spun Stripes Pillows & Cushions
Fitting pieces made more difficult by having to match stripes...

A: I had pieces of this striped fabric (a heavy sailcloth with some kind of waterproofing that makes water bead on it) in five colors: one yellow, three red, four blue and black, and five green. The fabric wasn't one large piece but was already cut up in approximate 28" x 30" sections. They were all different sizes and with the stripe design, that changed how many blocks I could cut from each piece. That's what made this a math problem!!

Q: How would you describe the prep work that you had to do?

Marie R's Sew4Home Inspired Spun Stripes Pillows & Cushions
Making it fit...

A: The task was to fit the pattern pieces on each fabric to see how many I could get. In each color, the largest piece gave me three blocks of each design, so I decided that the yellow would be the accent color and with nine yellow blocks, that dictated nine pillow tops. So I cut one set of three-blocks-of-each-design in each color.

Drawing out the color layout designs, and taking a pic of what could fit on each different color fabric piece helped me plan before cutting, because I needed four different blocks to make one pillow top.


Watch live classes for FREE at CreativeLive! Sign Up at CreativeLive
[affiliate link]


Q: Did you end up with a fixed plan, or was it a fluid, changing process?

Laying them out and sewing drew my attention to the beauty of the blue and green together, so I switched the pattern design and made layout A (the predominantly red one in the original Sew4Home sample pic) with two each blue and green instead of the one and three design! I made them both the same, but could have switched one to have the green pointing in — saw that long after it was sewed and stuffed… otherwise I would have taken it apart and rearranged it.

Marie R's Sew4Home Inspired Spun Stripes Pillows & Cushions
The surprising appeal of blue and green...

Q: I noticed in your photos that this project encompassed more than just pillows. Tell us about the seat cushions.

Marie R's Sew4Home Inspired Spun Stripes Pillows & Cushions
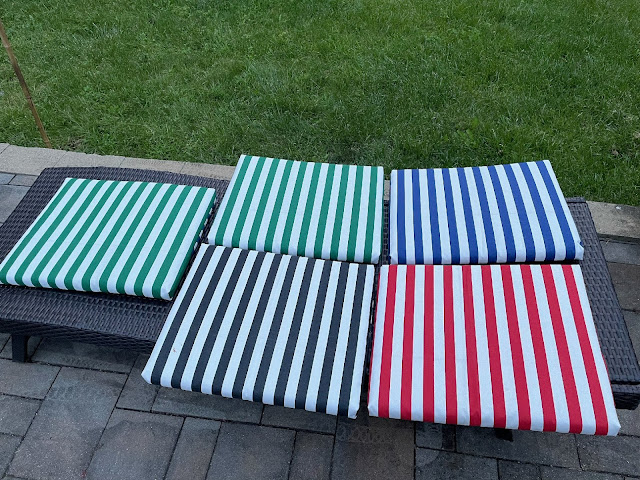
Matching seat cushions...

A: Before making more pillow tops, I had to plan for the chair seats. I didn't want to waste even an inch of fabric, and after days of pondering how to squeeze five seat cushions out of the least number of fabric squares, I sewed three fabric pieces together with the stripes of the middle section going the opposite way: =|||=  Then I could squeeze two seat cushion covers out of each of the three fabric sections. The sizes of the fabric pieces were all different, so I measured and laid this out a zillion times until it worked. I labeled each piece with its measurement and used the smallest fabric pieces so that I could save the larger pieces to cut more pillow top designs. Each cushion had a a single pattern on one side and two on the reverse. The fabric folded over the front of each cushion. The back seam was hand sewn with invisible stitches.

Marie R's Sew4Home Inspired Spun Stripes Pillows & Cushions
Seat cushions pieced side...

Q: Did you run into any hiccups during this "make it fit" project?

A: I learned that the bias cut layout C (the predominantly gray one in the Sew4Home sample pic) was hardest to fit on smaller fabric pieces.

Marie R's Sew4Home Inspired Spun Stripes Pillows & Cushions
The bias cut challenge...

But I found this task to fit my perfectionist attitude and it was actually quite fun. Many others might not have enjoyed this incredible puzzle. I was not in a hurry and it took over five weeks start to finish for making five seat cushions and eight pillows (that's sixteen pillow top panels — all different except for the two blue/green).

Q: We originally connected about this via a post on sustainability. You've told me that this fabric was in your possession for decades and that it came to you at no cost. Were there any other recycling opportunities involved with this project?

Marie R's Sew4Home Inspired Spun Stripes Pillows & Cushions
Seat cushions plain side...

A: The seat cushion foam came from my neighbor's garbage: an old 2" thick camping sleeping mat, covered in ripped up nylon. I saved this in my shed and ripped off the nylon when I had a use for it. I cut four seat sections using the long stretch and the fifth seat was pieces of foam from the extra side cut off. Foam in pieces can be glued together, but I just basted it and wrapped each seat with batting which I hand basted on. The batting also helped hold the foam sections together. It took me numerous drawings and measurement alterations to squeeze the five seat cushions out. I have a 3" x 16" foam piece left over to make a neck brace for sleeping on a plane.

I stuffed the pillows with old and new (Walmart $3.57) pillows cut in half. It's much cheaper than buying stuffing and it's the same exact material. I did use invisible zippers in the pillow tops to make it easier to change the stuffing. (Wawak is my inexpensive online sewing supply for thread/zippers, etc.)

Marie R's Sew4Home Inspired Spun Stripes Pillows & Cushions
Some left over...

But I have three pillow tops and other fabric left over to make an ottoman! The stuffing will be those large peanut shaped shipping foam material that I have been saving up for years. It will be a nice surprise for my son!

ME: How many of you agree that Marie's pillow and cushion project is just stupendous? When I first saw this project on Sew4Home, I thought it was awesome. But I knew I would never attempt it, because I had no need for the pillows, nor – perhaps most importantly – the fabric to make it work. It's wonderful to see someone execute it to such perfection!


Check out crafty classes at Creativebug!
[affiliate link]


Of course, you've noticed by now that the title of this post implies a "part two" is still to come. I have a special tutorial to share with you in that one, which arose out of this equation:

the golden ratio
One of the "fun" ways to calculate phi (courtesy of Erol Karazincir)...

And just in case you don't find anything fun in the above, let me reassure you that the project itself is not at all as esoteric!

Thanks again to Marie for contributing to today's post; hope you enjoyed.

'Til next...

Saturday, 30 September 2023

"Must Haves" For Your Sewing Toolbox

Must Haves for Your Sewing Toolbox
What's in your sewing toolbox?
A couple weeks ago, I served up some blog "potpourri"; i.e., three draft posts that had been languishing for years that I managed to stitch together into one. Today's entry is an old draft that I've actually taken the time to complete... because I think it can be potentially helpful.

It was originally titled "some of my favourite blog posts". I erroneously assumed that it was a collection of my own posts that were deemed favourites. It turned out to be a bunch of URLs to articles from other blogs that I had long ago bookmarked for future reference. Most of them were from Sew4Home.

A handful came from other sources, but as this compilation was started years ago, some of those old links are no longer valid. Rather than try to track down the content, I decided to put this out with just a Sew4Home focus. 

Because Sew4Home is just that awesome.

As sewers, we all probably have sewing toolboxes filled with actual notions and doodads that assist with our hobby. The lessons that I'm highlighting today are invaluable additions for your virtual sewing toolbox, particularly for those who are just starting out and learning the ropes, so to speak.


A skill that every sewer will pick up along the way is how to box corners for a basic pouch or bag. There are essentially two ways to accomplish a boxed corner: cut squares of fabric away from the corners and then sew up the seams, or sew a straight bottomed seam and then (squish and sew and) cut away the triangular corners.

We generally become familiar and comfortable with both techniques as we build up our sewing expertise. They're not difficult to understand or carry out and it's fairly easy to achieve good results.

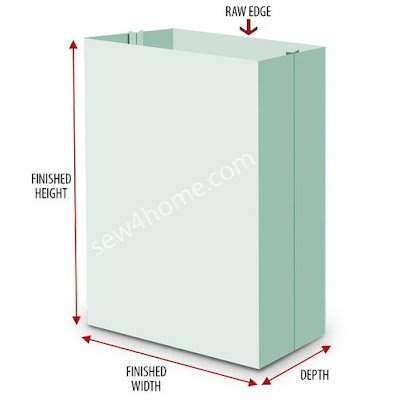
Image courtesy of Sew4Home
Sew4Home shows you how to "box" your own corners!

BUT... have you ever been more adventurous with boxed corners to want to apply them to a project of your own? Then, it's a matter of, well, how big do I need to cut this piece of fabric to get a finished item that's this high and that wide?

Sew4Home comes to your rescue with this post that includes all of the tricky math – which is the topic of some future blog posts that you'll soon see – that you'll need (copy and paste this link into your browser; it's not a hot link):
https://sew4home.com/tips-resources/sewing-tips-tricks/how-box-corners-two-methods-formulas

Once we've mastered the basics of pouches and bags, we might want to finish them off with extra detailing to have them stand out from the pack. In this unusual post, you're introduced to how zippers can add a designer touch in ways that you may never have expected.

Image courtesy of Sew4Home
Everything you ever wanted to know about metal trims courtesy of Sew4Home...

As a bonus, there is a discussion on how to shorten a metal chain strap with fabric trim threaded through it. (You can purchase these online or find them as belts like I did.) Let me say that while you may never use any of the tips in this article, it is likely to germinate creativity and inspire new ways of looking at things that you can use to jazz up your bag projects.

Again, copy and paste the following link into your browser to check this out:
http://www.sew4home.com/tips-resources/sewing-tips-tricks/tips-working-metal-trims


Watch live classes for FREE at CreativeLive! Sign Up at CreativeLive
[affiliate link]


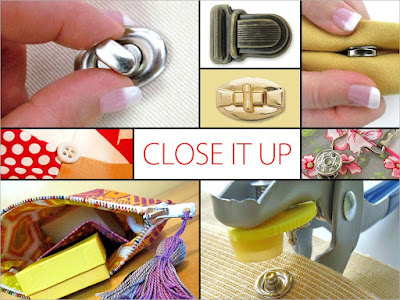
Staying somewhat on topic, our handmade pouches and bags usually need to be closed in some manner. This summary – which directs you to other more detailed posts on Sew4Home – covers the "how to"s from buttonholes to (three different styles of) zippers.

Image courtesy of Sew4Home
Sew4Home covers you everything you ever wanted to know about applying "closures"...

Once again, even if you never have a specific need to use some of these closures, just learning about their possibilities can do wonders to boost a budding sewer's confidence level.

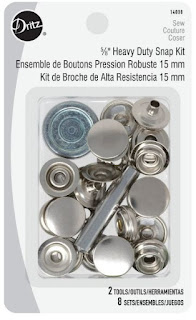
Dritz snap kit
Dritz snap kit...
I will say one thing, however: the discussion on installing snaps involves hardware that will incur additional cost to buy, i.e., specialized pliers and such.

While there is a paragraph devoted to an "old school" snapsetter tool, a simple solution that works for me is to buy a basic snap fastener kit from a discount store that comes with snaps and a couple of setting tools. (The Dritz set shown here is an example, but there are other brands that cost less.) All that's needed is a hammer and a firm surface to pound on. As long as you're not making something that requires a whole bunch of snaps, a kit like this can meet your requirements for about five bucks.

[By the way, instructions for these are printed on the back. If you choose to dump these snaps into an actual sewing toolbox, be sure to keep the cardboard backing from the packaging!]

To check out this post, copy and paste the following link into your browser:
https://sew4home.com/top-10-closures-a-handy-list-of-tutorials/

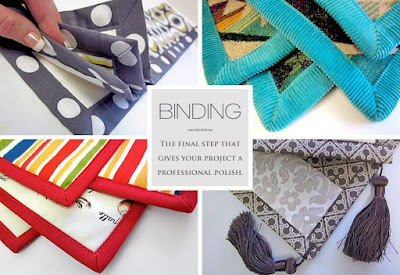
The final post I want to draw your attention to has to do with everything you've ever wanted to know about binding, from making it (and determining how much fabric you need to do so) to how to sew it onto your specific project... which doesn't have to be a quilt.


Check out crafty classes at Creativebug!
[affiliate link]


While Sew4Home's instructions for making bias binding (AKA bias tape) is different from my preferred method, it's probably the most commonly used method, involving cutting strips of fabric and sewing them up one at a time.        

Image courtesy of Sew4Home
The full meal deal on bindings courtesy of Sew4Home...

There are several ways to attach binding to something (some of which I covered here), and over time, we all end up with our own personal preferences. If you're new to the whole concept of binding and are looking for a detailed description, the content here will not disappoint. Not to mention that there's also some much appreciated instruction on how to turn corners and join ends... something that I admittedly do in an ad hoc fashion most of the time!

To check out this post, copy and paste the following link into your browser:
https://sew4home.com/tips-resources/sewing-tips-tricks/complete-step-step-binding-quilts-throws

One final suggestion for all of the above: save the material as a PDF. Sew4Home has a convenient button on a floating sidebar (left hand side of the screen) to save individual posts as PDFs. That way you can keep these toolbox must haves forever.

How's that for helping?

'Til next...

Saturday, 30 April 2022

Car Caddy & Waste Bin

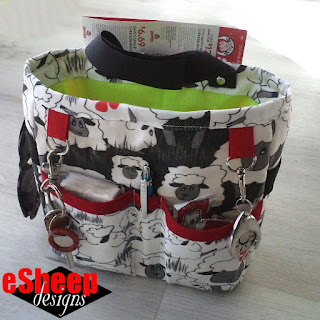
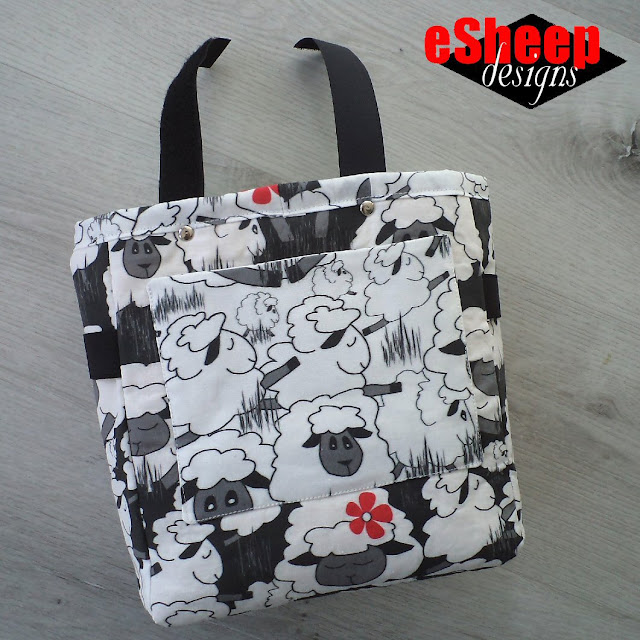
Car Caddy & Waste Bin crafted by eSheep Designs
Modified Sew4Home Car Caddy & Waste Bin...
Over the past decade and a half, hubby and I have taken several road trips a year out to our vacation home and beyond.

During these trips, we usually stop for fast food along the way. Every time, I've had to fashion some sort of waste container with a plastic or paper bag for discarded packaging or even chicken bones.

How many times have I said to myself — usually as I attempt to hang and prop open a plastic bag from the glove box door — why don't I make myself a fabric trash bin? Many times. Many, many times.

And yet for whatever reason, it never got done. (Part of it might be that I never came across the right project.) 

Until now, when — ironically enough — we've sold our vacation home and won't be doing those long drives on a semi-regular basis any more.

Car Caddy & Waste Bin crafted by eSheep Designs
Back view...

This combo car caddy and waste bin was made just in time for our last trip out. It's a modified version of a project from Sew4Home, searchable on their site via that name.


My modifications weren't major, but involved both design elements and supplies used.

Sew4Home Car Caddy & Waste Bin
image courtesy of Sew4Home...
In terms of changing the outward appearance, I did away with a snap secured flap pocket on the back and replaced it with a simple open top patch pocket. I didn't see myself needing to keep money in this, especially since this caddy isn't likely to stay in any of our vehicles full time.

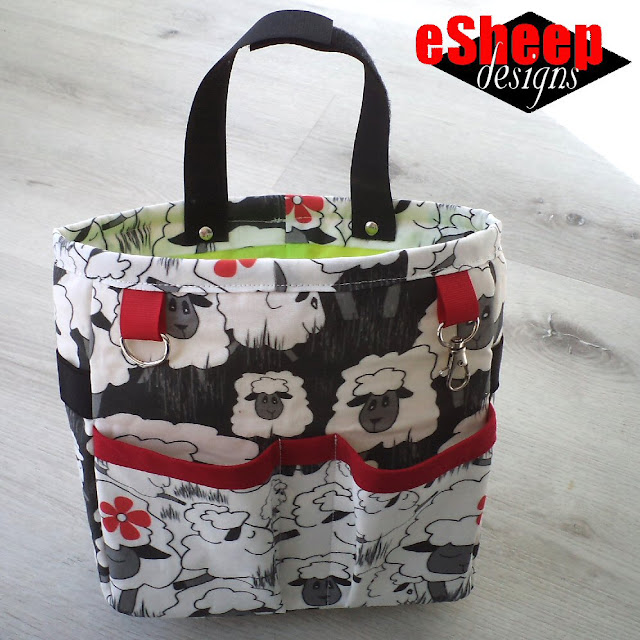
I also made the two front bellows pockets differently; different from the pattern and different from each other; one is bigger.

Because I wanted the caddy to hang from specific spots in both our vehicles (and not off a gear shift), the single strap as designed was omitted entirely. Instead, I used separate sections of hook and loop tape — attached to the back with a couple of rivets —to create a handle that can detach from itself.

Oh, and due to my "square shaped" fabric constraints (I used a couple of selections from my Just Sheep collection from Spoonflower), I made the entire bin an inch shorter (eight instead of nine).

Car Caddy & Waste Bin crafted by eSheep Designs
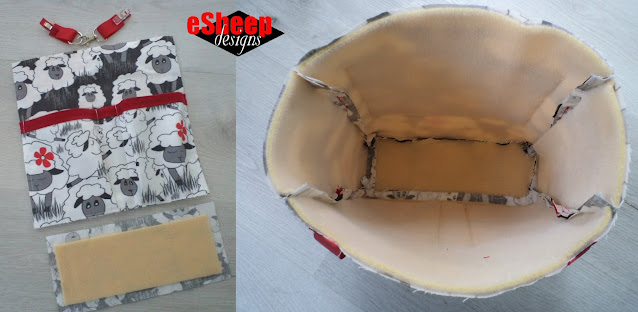
Using an old blanket as a substitute for fusible foam...

By way of supplies, I do not have — and don't ever anticipate having — fusible foam at my disposal. What I do have are remnants from a section of an acrylic blanket that I trimmed up to fit in a duvet cover for my mother.

It's not as firm as a foam interfacing and it's certainly not fusible, but I "made do" with it and some fabric glue. (Performance-wise, it serves the same purpose in making the bin able to stand up by itself.)

Car Caddy & Waste Bin crafted by eSheep Designs
Velcro handle that comes apart...

As designed, the front pockets were to be trimmed with something called foldover elastic from Dritz. Had none of that either, so I just went with bias tape.

Car Caddy & Waste Bin crafted by eSheep Designs
What do you think of the lime green interior??

I did, however, have the elastic for the side panels (from one of my $1 belts), red grosgrain ribbon for the hardware attachments, as well as a "D" ring and lobster clasp. I also had a supply of ripstop nylon for the interior... albeit in an eye-popping shade of lime green!
 

Watch live classes for FREE at CreativeLive! Sign Up at CreativeLive
[affiliate link]


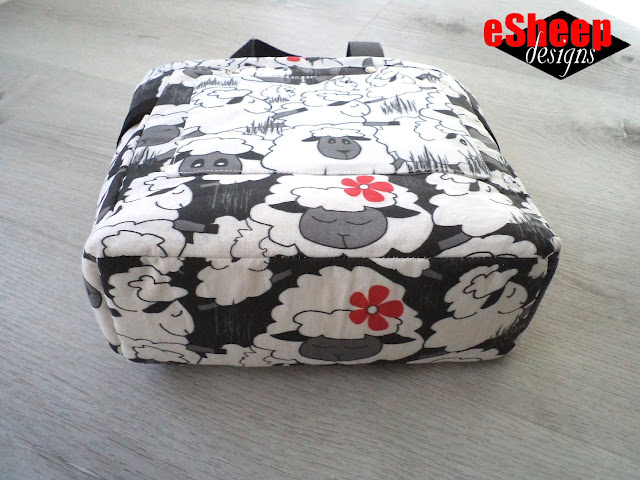
I want to draw your attention to the base of this item. The bottom of this rectangular shaped container has defined corners which are not rounded, nor boxed in the conventional way.
 
Sew4Home Tutorial
image courtesy of Sew4Home...
Sew4Home offers an extremely helpful tutorial for how to sew this type of inset base to a four sided "tube". (The link to the tutorial can be found on the same page as the instructions for this caddy project, or you can search for it on their site via the title shown in the graphic at right.)

It was definitely a lesson learned for me, and worth a read if you're interested in upping your sewing skills. If you're a regular reader here, you may know that I like to take on projects that offer something different, even if they're relatively simple. There's nothing otherwise difficult about this caddy/bin, but I'd never sewn in a base like this before.

Car Caddy & Waste Bin crafted by eSheep Designs
View of the rectangular base...

Further on the topic, I applied another recent lesson learned when I sewed the short side seams of the lining base to the short side seams of the exterior base. The result is that once it's turned right side out and the top edge is sewn down, the lining will never, ever pop out. (I used the same technique when I made my duffle; thank you to various YouTubers for that lesson.)

Car Caddy & Waste Bin crafted by eSheep Designs
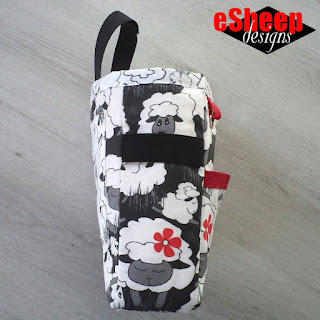
Side view...

As I said above, the sections of wide black elastic came from a belt that was purchased a few years ago at a discount shop for one measly dollar. This particular belt has now had its parts repurposed in three projects: the elastic on this caddy, the connector links on my Frankenpurse and the buckle on the Oriole bag.

Regardless of what economic era you care to name, that definitely qualifies as stretching a dollar!

Car Caddy & Waste Bin crafted by eSheep Designs
A relatively quick sew....

As you may have suspected, dealing with the substitution of interfacing took up most of my time on this project. Without the fusibility factor, I was left to glue small sections at a time and wait for them to dry before pressing to remove "glue bubbles".

The sewing part was fairly easy and went relatively quickly, even with having to adjust for my fabric. For instance, the top facing that joins the lining to the exterior called for a 22" piece. Since I was dealing with fabric that only measured 18" x 18", I sewed together sections to meet the requirement.


Check out crafty classes at Creativebug!
[affiliate link]


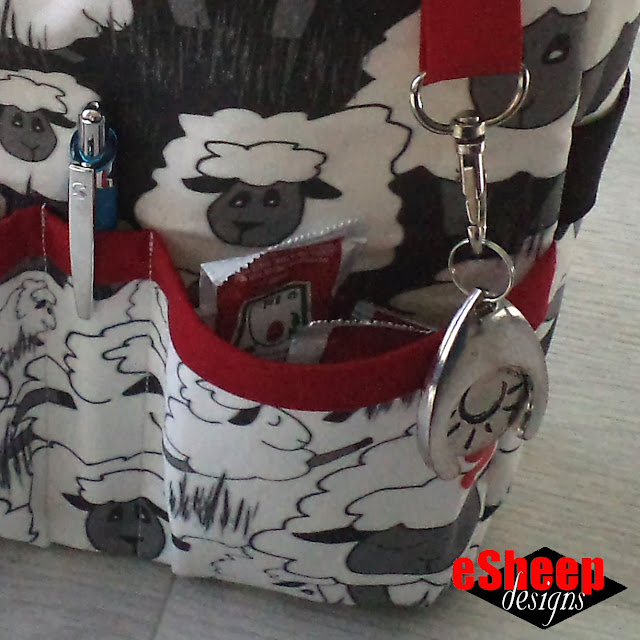
We once went out to our vacation home and forgot to bring the keys. Not to say that having a ring on which to hook them would have prevented that from happening, but it might have helped.

Car Caddy & Waste Bin crafted by eSheep Designs
One of two ways to keep keys handy...

Curious as to how we use the pockets? I stuffed a small packet of tissues for the photo shoot, but in actual use, I keep my phone and some napkins in this one.

The back one is for fast food coupons. (Now you can see why I didn't want a snap/flap closed pocket.)

Car Caddy & Waste Bin crafted by eSheep Designs
Back pocket is perfect for fast food coupons!

On the topic of fast food, whenever we buy anything that comes with fries, my other half is always quick to remind me, "Get ten ketchups!" (Lucky I don't want ketchup myself or it would be an embarrassing ask at the counter... and it's quite literally always me going in to do the purchasing.)

Car Caddy & Waste Bin crafted by eSheep Designs
A ketchup pocket!

Therefore the bigger bellows pocket is intended for the scads of ketchup packs required to keep hubby happy. (Oooh... does anyone else hear Wilma Flintstone singing??)

'Til next...

Saturday, 18 December 2021

Reimagining a Holiday Gift Idea

Sew4Home Rice-Filled Microwave Hand Warmers
image courtesy of Sew4Home...
This cute little project was last featured on Sew4Home a little over two years ago this week. As soon as I saw it, I thought that it was a nifty gift idea — stocking stuffer for family and friends, token of appreciation for teacher, newspaper carrier, etc. — and immediately downloaded the PDF for future reference.

What is it?

It's an example of a simple idea elevated by mere design. 

A rice filled hand warmer is pretty basic in and of itself, but throw in some fun eye-catching fabrics, give it an odd but identifiable shape — a jelly bean — and suddenly it becomes a trendy item.

Not only that, but the ladies at Sew4Home have also conveniently provided the complete gift giving package with downloadable tags that you can print out and attach to your finished items to explain their care and use.

What more can you ask for, really?


As you can see, this is a perfect project for fabric scraps. You don't need much to make one of these (they come in three sizes) and nothing says you have to use the same fabric for both sides. For full microwave-ability, however, all materials should be 100% cotton.

Sew4Home Rice-Filled Microwave Hand Warmers
image courtesy of Sew4Home...

Sew4Home suggests scenting the rice with an essential oil for an added touch.

My problem with cold hands has been addressed by past projects involving gloves (here and here) and mitts (here). For really cold days, our household has "snap activated" silicone hand warmers containing a reactive chemical that heats up. (They can be reused after boiling them in water.) Therefore, this project was never something that I'd ever make for myself.


Watch live classes for FREE at CreativeLive! Sign Up at CreativeLive
[affiliate link]


Until I encountered a different need. 

In September, the area around the small bone at the base of my hand (directly down from the pinky) started to bother me. Perhaps it was the effect of three decades of mouse use coming home to roost, but having that part of my hand rest on the hard surface of my desk had become uncomfortable. (I didn't feel it while typing or doing anything else, just when holding and moving a mouse.)

For several days, I wadded up my fingerless gloves and placed them behind the mouse to serve as a padded rest. Then one day this hand warmer project popped back into my head.

Wrist rest by eSheep Designs
Hand warmer pattern turned padded wrist rest...

How about making one of those, stuffing it with something soft and using it as a wrist rest? See how it's just about the perfect shape?

And since the minky that I used on those fingerless gloves was so soft and comfy, I searched through my scraps and found more than enough to make this little guy and to stuff it.

Wrist rest by eSheep Designs
A bean shaped wrist rest...

I used the smallest template to make this. (Just an FYI that while this is a "quick sew" project all in all, navigating those curves might be a bit challenging to some.)


Check out crafty classes at Creativebug!
[affiliate link]


Needless to say, this little bean was much appreciated; the discomfort slowly subsided and I deemed it gone by the end of November. (The bean itself is still sitting here on my desk, in case it's needed again.) I find it quite satisfying that a pattern that appealed to me from the start — but for which I had no personal need — has been repurposed into something useful and different. 

Has that ever happened to you?

In any case, I feel quite accomplished this week in recommending a project that is practical, fun and useful... in two totally different ways. (By the way, if you're looking for this project on the Sew4Home site, search for "rice filled microwave hand warmers".) Happy jelly bean making!

'Til next...