-->
DISCLOSURE: This blog contains Google Adsense ads and affiliate links via which potential commissions are earned when visitors click through.

Search This Blog > > >

Showing posts with label the tie project. Show all posts

Saturday, 14 November 2015

Revisiting the MyTie Makeover Mini Bag

MyTie Makeover Mini Bag by eSheep Designs
To mark the one year anniversary of the release of my MyTie Makeover Mini Bag pattern, I would like to share some of the projects that I have had the pleasure of seeing over the past twelve months.

This first one is from my tester Nekane, who originally made all three versions of the MyTie when she tested for me. The ironic thing is that this ended up being the first project she ever sold for "real money"! (Long before I ever sold anything for real money, I might add. Although in that vein, I am thrilled to report that the two MyTies that had been growing old on my friend's market table have been sold — yay!)

eSheep Designs' MyTie Makeover Mini Bag crafted by Nekane
Nekane's MyTie...

Here are a trio of MyTies from Lucie M. She said that this was her first attempt at sewing anything other than a patchwork quilt, so she was quite pleased with herself. This is a good representation of the results that you can achieve based on the type of tie design... from classic to whimsical.

eSheep Designs' MyTie Makeover Mini Bag crafted by Lucie
A trio of MyTies from Lucie M...

These next three elegant looking MyTies are from Kathie L., who took the time to share a lovely story about them with me.

eSheep Designs' MyTie Makeover Mini Bag crafted by Kathie L
Three keepsake MyTies from Kathie L...

"I'm sending you a photo of the purses I have made from my late father's ties. I'm making one for each of his granddaughters. I'm using some of my mom's costume jewelry attached to a magnet in place of the button closure. This way they will have something from both of their grandparents. I've done three so far and I have four more to go. They have all been silk and I learned after my first purse to adhere the interfacing before I cut the silk as the fabric is so much easier to cut! The red strap I took off an old purse, the black one is a repurposed blingy lariat I got from Michaels for about three dollars and the chain with black ribbon was a headband I also got from Michaels cheap. I love to improvise and use objects on things for which they were not intended."


And last — but certainly not least as I am sure you will agree — here are three fab MyTies by Alice Moroni from way over in Italy. She says, "I love ties and I love bags, so your amazing project is perfect to me. I can't stop sewing MyTie Minibags."

eSheep Designs' MyTie Makeover Mini Bag crafted by Alice Moroni
Alice's white dots on black with black and white geometric lining MyTie...

Alice apparently got into sewing not very long ago although her family has a history in the craft. I think she shows a natural talent for it, don't you?

eSheep Designs' MyTie Makeover Mini Bag crafted by Alice Moroni
Alice made use of both ends of the tie for the flap on all of her MyTies...

These were shared via Craftsy, which I was very grateful for since the platform used to allow many people to see the possibilities. [edit April 2019]

eSheep Designs' MyTie Makeover Mini Bag crafted by Alice Moroni
I love how the lime green lining pops out of this bag...

The most common sentiment I have received from those who have purchased this pattern is how great the project is for creating a meaningful and unique gift out of something that is usually one of the first things to be donated. We all have important men in our lives who are no longer around and the older ones usually had a lot of ties.

With the holiday season right around the corner, might there be some ties that you can turn into an unforgettable present? If so, go to my pattern shop and grab the PDF. You'll get a pattern featuring three different designs — resulting in three different bag shapes — that you can create from a single tie (along with some lining fabric of your choice), so it is very versatile.

And yes, each bag is truly unique.


Saturday, 15 November 2014

New Pattern Release: MyTie Makeover Mini Bag!

MyTie Makeover Mini Bag by eSheep Designs
A tie goes through a major makeover to become a purse!
When I first encountered these little purses made out of a single tie, I was so intrigued and so interested in making one that I looked high and low for a pattern. Not a one. Found a couple of tutorials for what I consider "not quite successful" facsimiles, but the internet was surprisingly unyielding in this case. So once again, necessity being the mother of invention, blah, blah, blah...

Today I unveil my own MyTie Makeover Mini Bag PDF Pattern and Tutorial. The name reflects the fact that it's a tie that's gone through a makeover to become a little purse (and I just liked the play on words of the "MyTie"/"mai tai" bit). You've seen the results of my tester bags last week, now it's time to make your own! Who knows, you might have just enough time to churn out a few of these to add to your table at the local holiday market or to give away as gifts.

This is a 59-page PDF with over 100 photos, providing clear instructions to guide you in making your very own unique — not to mention super cute — little purse that will do the job from formal evenings to girls night out. (And yes, it is because of the number of large photos — so that you can see detail — that the pattern is so long; do not be alarmed by the thought of 59 pages!)

MyTie Makeover Mini Bag Pattern by eSheep Designs
Some sample pages from the MyTie Makeover Mini Bag PDF Pattern & Tutorial...

In case you hadn't heard, the pattern provides the templates for three different body styles for this little purse: the "free version" that you see above, plus two others, one of which is shown here.

MyTie Makeover Mini Bag by eSheep Designs
One of the other body styles offered via the MyTie Makeover Mini Bag pattern...

So it's not just a dressed up, detailed version of the free tutorial that I've posted on my blog. You will actually be able to make three different MyTie bags with this pattern! It's truly a three for one deal. Not only that, I also include 8 pages of bonus instructions for how to change up the look of your bags from what's been shown here.

How Big is This Bag?


How big depends on which one you make. Sizes range from 6” high by 8” wide (approx 15cm x 20cm) to 6” high by 9” wide (approx 15cm x 23cm). Also, if you have an odd-sized tie and end up having to adjust the pattern, your finished bag will be smaller.

Oh, and while they may seem small, look (down further below) at what they can hold (this being the "medium size" of the three designs).

Who is this Project For?


This is an intermediate to experienced beginner level project. If you've been successful at completing simple sewing projects in the past (like lined pouches or wristlets), you should have no issues with this. (And in fact, the three different variations are aimed at three different skill levels, with the most difficult one being the one that's been featured on my blog as a free tutorial.)

MyTie Makeover Mini Bag by eSheep Designs
The MyTie Makeover Mini Bag is a small purse
that can hold a lot! (In this case, a bifold wallet, a smart phone,
an eReader and a set of keys with extra "stuff".)
It would be preferable if you were not intimidated by the idea of zippers and buttonholes, even if you have not had previous experience with them. (That said, I like to create patterns that enable the user to customize, so you can definitely skip the zipper and buttonhole if you are so inclined.) To be truthful, the two trickiest parts of this project will be: 1) the whole process of cutting out customized pattern pieces required by your specific tie (it's definitely a DIY task unlike any you've probably ever done before), and 2) working with the tie itself (depending on what it's made out of, it could be finicky to handle).

How Long Will this Project Take?


The sewing part of the project can be completed in an evening (i.e., once you have all of your supplies at the ready)... the whole project is definitely doable in a day. And it goes without saying that your second, third and fourth bags will go much more quickly!

MyTie Makeover Mini Bag by eSheep Designs
Back view of the MyTie Makeover Mini Bag...

What do I Need to Make this Project?


First of all: a tie! (And some interfacing for it.) It can be a vintage tie that used to be worn by someone close to you, or — like me — you can go prowling on eBay for some amazingly beautiful and cheap ties. (Problem with the latter plan is that it may or may not get to you... and if it does get to you, it might take a few weeks. Or two months, as was the case with the lovely orange tie that you see here.) Definitely try your local thrift stores or just ask the men in your life. ;-)

MyTie Makeover Mini Bag by eSheep Designs
Top view of the MyTie Makeover Mini Bag...

For the inside of the bag, you'll need some coordinating fabric. Quilting cotton scraps (or satins, if you're a capable sewer) will suffice; this is a great project for using up small pieces from your stash. Or, one fat quarter will accommodate the lining and pockets if you want to go that route. (If your tie was worn by someone you know, perhaps a shirt worn by that same person could provide fabric for the lining.) As you can see from the photos, the purse strap can be anything from a length of decorative cord to a chain that requires additional hardware to whatever your imagination serves up (check what my pattern testers did).

List of required materials:
  • Medium weight interfacing (enough to cover a tie)
  • Two 3/4" (2cm) swivel snap hooks (optional; only to attach a chain strap)
  • One large decorative button
  • Decorative cord, 3/4" (2cm) wide webbing, or a chain; cut to a desired length (for your strap)
  • A tie
  • Fabric for lining & pockets (equivalent of one fat quarter or use scraps; each pocket requires two pieces of 7" x 5" (18cm by 13cm))
  • One 6" (15cm) matching/contrasting zipper (optional; for zippered pocket)
  • Pins, clips, ruler, fading marker, your sewing machine's zipper foot & buttonholer, iron, pressing cloth, rotary cutter & mat, etc.
  • Matching/contrasting thread


Want the pattern?
Click here to go to my Payhip shop and purchase for $9.00.
NOTE: Due to the nature of digital products, all PDF sales are final and non-refundable.


TERMS OF USE

If you are "sew" inclined, feel free to make and sell as many MyTie Makeover Mini Bags as you care to; I only ask that you credit me and this blog by attaching the following card to the item.

eSheep Designs swing tag


Saturday, 8 November 2014

MyTie Makeover Mini Bag TEST Bags

MyTie Makeover Mini Bag by eSheep Designs
The MyTie Makeover Mini Bag...
We are so near the finish line!

This week, I am pleased and proud to present to you the results from my pattern testers for the MyTie Makeover Mini Bag. (If you are visiting on the Saturday that this post originally goes live, I invite you to return later in the week for more results.)

As a brief bit of background, three months ago almost to the day, I posted about a couple of "purses made from a single tie" that I had admired. In the ensuing weeks, I planned, experimented and waited (mostly for ties to show up in my mailbox — the eBay experience was almost painful). A few weeks ago, I put out a call for interested crafters to test my pattern, as the second last step in the pattern making business.

I was inadvertently hobbled by Google's email sending my messages to spam for some strange reason. (I have owned the domain for over ten years and it's used sporadically for my consulting business; I have never spammed anyone with it.) I attempted to get back in touch with some people who had wanted to remain on a call back list for testing but had no luck. (And I'm assuming that they weren't just being rude by ignoring me.) Needless to say, I am happy to have had the pattern tested at all!

So without further ado, here they are...

Nekane's Bags


Nekane of non dago titarea over in northeastern Spain contributed the following MyTie Makeover Mini Bags. She went way "above and beyond" by making all three MyTie versions!

Here is her version A:

MyTie Makeover Mini Bag by eSheep Designs
Nekane's take on the MyTie Version A - front view...

Apparently she received her ties as donations from her workmates for this project... I can only say that the men over in Spain wear some pretty jazzy ties!

MyTie Makeover Mini Bag by eSheep Designs
Back view of Nekane's MyTie Version A...

I like how she used cording to hold her chain strap... saves money on extra hardware! Next up is Nekane's lovely MyTie version B:

MyTie Makeover Mini Bag by eSheep Designs
Nekane's MyTie version B front view...

This was my favourite tie out of the three.
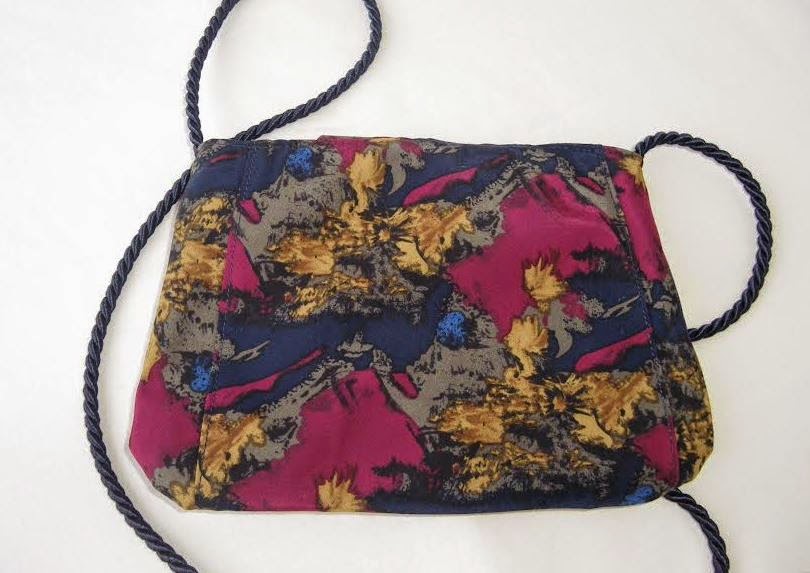
MyTie Makeover Mini Bag by eSheep Designs
Nekane's MyTie version B back view...

Impressed by how she took the time to topstitch the seams on the front and back panels. (That was suggested in my pattern, but I never did it.) And have you noticed her self-covered buttons?

Finally, here is Nekane's MyTie version C:

MyTie Makeover Mini Bag by eSheep Designs
Nekane's MyTie version C front view...

See what I mean about the ties that the dudes are wearing in Spain??

MyTie Makeover Mini Bag by eSheep Designs
Nekane's MyTie version C back view...

A note about interfacing from Nekane's testing. She used a stiff interfacing for the version A bag (probably quite similar to the Decor Bond that I used) but then tried something more lightweight on the other two bags. In her opinion, the lighter stuff worked well for version B, but not so much for version C (which she says should probably be done with the stiffer interfacing).

By the way, she finished all of her bags with a satin lining, as you can see here in her version A bag:

MyTie Makeover Mini Bag by eSheep Designs
A sharp looking lining...

English not being her first language, Nekane was at first hesitant to take on the testing task. We both figured that if she was successful, then it would be "all good", as the saying goes. In the end, her feedback was that "The instructions are very easy to follow, truly. I like your writing style."


Daryl's Bag


Daryl Perry of Patchouli Moon Studio delivered this take on the MyTie Makeover Mini Bag version A.

MyTie Makeover Mini Bag by eSheep Designs
Front view of Daryl's MyTie...

Love the embellished fabric flower and button (she used a snap fastener underneath). I have seen the results of Daryl's creativity in her other projects and she did not disappoint here in making this MyTie her very own.

MyTie Makeover Mini Bag by eSheep Designs
Interior of Daryl's MyTie...

A very sunny choice of lining fabric (and she made pockets on both sides).

MyTie Makeover Mini Bag by eSheep Designs
Back view of Daryl's MyTie...

And finally...a look at the beautiful cording that she hand braided for the strap. She tells me that this is the Japanese art of Kumihimo. (And here I was wondering how she got matching fabric to make a strap!)

MyTie Makeover Mini Bag by eSheep Designs

Some feedback from Daryl: "I like the idea of upcycling a necktie into something else and these bags are so cute and a great way to give new life to a necktie. The size of the bag is perfect for a young girl too. Elegant fabrics would make a great evening bag or great bag for a wedding, while a novelty tie print would make a cute bag for a young girl or teen."

Amy's Bag


Amy Walker shows off her years of sewing experience with this MyTie Makeover Mini Bag, version A. Hers is made from a navy blue geometric print tie (shopped from her husband's closet), finished with a pink lining.

MyTie Makeover Mini Bag by eSheep Designs
Front view of Amy's MyTie...

Amy provided an interesting take on how to deal with potentially flimsy tie fabric: she traced her pattern pieces onto butcher paper and then ironed them directly onto the front of her fabric so that she could cut them out. Apparently it's an applique technique... interesting! (That's my "something new" that I learned today.)

MyTie Makeover Mini Bag by eSheep Designs
Back view of Amy's MyTie...

Pink is always a nice contrast with navy, don't you think? (For those with an eagle eye who think Amy's bag looks just a little different, it's because she installed a gusset into her lining.)

MyTie Makeover Mini Bag by eSheep Designs

Some feedback from Amy: "This pattern is so cute! What a great way to spend a Sunday afternoon. Creating something pretty out of an old tie. Your tutorial was very thorough and I enjoyed your explanations and tips."


Naomi's Bag


Naomi from down under (Australia) blogs at Made by Nomes. Here is her MyTie Makeover Mini Bag, version B.

MyTie Makeover Mini Bag by eSheep Designs
Front view of Naomi's MyTie...

As you can see, she actually managed to harvest enough fabric out of her elegantly striped tie to create a fabric strap. (I believe her tie was over 4" wide.)

MyTie Makeover Mini Bag by eSheep Designs
Interior view of Naomi's MyTie...

The bag appears to be standing up well despite the fact that she said that she didn't interface it. (I'd be interested in what it would look like if it was carrying "stuff" inside...)

MyTie Makeover Mini Bag by eSheep Designs
Back view of Naomi's MyTie...

Feedback from Naomi included, "Pattern is very well written and the only thing I believe would be a valued alteration, would be a pic to show 'newbies' how to measure the width of the tie required....otherwise I'd say this pattern is suitable for all levels of sewist, although with most ties being 'slippery little suckers', I would perhaps grade it for an advanced beginner."

Erin's Bags


This next set of MyTies is courtesy of Erin McKinney, who added these renditions of versions B and C (at my request) to the pile:

MyTie Makeover Mini Bag by eSheep Designs
Erin's MyTie version B with fancy strap...

I love the creativity of my testers in finding just the right strap!

MyTie Makeover Mini Bag by eSheep Designs
Front view of Erin's MyTie version B...

Erin's version A MyTie was completed with a 100% cotton tie (I didn't even know they made ties out of cotton), so she didn't interface it with anything. With the benefit of hindsight, she thinks that a lightweight interfacing would have provided a bit more structure.

I would recommend that — if these purses are meant to be used (who knows, you might just want to hang them on your wall) — it would be helpful to interface them with something so that they are supported when filled with stuff.

MyTie Makeover Mini Bag by eSheep Designs
Back view of Erin's MyTie version B...

For her version C MyTie , Erin encountered a totally different tie material. She says that this one "was completely slick, it didn't have any texture to it at all and it wanted to slide around on me no matter what I did"!

Another recommendation at this point: it may be worth it to source out the less expensive ties made out of polyester. If you have no choice, be aware that those made out of real silk (or even satin) will be more challenging to work with! But — like this one — it could turn into a very pretty purse.

MyTie Makeover Mini Bag by eSheep Designs
Front view of Erin's MyTie version C...

Erin interfaced this one with Pellon Fusable Midweight. She says it's a bit stiff but it does provide body to the bag.

Again, I think that in actual use, if you interface the exterior material, you will appreciate that the bag keeps its shape and does not sag all over the place.

MyTie Makeover Mini Bag by eSheep Designs
Erin's MyTie version C with fancy strap again!

Some other comments from Erin: "I think the pattern is easy to understand, specially since there is such a variable in tie design. I noticed that even if two ties are the same size, once you open them up, they are drastically different. (The taper is different for every tie!) I'm amazed at the size of bag I can get from a tie! Both B and C bags are great, though my favorite is probably C. I'm not so great at curves and love box corners!"

A heartfelt thanks to all of my testers... I greatly appreciate the interest and the effort. There is something surreal about seeing a creation that you've designed come to life in the hands of another crafter. (Wanna see more? Check out this update post.)

Look for the MyTie Makeover Mini Bag pattern to be up for sale in my shop next week.



Saturday, 25 October 2014

Free Pattern/Tutorial: MyTie Makeover Mini Bag

MyTie Makeover Mini Bag by eSheep Designs
Are you up to making over a tie?
The tutorial part of The Tie Project has come to an end — finally! And with its completion, I thought I'd post a summary of the information that got me to here, so that anyone wanting to attempt their own purse (without waiting for the PDF pattern that I'm developing for sale) can do so.

A quick aside for those who are not familiar... this was originally an "upcycle/repurpose" project to create a purse out of one single neck tie. (What you see here was actually made out of a 99 cent tie set that I purchased on eBay. Keep in mind also that not all ties are the same size. Look for something in the neighbourhood of 58" (147cm) long and 3.9" (10cm) wide.) The lining and pockets are completed with other fabric but the entire exterior comes from the tie. The result — depending on what pattern of tie you use — is a little purse that will do well for an elegant formal evening out or will make a great gift for girls of all ages.

Shown here is one version (out of three) of the MyTie Makeover Mini Bags that I have designed and will be offering up as a pattern for sale next month. If you have some sewing experience, you should be able to create a purse of your own just by following instructions that I've provided in previous posts.

What are those previous posts? Since I know that people will likely come specifically for this tutorial, I thought I'd make life a little easier for them by listing a "directory" of the posts pertinent to this project. You're welcome. ;-)

Click on the headings that follow to access each post relating to this project. Note that I am going to go "backwards" in time, listing the most recent post first. Last week's entry shows you the main processes involved with sewing up this bag.


The Tie Project [Pt 5] - Big Test of a Little Bag

Consider this the "full photo tutorial". Using the information presented in the previous three posts, track my progress as I cut into a real tie and make my first MyTie Makeover Mini Bag.

The MyTie Makeover Mini Bag by eSheep Designs
A little purse perfect for an evening out...

The Tie Project [Pt 4] - Finishing Details

Still working with a muslin, this post discusses how to finish up the interior of the purse, from the pockets and lining to the closure and strap.

MyTie Makeover Mini Bag by eSheep Designs
Front of the bag with flap down...

The Tie Project [Pt 3] - Prototyping the Exterior

This post shows you how to cut pattern pieces that will fit your particular tie. Working with a muslin, cut pieces were sewn together to produce the exterior of the purse.

MyTie Makeover Mini Bag by eSheep Designs
Proof that main pieces of my tie purse pattern can "work"...

The Tie Project [Pt 2] - The Design Process

This post is the official start of the tutorial. Take away the measurements for the main pattern piece that you will need to make for the body of the purse and learn how to create the remainder of the pieces.

MyTie Makeover Mini Bag by eSheep Designs
Figuring out how to allocate the fabric... 

Repurposing and Upcycling... The Tie Project [Pt 1]

This was just some background about admiring two different versions of a "purse made from a single tie" that were being offered for sale by two talented ladies. Since neither of them offered a pattern for sale, I threw myself a challenge to come up with my own. This particular post does not have any tutorial instructions in it, so you can safely ignore it if you're not interested in how I came to be inspired.

Was that useful? Up for the challenge? Or maybe you'd prefer to wait for the actual pattern to come out? I hope to release the pattern in two to three weeks (after my testers finish testing), so check back then.

TERMS OF USE

If you are "sew" inclined, feel free to make and sell as many MyTie Makeover Mini Bags as you care to; I only ask that you credit me and this blog by attaching the following card to the item.

eSheep Designs swing tag


Saturday, 18 October 2014

The Tie Project [Pt 5] — Big Test of a Little Bag

MyTie Makeover Mini Bag by eSheep Designs
Introducing the MyTie Makeover Mini Bag!
If you've followed my previous post about the tie project, you may recall that I'm finally going to take scissors to an actual tie. Well, I've done more than that, 'cause here is the full result: the MyTie Makeover Mini Bag! (I've never actually had a mai tai cocktail, but it sounds like it would be good and I love the meaning behind the words: out of this world.)

I feel somewhat proud of this one, having taken it from the "I see it, I like it and have to make it" phase to designing a finished product that looks similar to the originals but is still my own. As mentioned last time, I also have two other body styles that I am going to be including in a full PDF pattern/tutorial for sale.

For this particular test bag, I followed the instructions that I had previously posted for the muslin versions, so don't expect much additional verbiage regarding the steps here. To help you out, I've prepared a post with many, many photos! (If you missed the previous entries in this series, go to this page and you'll get the 411 on all of the posts that you'll need to reference for the "how to's" of the pattern and design.)


The first step, obviously, is to pick open the tie. Reserve all pieces. (The little tab piece that holds the small end of the tie underneath? It's called the keeper. I will use it to create strap tabs, since I decided to put a chain strap on this.) All ties will have some sort of interlining keep that also. Once you have freed the basic fabric of the tie, give it a good press with an iron (careful not to scorch) and then measure and cut 5.5" off the wide end to use for the flap.

MyTie Makeover Mini Bag by eSheep Designs
Cut off five and a half inches from the end for the flap...

The lining from this particular tie is a lightweight felt; I pushed it back inside the flap and then hand-sewed the two sides back together.

MyTie Makeover Mini Bag by eSheep Designs
Whatever lining the tie had to begin with, keep it with the flap...

Of course, the next time I make this, I will simply cut off the end of the tie before picking it apart... duh!

MyTie Makeover Mini Bag by eSheep Designs
Putting back what I took out!

Next, I gathered up the pattern pieces that that I made for my muslin version and laid them out on top of the tie.

MyTie Makeover Mini Bag by eSheep Designs
Place your pattern pieces and then cut out...

Here is where I really wished I had a rotary cutter! Using scissors took a long time given the delicate nature of the fabric. (And I really dislike the cutting part of sewing at the best of times.)
MyTie Makeover Mini Bag by eSheep Designs
Here are my main pieces...

To provide support for the gusset, I will sew in some of the tie's original felt lining; the width of it is almost perfect! (The gusset being 1.5" wide.)

MyTie Makeover Mini Bag by eSheep Designs
Cut a 1.5" wide piece from the remainder of the tie for the gusset...

I decided to apply fusible interfacing to the body pieces after all, despite my hesitation to commit the last time I posted about this. The thing that tilted the scales in the end was the fact that the fabric is so light and flimsy that if I don't interface it, it will 1) be very, very hard to sew and 2) not look very nice in the finished product (i.e., will hang like a sack when used as a purse).


Get Betz White's Flight Bag class with your free Creativebug trial...
http://www.shareasale.com/r.cfm?u=960352&b=404942&m=42943&afftrack=&urllink=www%2Ecreativebug%2Ecom%2Ftrial%2Fcreate%2Daccount%3Fredirect%5Fon%5Fsuccess%3D%2F
Check out my review here...
[affiliate link]


So (and this is where I hope pattern testers will be able to help me out), I used what I had on hand: scraps of Decor Bond. It results in a finish that's fairly stiff. You may appreciate that, once the purse is stuffed full of your personal crap. ;-)

Here are the two body panels all sewn up (and pressed).

MyTie Makeover Mini Bag by eSheep Designs
That wasn't so hard...

The next step was to stack the two panels and ensure that they are the same size (i.e., clip off any excess if they don't match).

MyTie Makeover Mini Bag by eSheep Designs
Like my puzzle-like application of interfacing??

Next, I pinned the gusset (backed by the original felt lining) to one of the main panels.

MyTie Makeover Mini Bag by eSheep Designs
The original felt lining is an ideal support for the underside of the gusset...

I attached the gusset with a 1/4" seam allowance.

MyTie Makeover Mini Bag by eSheep Designs
Gusset attached to one body panel...

Then pinned the other panel...

MyTie Makeover Mini Bag by eSheep Designs
One side sewn, the other side pinned...

After sewing up the exterior shell, I did my best to finger press the seams, but there's only so much you can do with those. And here is what it looks like turned right side out...

MyTie Makeover Mini Bag by eSheep Designs
The outer shell of this tie purse is basically done...


Watch live classes for FREE at CreativeLive!

[affiliate link]


Next, comes the lining! My tie came with a hanky, so I just used it to make a slip pocket. (Since this is just a test bag and I will be making more, I didn't go to the effort of adding a zippered pocket this time.)

MyTie Makeover Mini Bag by eSheep Designs
The lining fabric is from a $2 set of pillowcases that I bought on vacation last month...

After attaching the pocket, I pinned the two lining body panels right sides together and stitched them together, starting with a 3/4" seam allowance at the top and tapering down to 1/4" the rest of the way.

MyTie Makeover Mini Bag by eSheep Designs
Pinned and ready to sew... remember to leave a turning gap along the bottom!

This purse will have a chain, so I cut the keeper in half to create two little strap tabs and threaded them through a couple of D rings with attached swivel hooks. These, the purse flap, and the two front and back pleats are then basted in place.

MyTie Makeover Mini Bag by eSheep Designs
An example of where basting is not really an option...

The exterior is then dropped into the lining of the bag, with right sides facing. (The pieces — surprisingly — ended up fitting together like a glove... no adjustments needed; that's a first!)

MyTie Makeover Mini Bag by eSheep Designs
It's a tight fit, but it's also the right fit!

After stitching together, the bag is turned through the gap left in the lining. The next step is to press and clip the top seam in preparation for topstitching.

MyTie Makeover Mini Bag by eSheep Designs

And here it is, all nicely topstitched!

MyTie Makeover Mini Bag by eSheep Designs

All that's left is to close the opening in the bottom of the lining, make a buttonhole, sew on a button and add a chain... ta da! The MyTie Makeover Mini Bag!

The MyTie Makeover Mini Bag by eSheep Designs

Hope you found this series of posts informative and useful as a tutorial. As mentioned, I'm looking for pattern testers so if you have some ties at your disposal and want to take this on, please drop me a line or leave a comment. The pattern is ready and waiting!

TERMS OF USE

If you are "sew" inclined, feel free to make and sell as many MyTie Makeover Mini Bags as you care to; I only ask that you credit me and this blog by attaching the following card to the item.

eSheep Designs swing tag