-->
DISCLOSURE: This blog contains Google Adsense ads and affiliate links to Creativebug via which potential commissions are earned when visitors click through.

Search This Blog > > >

Showing posts with label easy sewing projects. Show all posts

Saturday, 25 February 2023

Start With a Circle...

Things to sew with circles of fabric
You'd be surprised what all you can sew starting with a circle...
... and end up with some pretty awesome things!

Over the past decade, I've featured several projects where a simple flat circle (or two) sewn up from two pieces of fabric is manipulated into a functional three dimensional object.

I recently came across yet another one, so to tease it up (full details to come next week), I thought I'd revisit the past projects, just in case you're a relatively new reader here and haven't seen them before.

Or if, by chance, you're a long-time reader — thank you ❤ — maybe these will serve as a reminder that you should try them out.

I must say, having had the chance to take another look at these, they were all rather fun to make... and at least half of them are highly useful.


This project was inspired by a bit of curiosity on my part while eating some Lindt chocolates one Christmas. The wrapper for one of the candies was made out of gold foil in the shape that you see here in this basket.

Waffle Cone Basket by eSheep Designs
Waffle cone hanging basket...

When I unfurled it, I was surprised to see that it was just a circle. So of course, I had to make something with that idea. Thus was born the waffle cone hanging basket.

The back of this is flat (and in this case, supported by some Peltex) so that it can hang nicely against a wall. After writing up the tutorial, I thought about how I could use it, but luckily, it was ultimately given away as a housewarming gift containing some flowers.


Several years ago, I came upon some "food" projects sewn up by some crafty people. I remember being quite impressed by them. There was only one, however, that made me take a second look and think, hey that would be a neat looking display item.

Fabric Fortune Cookie by eSheep Designs
Any size fabric fortune cookies...

I subsequently made myself several small versions, but this large one here was a gift... filled with a "fortune" with words of inspiration and some actual fortune cookies, of course.

This project also has the added benefit of being an unusual way of using up scraps, since you can do these in virtually any size.


This project arose from one of my first extended sessions on YouTube. Being fascinated by origami (how many times have I said that?) in paper form, I was totally taken with how it could be translated to fabric.
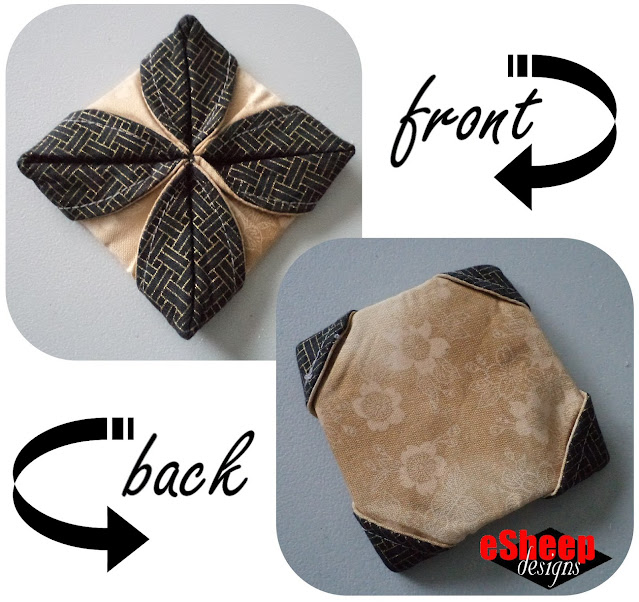
Fabric Origami Ornament crafted by eSheep Designs
An origami fabric ornament...

These have been made as Christmas tree or just hanging ornaments in all sizes. Yet another way to turn fabric scraps into something lovely and unique. (Plus, it takes no time at all. I called this original blog post "A Tute in Ten" and quite literally, this could be made in ten minutes.)


Watch live classes for FREE at CreativeLive! Sign Up at CreativeLive
[affiliate link]


CD Coasters

It wasn't like I had massive amounts of CDs to get rid of, but when I discovered that they weren't accepted in our blue bins for recycling, I looked for ideas online for how they could be reused and transformed.
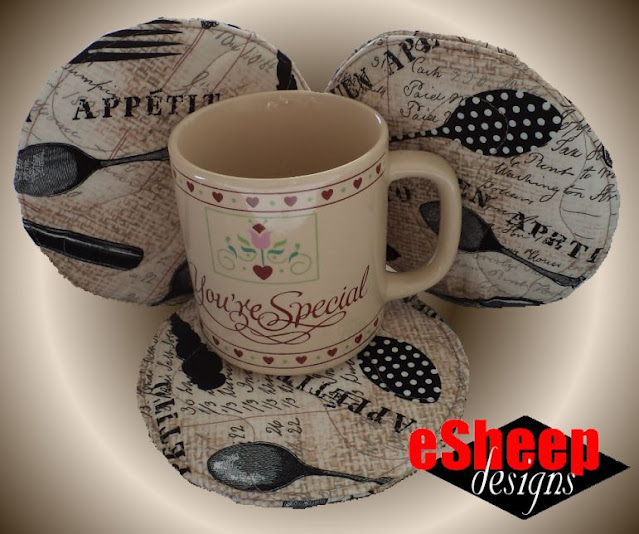
Quilted CD Coasters by eSheep Designs
My first attempt at recycling CDs was a success...

Most of what I found involved smashing them up into tiny bits and using the prism-y pieces as mosaics. But I did eventually luck out in finding a couple of ideas that have served me well over the years. I see and use these coasters every day. (On the rare occasions that they've needed to be washed, I swish them around in the kitchen sink with the dishes and then let them air dry.)

Oh, and not only is this an opportunity to recycle CDs, if you use old kitchen linens and fleece from sweatshirts ready to be tossed, it's even more of an earth-friendly project!


Here's another CD recycling project that uses the actual whole CD. (I also see this one every day; one still holds my cell phone charger and another holds my sewing clips.)

Stacked CD Baskets by eSheep Designs
My second attempt at recycling CDs was arguably prettier...

The lid and the bottom of the basket are reinforced by CDs. Polyfil is used to give everything a puffy look.

By the way, both of these CD recycling tutorials have been PDF'd for your convenience, and can be downloaded from the original blog posts.

Multi-Compartment Organizer

This has become a favourite of mine, as it sits beside my sewing machine being very helpful ever since I made it. Unlike the previous projects, however, this one requires sewing up two circles, but as you can see, the result is worth the extra effort.

Multi-Compartment Round Tray crafted by eSheep Designs
A round organizer with plenty of storage options...

To follow on a common theme, this organizer is perfect for using recycled materials. The blue stuff here used to be the covering for some chair pads.


FINAL DAYS to craft your way to spring with FREE access at Creativebug!
[affiliate link]


Finally, here is a sneak peak at my most recent "start with a circle" project.

Start with a circle...
What is this?

I can't give it all away yet, or you won't have reason to come back next week. ◕‿↼

But trust me, it's pretty neat. And at its simplest, all you need is a couple of fabric circles and some interfacing.
Sale!
This weekend marks the tail end of one of Spoonflower's best sales: 50% off fat quarters, tea towels and wall hangings with free shipping to boot! Check it out by clicking my sidebar graphic at the top of this post to get to my shop. From there you can navigate to explore the creations of any of Spoonflower's talented designers.

Spoonflower 50% fat quarters sale
With free shipping!
Remember also that you can always upload your own designs, and you don't have to be super creative to do so. For tea towels, a unique idea is to scan a favourite family recipe — perhaps in someone's actual handwriting — and have it printed for gift giving. (Tea towels are $9.50 each.)

One final reminder: a fat quarter of lightweight cotton twill is a good option for making a square throw pillow at minimal cost ($7.50 during this sale). If you've been thinking about it, don't miss out on the opportunity! In today's marketplace, you never know if "next time", the price will be higher.

'Til next...

Saturday, 16 April 2022

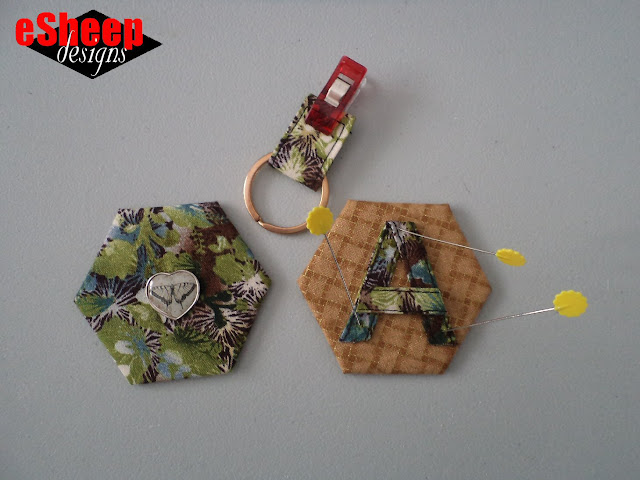
Quasi-Tutorial: Monogram Hexie Keychain

Monogram Hexie Keychain by eSheep Designs
Amanda's keychain...
It's been a crazy busy, stressful, exhausting and emotional couple of weeks.

About ten days ago, we removed personal belongings from our vacation home — the one I made these skylight curtains for a few years back — and said goodbye forever.

After a decade and a half, we took advantage of an insane economic boom running through the area and decided to cash out.

Even though my own feelings about the place — the town itself, not the home — have been ambivalent for some time now, it's oddly bittersweet to arrive at the end.

For those of you wondering what any of this has to do with today's topic, our buyer's name is Amanda. This is her keychain.

She was easy to work with (although I can't say the same for her overly aggressive lawyer, who didn't seem to grasp that this was a simple real estate transaction and not a criminal or fraud case) and I wanted to show my appreciation with something handmade when we turned over the keys. Under the circumstances, what could be more appropriate as a gift?


Once I latched onto the idea, a two minute online search convinced me to use hexies, especially since I already had a collection of premade ones from a few years ago.

I chose two that were made with Peltex, so your first step will be to create a couple of Peltex backed hexies. After that, here are the rest of the required supplies. (You'll also need some optional interfacing, fabric glue and a split key ring.) Something to decorate the reverse side with is also good; I had a special brad to use as you'll see later.

Monogram Hexie Keychain by eSheep Designs
What you need...

Shown with the completed hexies above are two strips of matching fabric, each originally about an inch wide. I took a 4" long section and folded the sides in towards the middle (this is the piece at the bottom of the picture).

I also interfaced it since I had a scrap of Decor Bond lying around. This was then folded in half and sewn as shown below. This will be the tab piece for the split ring.

Monogram Hexie Keychain by eSheep Designs
Sew up the strips...

The other piece — which was about 8" long but how much you need will depend on what monogram is being made — was folded as you would a standard "no turn" strap (i.e., edges to the center and then folded down the center) and sewn along both edges.

By the way, if your letter isn't just formed from straight lines, consider cutting this strip of fabric on the bias so it can curve more easily.

Monogram Hexie Keychain by eSheep Designs
Use the thin strip to create a monogram...

Cut the strip into pieces needed to form the monogram.

I got lucky with the letter "A", since it's simple to create. (The top of the letter is folded; I would suggest doing it that way if you have an "N", "M", "V" or "W" too.)


Watch live classes for FREE at CreativeLive! Sign Up at CreativeLive
[affiliate link]


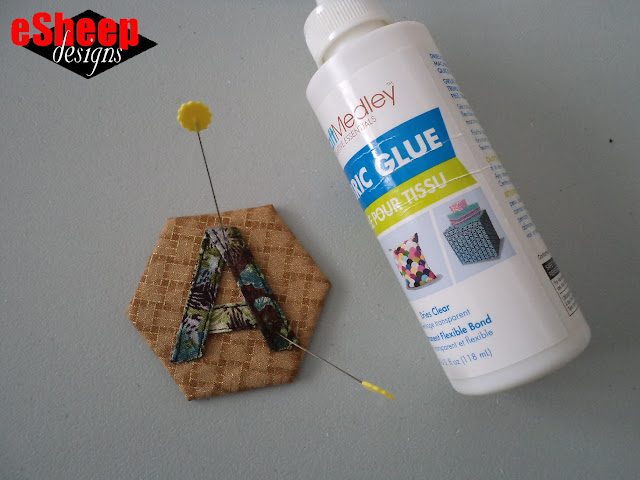
Use fabric glue (or double-sided tape) to help keep the pieces in place before sewing. I managed to sew all the way around the letter in one continuous sweep.

Monogram Hexie Keychain by eSheep Designs
Fabric glue comes to the rescue...

Ensure that your thread matches well with your fabric(s). (Or have a busy fabric print like I have here to hide any wonky stitching.) This means having a different coloured thread for the bobbin later on, if necessary.

Monogram Hexie Keychain by eSheep Designs
My finished monogram...

The next step is to put the two hexies together — with the ring tab in between — and stitch closed.

Monogram Hexie Keychain by eSheep Designs
Getting it ready for the final sew...

Since the hexies were made with the Peltex fusible sides facing up, a good press with the iron right now will help seal the two together before stitching.


Check out crafty classes at Creativebug!
[affiliate link]


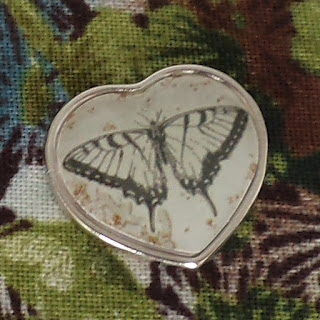
Here's the back side of the keychain... embellished with a heart shaped brad featuring a butterfly.

Monogram Hexie Keychain by eSheep Designs
Reverse side of keychain...

Among other things, a butterfly evokes hope, change, life and transformation.

Butterfly brad
Apt symbolism of a butterfly...
I believe Amanda would agree that it's an appropriate symbol as she steps into a new phase of life as a homeowner.

Meanwhile, hubby and I are also turning a page as we bid farewell to (a much underused) home away from home. It's never easy to let go of something into which you poured literal blood and sweat (although not any tears that I'm aware of) over fifteen years. Our efforts, however, made it the arguable jewel of the block.

We may feel slightly conflicted for a while yet, but it's reassuring to know that our former home has been handed over to an owner who will carry on the pride of ownership.

'Til next...

Saturday, 22 May 2021

Quasi-Tutorial: Almost Origami Coupon/Card Holder

Almost Origami Coupon/Card Holder by eSheep Designs
A new way to carry around coupons and cards...
Presenting week four of "Make it in May".

Back in 2016, I made a shopping list and coupon holder thingamajig for myself and featured it here as a tutorial.

It was my steady companion on grocery shopping days for over three years, before that thing called a pandemic relegated it to my purse indefinitely. (I still don't carry my regular purse when out shopping, nor would I toss a fabric shopping list holder into the average shopping cart.)

Make it in May at eSheep Designs

While it was easy to switch gears and take along just a simple paper shopping list, I didn't have a way to organize the occasional coupon that I'm still receiving every now and then.

Recently — since it's certainly not being used for travelling — I turned to my minimalist wallet for that purpose.

Minimalist Wallet by eSheep Designs
Minimalist wallet as coupon keeper...

Its three compartments make it somewhat easier to sort my coupons, even though I cannot see them.


Then I came across a tutorial for an origami pouch from Darae at indigobird.ca. Her project finishes out at 6.5" x 4.5". I revamped it to a more compact size to fit my coupon and card needs — about a 3.5" square — and present it to you today as a quasi-tutorial. I call it "almost" origami since it's not quite functional just being folded; it has to be sewn.

Almost Origami Coupon/Card Holder by eSheep Designs
Front view...

But once it is sewn, you'll have five compartments in two different heights, perfect for keeping gift cards and coupons in one place. As you can see from the picture at the top of this post, I was able to fit a card horizontally into the middle pocket. (If by chance you end up with tighter seam allowances, cards will still fit vertically.)

Almost Origami Coupon/Card Holder by eSheep Designs
Back view...

Exterior fabric is my Medium Bouncing Ox (Red), backed with remnants of the jumbo yellow and gray version left over from my personal project portfolio.

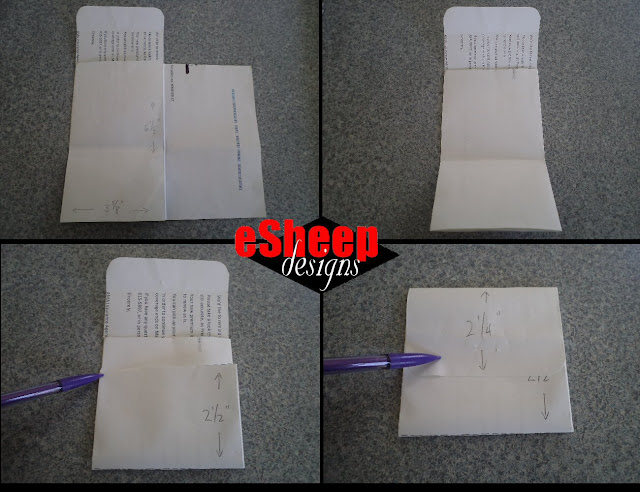
The inspiration tutorial from indigobird provides a downloadable template for foolproof results. You can DIY my smaller version with a sheet of letter size paper (8.5" x 11") by folding it into thirds.

Almost Origami Coupon/Card Holder by eSheep Designs
Divide a standard 8.5" x 11" sheet of paper into thirds...

Eleven inches divided into thirds is 3.66666 inches, but I didn't bother measuring that out. Instead, I just started folding a sheet of paper. It is derived from origami, after all.

Almost Origami Coupon/Card Holder by eSheep Designs
How to fold...

It ends up that two panels 3 5/8" wide and one panel 3 3/4" wide makes up about 11". (If you live in the metric world, you can go with 9.3cm per panel.) The process is for one side to fold in on top of the centre panel, the other side to fold in on top of that, the bottom part to fold upwards and then the top flap to fold down.

While origami usually requires some level of precision, this one doesn't need to be perfect. (Those of you who can make out the pencil marks on my template can see that the original measurements don't match the text that I overlaid on the image.) If you can fold the sheet to the approximate dimensions, I'd say you're fine.


Watch live classes for FREE at CreativeLive! Sign Up at CreativeLive
[affiliate link]


The next step is to use the template to cut two pieces of fabric — one exterior, one lining — and one piece of SF101 (or equivalent) interfacing. (The SF101 is applied to the exterior fabric.)

When using the template to cut fabric, add a seam allowance around it; I used 1/4" or 6mm. For the SF101, use the template as is. OR, you may prefer to cut the interfacing first, fuse it onto your exterior fabric and then cut around the fabric with your desired seam allowance. You can then use this finished piece as a template for the lining (just make sure to stack fabrics right sides together).

Almost Origami Coupon/Card Holder by eSheep Designs
Cutting and interfacing, then trimming and prepping the seam...

Again with the fabrics right sides together, sew around the perimeter, leaving a turning gap on whatever side that you will be folding first (the right side in my case).

Clip the corners and taper the seam allowance near the corners. Then take the whole thing to your ironing station and press one side of the seam open as shown in the last picture above. (This will make your edges neater when you turn it right side out.)

Almost Origami Coupon/Card Holder by eSheep Designs
Starting with one piece...

Turn it right side out and press, press, and press to ensure that you have a crisp starting point before you fold.

Almost Origami Coupon/Card Holder by eSheep Designs
Making the folds...

Fold and press as shown above. Remember that the side that has the open turning gap should be folded inwards first. Secure by sewing as close to the edge as possible.

Make the second vertical fold and sew that side down as close to the edge as possible. Then stitch across the lower horizontal fold line to create the bottom set of pockets, and fold up. Press again.

Almost Origami Coupon/Card Holder by eSheep Designs
Hand sewn sides...

To finish, stitch up the lower sides. I could not for the life of me get my sewing machine to go through all of those layers, so I hand sewed this part. The advantage of doing so is that you can get right at the two layers that need to be held together instead of punching your needle through all of them.

All that's left is to install a snap fastener to the top flap and first layer of the bottom pocket.

Almost Origami Coupon/Card Holder by eSheep Designs
A five-pocket coupon and card holder...

I'm not giving instructions on how to do that; any packet of snap fasteners will offer directions for installing them.


Check out crafty classes at Creativebug!
[affiliate link]


And here is what the final item should look like. This is the top pocket.

Almost Origami Coupon/Card Holder by eSheep Designs
Last pocket? First pocket?

You can see from these pics where the lining fabric shows up, if that's an important consideration for how you want to allocate your fabric.

Almost Origami Coupon/Card Holder by eSheep Designs
Four remaining pockets...

This can be just as handy as a minimalist wallet in that there is ample room for coins (as long as they're kept in the top pocket, they'll stay put), paper money and cards. You can't beat it for simplicity, given that it's "almost" origami.

'Til next...

Saturday, 8 May 2021

Quasi-Tutorial: Sew a Hanging Fabric Kite — 3 Ways [Pt 2]

Hanging Kite by eSheep Designs
Other side of my hanging kite...
Week two of "Make it in May" is part two of my quasi tutorial for making a hanging fabric kite.

Let me take a moment to acknowledge that this idea is certainly not original. I've seen other people's versions and I'm sure they've left enough of an impression on me to influence this project. To be sure, I'm not taking credit for making a decorative kite out of fabric.

That said, I haven't seen one made in exactly this way, using either the strip method I posted about last week or the scrappy method that I'm going to show you here.

Make it in May at eSheep Designs

Perhaps I can take a bit of credit for coming up with a unique take on the fabric kite. ;-)


Regardless of how big your kite project is, any sewer can make one using this method. Quite literally, you are going to cover your kite template with fabric scraps.

You will need some fusible fleece and some 1/2" double folded (i.e., 2" unfolded) bias or regular straight binding to finish.

Method #2: Hanging Kite Using Fabric Scraps

Because I'm making a double-sided item, I used the back of the other side of the kite as a cutting template for the fusible fleece (fusible side up).

Hanging Kite by eSheep Designs
Method #2...

Then I laid down a bunch of coordinating fabric scraps until the entire surface was covered. This was just a preliminary step to ensure that I had enough fabric; I was still going to fiddle with the final arrangement.

Hanging Kite by eSheep Designs
Scraps pinned down...

I ironed some of the more crinkly pieces and then started pinning them onto the fusible fleece. There is some overlap, but for the most part I tried to puzzle piece them. My aim was to have the darker gray pieces to one side. (My fabric scraps were Robert Kaufman, Tim Holtz and "no name" sheet and pillow case remnants.)

Once satisfied with the placement of the scraps, I fused them onto the fleece and then contemplated how to quilt the surface.

Hanging Kite by eSheep Designs
A form of echo quilting...

I chose to do an echo quilting technique around each half of the surface. (While I was doing it, though, I again wondered how people can enjoy quilting and quilting and quilting large surfaces. Sadly, it's not my thing.)


Watch live classes for FREE at CreativeLive! Sign Up at CreativeLive
[affiliate link]


So quilt it or not, it's up to you. But even though I'm not a fan of the process, there's no doubt that quilting the surface makes it look a lot nicer... and it adds even more textural interest beyond the scrappy-ness of the piecing.

Hanging Kite by eSheep Designs
Worthwhile quilting job...

If intended as a wall hanging, the edges can now be bound and finished off. Otherwise, pin it back to back with the other piece and baste the edges together.

Hanging Kite by eSheep Designs
Baste both pieces together...

Keep the seam allowance as small as possible when basting.

Hanging Kite by eSheep Designs
Clip binding to "back" side of kite...

Clip the binding — right side down — to the edge of whichever side you deem is the "back" side of the kite. Start at the tip of the kite and work your way around (leave enough binding to finish off with a tail).

The inset picture above shows how to turn the corners.


Check out crafty classes at Creativebug!
[affiliate link]


Sew the binding with just under 1/2" seam allowance; i.e., just short of the first fold. Then flip it around to the other side and clip again. Finish sewing the binding from the "right" side.

Hanging Kite by eSheep Designs
Turn binding to the right side and finish sewing...

As you can see in the above picture, my 13" square of fabric left me with just enough bias binding to make it all the way around. (The 1" wide strip of fabric that remained was then folded in half and sewed up; some artful tucking and stitching later, it was secured as the tail.)

Hanging Kite by eSheep Designs
Kite with a tail...

However you choose to add a tail and finish off the binding will be fine; it's a simple matter of making it work. I'm not going to describe any particular process for it.

Hanging Kite by eSheep Designs
Tie fabric scraps to the tail to complete the look...

If you made the other half of the kite as detailed last week, you can take some of the fabric scraps you sliced off the edges of the quadrants and tie them to the kite tail. (If not individually big enough to tie, you can sew them together first.)

Hanging Kite by eSheep Designs
Got wire? Give your kite tail the illusion of movement...

A long time ago, I harvested the wire out of some wired ribbon (which I then used to make some zipper pulls). I inserted some into the kite tail to give it the ability to bend. (Yes, I thought that was clever of me too.)

One final photo to share... this is how I hung it up in the window.

hanging solution
A solution to the "how to hang" problem...

The little clip is from a bag of Hawaiian coffee (a small binder clip will do the job just as well) and the gold cord is left over from my personal project portfolio. I clipped it along the top — about six inches away from the peak — so that it hangs at an angle. Because after all, a kite rarely flies straight up and down.

A bit of an update... I've had this in my window since late March, with the vibrant stripey side facing out. However, this scrappy side has grown on me, so I might consider alternating the display at some point. I also had a thought that making smaller versions and hanging them from a ceiling might result in a fun display.

What do you think?

'Til next...