
-->
DISCLOSURE: This blog contains Google Adsense ads and affiliate links via which potential commissions are earned when visitors click through.

Search This Blog > > >

Showing posts with label quick craft mondays. Show all posts

Saturday, 5 August 2023

Quick Craft Mondays: Scrappy Keychain Card Wallet

Scrappy Keychain Card Wallet by eSheep Designs
A quick and scrappy project...
The Monday afternoon TV marathon that used to provide the background motivation for my quick craft Mondays is long gone, TV schedules being subject to change and all that.

For that reason, my Monday afternoons have not involved any specific sewing activities for a couple of years.

But if I were still doing it, this particular project would qualify as something that can easily be done in an afternoon. It's also small and scrap friendly, so you can dip into those leftover pieces of fabric and interfacing and make something pretty and useful.

I got the inspiration from YouTube on Candy Tomato's channel, from a video uploaded September 25, 2020 (called "Quilt No.100 key & card ring, quilt key ring"). It was originally offered as a free pattern, but Candy Tomato/Tomato Candy is one of those unfortunate crafters whose work is constantly being ripped off by unscrupulous entities.

She and I managed to exchange some brief correspondence back when I was having my difficulties with Dyanneo. She told me that these sites "repeatedly steal from me, run factories, and steal my photos, videos and patterns." In response, she's pulled some of her previously free patterns and put them into her Etsy shop, where she charges a mostly modest price for them. (However — and I've said this to fellow designers — if someone is determined to steal from you, it won't make a difference if you charge for the pattern and stamp it with the purchaser's name. These unscrupulous sorts will quite easily reproduce it and sell it as their own anyway.)
 
Candy Tomato
image courtesy of Candy Tomato (Youtube)...

But enough of that. When you have a moment, check out her YouTube channel and see some of her amazing creativity for yourself. I can't get over what she manages to accomplish just by hand sewing.



Tomato Candy's project is quite a bit more elaborate than mine. Hers actually opens up like a clamshell (secured with a zipper) to store the other keys on that large key ring. The pockets have a curvy edge to them and the flaps (on both sides) are angled.

I simplified everything to the point of only having a couple of pockets and a single flap. That said, I will give you access to my pattern templates. (NOTE TO SCAMMERS: This doesn't mean that you can turn around and sell them along with my instructions for some insane, stupid price.)

Scrappy Keychain Card Wallet by eSheep Designs
Simplified version of the "inspiration" project...

Anyway, as the name suggests, this is something that can be easily sewn using some of your fabric and interfacing scraps. The SF101 adds a little body to the pieces without adding bulk, but it's not absolutely necessary; or, you could use some other type of interfacing. (The fusible fleece is applied to the exterior body piece. The SF101 — if you're using it — is applied to the lining body piece and the two exterior pocket pieces.)
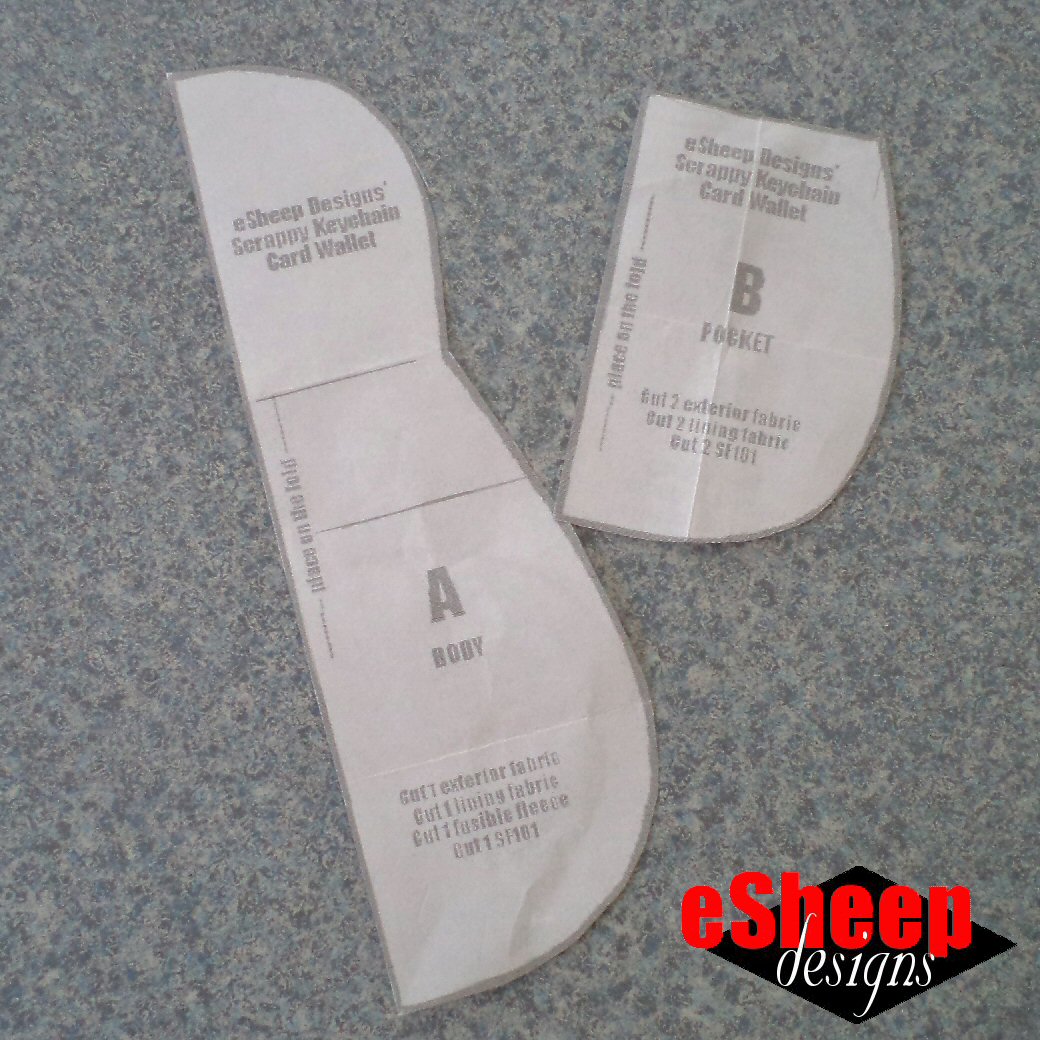
Keychain Card Wallet templates by eSheep Designs
Templates for the Scrappy Keychain Card Wallet...

You'll also need about 18" (45cm) of bias binding, which you can make yourself with a "spare square" of fabric. (In fact, if you decide to make your own, make it 1.5" wide — just under 4cm — instead of 2"; this is a small item and doesn't need such wide binding.)

In terms of hardware, you'll need a snap fastener set, a 1/4" (6mm) eyelet set, and a split key ring with optional lobster clasp.

Scrappy Keychain Card Wallet by eSheep Designs
Fuse, sew and baste...

I used the same fabric for the exterior and lining of the body and another selection for the pocket exteriors and linings. (They were all remnants of a Craftsy purchase from years ago.)

Once the pieces are cut and interfaced, the two pocket linings are matched to the two pocket exteriors and sewn with a 1/4" (6mm) seam allowance. The finished pocket assemblies are then turned right side out, pressed and topstitched.


Watch live classes for FREE at CreativeLive! Sign Up at CreativeLive
[affiliate link]


Baste the pocket meant for the back of the wallet to the exterior body piece.

Next, position the front pocket on the lining body piece and use some clips to hold it together with the exterior body piece (the one that was just basted with the back pocket). Because these edges will be finished with bias binding, everything should be right side out when you do this.

Put a card in the front pocket and fold the flap down on top of it to gauge the best placement for the snap fastener. (The one I made had a very tight fit, so I added a bit of length to the template afterwards.)

Scrappy Keychain Card Wallet by eSheep Designs
Determine placement of snap fastener...

When you do this, be aware that installing the bias binding later will do two things: 1) reduce the depth of the pocket and 2) take up space along the edge of the flap.

Once you're satisfied with where the snap should go, install the bottom half of it on the pocket piece. Then baste around the entire assembly to secure everything before binding.

Scrappy Keychain Card Wallet by eSheep Designs
Bind the edge...

I'm not going to discuss how to sew bias binding here. If you've never done it before or need to have a refresher, check out this post for some ideas. (Like I said above, however, if you're going to make binding specifically for this project, go with a narrower width than the usual 2" option.)

After the whole thing is bound, install the top half of the snap fastener set, after reconfirming that the location will allow it to close properly with a card in the pocket. (Tip for marking: push a pin up through the bottom half of fastener and let it go through the flap at the desired location.)


Check out crafty classes at Creativebug!
[affiliate link]


I had a heck of a time getting a hole punched through the layers of fabric, interfacing and binding to install the eyelet. To make this job easier, I recommend punching a hole into the body piece before sewing on the binding.

Scrappy Keychain Card Wallet by eSheep Designs
Finished front view, opened...

You can then feel around for the opening afterwards and cut through the binding at that same spot to complete the hole.

I'm not going to say anything further about how to install snap fasteners or eyelet/grommets since they come with instructions when you buy them. Maybe one tip is to hammer on something truly solid for best results. (You may have to go outdoors for that.)

Scrappy Keychain Card Wallet by eSheep Designs
Finished back view...

I made this little wallet for a friend visiting from Vancouver Island last month. Always good to test out one's creativity and be able to give the result away.

'Til next...

Saturday, 11 February 2023

Socks For Your Hands

Socks remade into hand warmers by eSheep Designs
A practical way to recycle old socks...
By the time either I or my hubby decides to part ways with a pair of socks, they have holes in them. And while I recently watched one of my favourite YouTubers demonstrate the art of darning socks, it's not something that I can see myself doing on a regular basis... if at all.  

From a crafting point of view, however, there's not a whole lot that one can do with socks in that condition. If you've ever seen a sock puppet, doll or snowman idea, wouldn't you agree that they always look like they were made with new socks?

In our home, discarded socks would usually be tossed into a bag for future use as rags. Hubby is always polishing something or other and old socks are often good for that. From a crafting perspective, I suppose they'd be useful for stuffing plushies if you cut them up into small pieces.

But in my case here, I had a couple of pairs that the other half bought for me years ago because they were adorned with certain black and white flightless seabirds, for which I have an affinity. Despite being no longer wearable as socks, I was reluctant to let go of them.

Socks remade into hand warmers by eSheep Designs
Socks about to get a new life...

Then I had a thought: how about turning them into hand warmers or quasi fingerless gloves?

I tell ya, it's a quick project with a solid return. And if you have socks that are similarly decorated, the result can even be a fashion statement of sorts!


The project is as simple as can be.

Just take your old pair of socks, stack them up and slice them off right before the damaged area. (In this case here, both the toes and the heels had holes in them.)

Socks remade into hand warmers by eSheep Designs
Cut away the toe to heel area...

You might notice I have a bit of an angle going on here under the ruler. How you make this cut is totally up to you. You may want to retain as much of the sock as you can at this point, just to see what your preference is regarding overall coverage for your thumb. (You can always trim it down before you sew.)

Socks remade into hand warmers by eSheep Designs
Create a division for the thumb on each sock...

On the side opposite to where the heel used to be, use a pin to create a divided space for your thumb. Try it on for size and then you can decide if you want to do some trimming.


Watch live classes for FREE at CreativeLive! Sign Up at CreativeLive
[affiliate link]


I have seen this project done up as fingerless gloves where the crafter has gone to the trouble of creating four additional stubby little compartments, but in my mind, I'm thinking, why bother?

Once you're satisfied with the size of the compartment that you've created for the thumb, go ahead and sew a line anywhere from 3/4" to 1.5" (roughly 2 to 4cm) in length at that location. (As indicated by the broken white lines in the photo below.) 

Socks remade into hand warmers by eSheep Designs
The only bit of sewing that you'll need to do...

The longer the sewn line, the more coverage your thumb will have.

I would highly recommend that you use whatever stretch stitch setting you have on your sewing machine for this. (And perhaps a ballpoint needle.)

Socks remade into hand warmers by eSheep Designs
And it's done!

The sock won't fray, so you don't need to do any further sewing. As a matter of fact, the top part will eventually curl a bit to create some added dimension, as you can see on the other pair that I made.


Craft your way to spring with FREE access at Creativebug!
[affiliate link]


See what I mean about simple? Can a useful project get any easier than this? This one hits all the right chords with me, especially in being a recycling effort.

Socks remade into hand warmers by eSheep Designs
Two pairs of new hand warmers!

Now I can leave a pair of these wherever I "hang"... upstairs, downstairs, and in between. I've been regularly using my minky fingerless gloves while at the computer, but I find it a bit constricting to type while wearing them, since minky doesn't really stretch a whole lot. (Those can now go in my sewing room.)

Socks remade into hand warmers by eSheep Designs
Staying warm while the fingers fly...

On the other hand, these recycled sock hand warmers enable a great range of movement at the keyboard. All in all, very happy to have kept my penguin socks out of the rag bag!

'Til next...


Saturday, 24 September 2022

Quasi-Tutorial: Mini Notebook Cover With Receipt Pocket

Notebook Cover with Receipt Pocket by eSheep Designs
My new notebook cover with receipt pocket...
I'm a big fan of little notebooks.

You may recall this one that I have in my sewing room.

I have slightly larger ones for travel, with one that was used as a cruise diary, detailing where we were, what we did and what we ate... totally fun to read. (We haven't cruised in over a decade.)


The blue one that you see here is almost out of usable pages. For the past fifteen years or so, it's gone on vacations and road trips with us, creating a permanent record of dates, places, restaurants, expenses, and even Yahtzee scores.

The little inside pocket is useful for keeping receipts, but can only hold so many. You may be able to see that it's being held in place with tape.

Travel notebooks
My vacation notebooks...

Just in time for our annual BC getaway, I figured making a multi-functional cover for the new notebook (that I'd purchased a few years ago) would be a timely project.

Notebook Cover with Receipt Pocket by eSheep Designs
Receipt pocket on back cover...

The cover incorporates a pocket to keep receipts, of course.


I'm going to share some basic instructions using the dimensions that I had to work with, but you can apply the process to any size notebook.

The first step, therefore, is to measure. This particular notebook is 4.5" wide by 5.5" high; the coil is about 3/4". A cover, however, would need to extend at least 1.25" at both ends to wrap back to the inside so it can hold the actual notebook's front and back cover in place.

Notebook Cover with Receipt Pocket by eSheep Designs
Wrap-around extension to keep cover in place...

For the receipt pocket, I decided that a horizontally placed bellows pocket measuring 3/5" x 5" would be a good fit on the back. (At this point, I also knew that a tab of some sort would be needed to keep the book closed and the pocket secure, but size can be determined later.)

Once the physical measurements are accounted for, it's time to add seam allowances; I added 1/4" to all edges*.

For fabric, I looked to my remaining fat quarters of Tim Holtz's Eclectic Elements. The one that I'm using for the exterior is a vacation themed selection called Travel Labels.

Notebook Cover with Receipt Pocket by eSheep Designs
Project fabric selection...

The interior is a piece that came with my Boundless DECOdent bundle, purchased from Bluprint in 2018.

Both pieces were cut to 12.75" x 6" and were interfaced with some SF101. The math to arrive at the dimensions: (4.5" wide x 2) + (.75" width of coil ) + (1.25" overlap ends x 2) + (.25" seam allowance x 2) = 12.75" and (5.5" height) + (.25 seam allowance* x 2) = 6".

The bellows pocket piece is folded in half and then interfaced with SF101 on one half. Then it's sewn up, corners trimmed, and turned right side out. Be sure to leave the turning gap along the bottom. (Throughout this project, I recommend pressing seams open before turning as described in this post.)

Notebook Cover with Receipt Pocket by eSheep Designs
Making a bellows pocket...

A small piece of hook and loop tape is the final add-on.

Make a couple of 1/4" accordion folds along both sides of the pocket piece and press well. (The folds will allow the pocket to expand.)

Notebook Cover with Receipt Pocket by eSheep Designs
Bellows pocket sewn onto exterior panel...

Position the pocket piece on top of the exterior piece at the desired location and pin. (Put the actual notebook underneath so that you can determine the correct placement.) Stitch along the edge of the first fold on both sides. Then, with the second folds flattened down, sew across the bottom, which will also close up the turning gap.


Watch live classes for FREE at CreativeLive! Sign Up at CreativeLive
[affiliate link]


At this point, I did some rough estimating and decided that an 8" long x 1.75" wide strip of fabric would work for the tab closure. (This is based on the notebook being about a half inch thick.)

Simply fold the strip in half with wrong side out, sew around and leave a turning gap along one of the long sides. Trim corners, turn right side out, and topstitch. Attach the other part of the hook and loop tape to one end.

Notebook Cover with Receipt Pocket by eSheep Designs
Make a tab, add velcro and secure to front cover...

Now determine the proper placement for the tab and stitch it in place at the other end of the exterior panel. You can see below what the stitching should look like from the back.

Notebook Cover with Receipt Pocket by eSheep Designs
Pin exterior panel to lining, wrong sides together...

Place the two panels wrong sides together and pin, ensuring that the tab piece is tucked inside and out of the way. Leave the turning gap along the bottom of the cover. (If the fabric is non-directional, this won't be an issue, but this Tim Holtz selection has a definite up and down orientation.)

Sew, trim the corners and turn right side out. Use the notebook itself to determine where the two end folds need to be made. Press well.

Notebook Cover with Receipt Pocket by eSheep Designs
Add some Peltex for structure...

I wanted the cover to have some additional firmness, so I cut two pieces of Peltex to about 3.5" x 5.25" and slid them into place before closing up the turning gap. They should just butt up against the folded edges. (Not that it should matter much, but I put the fusible side against the exterior fabric.)

Once the Peltex pieces are inside, it's time to sew along the top and bottom to finish the cover. Stitch as close to the edge as you can, since the actual front and back cover of the notebook needs to slide into the end openings.

* Which leads to this asterisk. I made this as a Quick Craft Mondays sort of thing, creating on the fly. When I first envisioned the project, I knew that having the ends folded back inside after the whole panel is sewn up would require extra room at the top and bottom of about 1/8" or so in order for the notebook to fit. Unfortunately, when I cut the fabric, I did not add this extra bit to the 6" height. Later when I sewed the panels together, I had a last chance to fix the problem by stitching with a smaller seam allowance and did not remember to do that! (And to answer your question as to why I just didn't rip the seam open and redo it, I had already trimmed the corners.)

Notebook Cover with Receipt Pocket by eSheep Designs
Doesn't fit? Make it fit!

So, I was left to slice away at the top and bottom of the notebook's front and back covers in order to make them fit. If you don't mind this hack, it's a good way to achieve a snug fit, which is important because otherwise the covers might slip out every time the book is opened.

On the other hand, if you think this is hacky and lacks finesse, be sure to add extra room at the top and bottom when you cut the main pieces of fabric.


Check out crafty classes at Creativebug!
[affiliate link]


As shown in one of the images at the top of this post, I usually keep a pen inside the coil of the notebook. The pen still fits.

If you're wondering why I decided to put the pocket on the back, it's because I prefer a less cluttered look on the front.

Notebook Cover with Receipt Pocket by eSheep Designs
Back view...

One of the advantages of making the covers fit by trimming them is that the pages are pretty much even with the cover; i.e., the end result is the same essential size as the original book. (I like it this way rather than having the cover extend beyond the pages.)

Notebook Cover with Receipt Pocket by eSheep Designs
Front view...

Isn't this just the neatest fabric? So much detail to catch your interest and it hides dirt, to boot! (See the "smudges" over parts of the print? Those are part of the design. The notebook was well handled during our recent holiday and shows no signs of wear.)

My original purchase of twenty-five of these Tim Holtz fat quarters from early 2018 is now down to eight (plus assorted scraps). It's somewhat of an achievement that I've actually used seventeen selections, given how I had no plans for the bundle. The Eclectic Elements line is still widely available online (I've seen the Fat Quarter Shop selling yardage at $12.48), even though I think it debuted in 2013.

That's definitely a testament to its lasting appeal. Even simple projects like this one are so much better when done up in Eclectic Elements fabric.

'Til next...

Saturday, 23 July 2022

Quasi-Tutorial: "Pentie" Magnetic Needle Tracker

Magnetic Needle Tracker by eSheep Designs
Magnetic needle tracker...
Three years ago, I came up with a no sew way of making hexies, even though I had no need for any hexies at the time.

I used one of my favourite materials to facilitate the project: silicone. A piece cut into a hexagon shape allowed me to press fabric directly around the template.

I also cut a pentagon shaped template, to make several "penties" as well... although they don't seem to be commonly known by that logical nickname.

Magnetic Needle Tracker by eSheep Designs
A way to keep track of your needle when hand sewing...

A few months ago, I grabbed a couple of the hexies to make a keychain, but I've yet to use any of their five-sided cousins.

supply of "penties"
My collection of "penties"...
Naturally, when I saw a version of today's project on Crafty Staci's site, I decided to change up the shape. She used hexies, so I had to use "penties".

All this is, is a couple of button magnets encased in some fabric. The magnets enable the pieces to be "attached" to both sides of a (hand) sewing project, allowing you to keep track of your needle by placing it on top of the magnetized surface.

Certainly not a life-changing item, but perhaps a fun way to use up scraps of fabric and interfacing. It might also make a nifty stocking stuffer item for your sewing buddies at Christmas.


To make this needle tracker, you'll need to round up four scraps of fabric, similar scraps of fusible fleece, and two button magnets (at least 1/2" or 12mm in size).

Depending on how large your shapes are, you may also need a couple of scraps of SF101 or similar lightweight interfacing to hold the magnets in place. Optionally, about 10" or 25cm of narrow ribbon is used to connect the two pieces.

Magnetic Needle Tracker by eSheep Designs
Gathering materials...

First, make your hexies or penties (or whatever shape) with the fabric scraps. Then fuse the fleece onto the fabric.

Magnetic Needle Tracker by eSheep Designs
Fusible fleece added...

Next, if your fabric pieces are all different, decide how you want them to be oriented when they're "joined" (understanding that magnets attract on one side and repel on the other).

In my case, I just wanted to make sure that the matching fabrics would always be kept together. 

Once you make your decision, ensure that the magnets are positioned correctly against the fabrics.

Magnetic Needle Tracker by eSheep Designs
Cut some SF101 interfacing to secure the magnet in position...

Since I didn't want them to slide around inside, I fused a small piece of SF101 on top of each in the center of my "pentie" to hold it in place. If the shapes and magnets that you use have a similar size difference, you may want to do that also.


Watch live classes for FREE at CreativeLive! Sign Up at CreativeLive
[affiliate link]


The next step is to determine the optimal way to put the two halves together. Even when pieces should be more or less identical, there is usually a best way to align the edges so that they're even.

Magnetic Needle Tracker by eSheep Designs
What is the best way to match up both halves?

Once you've determined what that should be, clip them together in preparation for sewing.

Magnetic Needle Tracker by eSheep Designs
Use a ribbon to connect the two pieces if desired...

If you want to tie the set together, take a section of thin ribbon and sandwich one end between each of the two halves. (Note that if you choose to do this, it will limit where you can place the needle tracker on larger projects.)

Sew around the perimeter with as small a seam allowance as you can manage.

Magnetic Needle Tracker by eSheep Designs
Done!

That's all there is to this quick, scrappy project. Your magnetic needle tracker is done!


Check out crafty classes at Creativebug!
[affiliate link]


I don't do a lot of "unnecessary" hand sewing, so it's debatable how often I might use this. In the past, I generally just stab my needle into whatever it is that I'm sewing if I need to put it down or walk away for a bit. With this, I'll at least easily see where the needle is on whatever it is I'm sewing. 

Magnetic Needle Tracker by eSheep Designs
A quick and easy project that you can complete in a half hour...

For those who do intensive needle work like embroidery, cross stitching, etc., it might be a welcome addition to the tool box. In those circumstances, simply punching the needle into the fabric may not work as well (it could fall right through). With the potential requirement to change thread/floss regularly, having some place to keep a bare needle safe is a good thing.

Magnetic Needle Tracker by eSheep Designs
The other side...
Apparently these little gadgets — also called needle minders and needle nannies — are usually DIY'd with buttons. For use with smaller embroidery hoops, it's probably a good idea to keep the needle tracker relatively unobtrusive.

I envision my version here being useful for occasional hand quilting. By attaching a cord to the two halves, I know that it can't be used just anywhere — like in the middle of a large quilt — but that's not going to be a problem for me as I don't foresee any large quilts in my future.

'Til next...