
-->
DISCLOSURE: This blog contains Google Adsense ads and affiliate links via which potential commissions are earned when visitors click through.

Search This Blog > > >

Showing posts with label wallet projects. Show all posts

Saturday, 5 August 2023

Quick Craft Mondays: Scrappy Keychain Card Wallet

Scrappy Keychain Card Wallet by eSheep Designs
A quick and scrappy project...
The Monday afternoon TV marathon that used to provide the background motivation for my quick craft Mondays is long gone, TV schedules being subject to change and all that.

For that reason, my Monday afternoons have not involved any specific sewing activities for a couple of years.

But if I were still doing it, this particular project would qualify as something that can easily be done in an afternoon. It's also small and scrap friendly, so you can dip into those leftover pieces of fabric and interfacing and make something pretty and useful.

I got the inspiration from YouTube on Candy Tomato's channel, from a video uploaded September 25, 2020 (called "Quilt No.100 key & card ring, quilt key ring"). It was originally offered as a free pattern, but Candy Tomato/Tomato Candy is one of those unfortunate crafters whose work is constantly being ripped off by unscrupulous entities.

She and I managed to exchange some brief correspondence back when I was having my difficulties with Dyanneo. She told me that these sites "repeatedly steal from me, run factories, and steal my photos, videos and patterns." In response, she's pulled some of her previously free patterns and put them into her Etsy shop, where she charges a mostly modest price for them. (However — and I've said this to fellow designers — if someone is determined to steal from you, it won't make a difference if you charge for the pattern and stamp it with the purchaser's name. These unscrupulous sorts will quite easily reproduce it and sell it as their own anyway.)
 
Candy Tomato
image courtesy of Candy Tomato (Youtube)...

But enough of that. When you have a moment, check out her YouTube channel and see some of her amazing creativity for yourself. I can't get over what she manages to accomplish just by hand sewing.



Tomato Candy's project is quite a bit more elaborate than mine. Hers actually opens up like a clamshell (secured with a zipper) to store the other keys on that large key ring. The pockets have a curvy edge to them and the flaps (on both sides) are angled.

I simplified everything to the point of only having a couple of pockets and a single flap. That said, I will give you access to my pattern templates. (NOTE TO SCAMMERS: This doesn't mean that you can turn around and sell them along with my instructions for some insane, stupid price.)

Scrappy Keychain Card Wallet by eSheep Designs
Simplified version of the "inspiration" project...

Anyway, as the name suggests, this is something that can be easily sewn using some of your fabric and interfacing scraps. The SF101 adds a little body to the pieces without adding bulk, but it's not absolutely necessary; or, you could use some other type of interfacing. (The fusible fleece is applied to the exterior body piece. The SF101 — if you're using it — is applied to the lining body piece and the two exterior pocket pieces.)
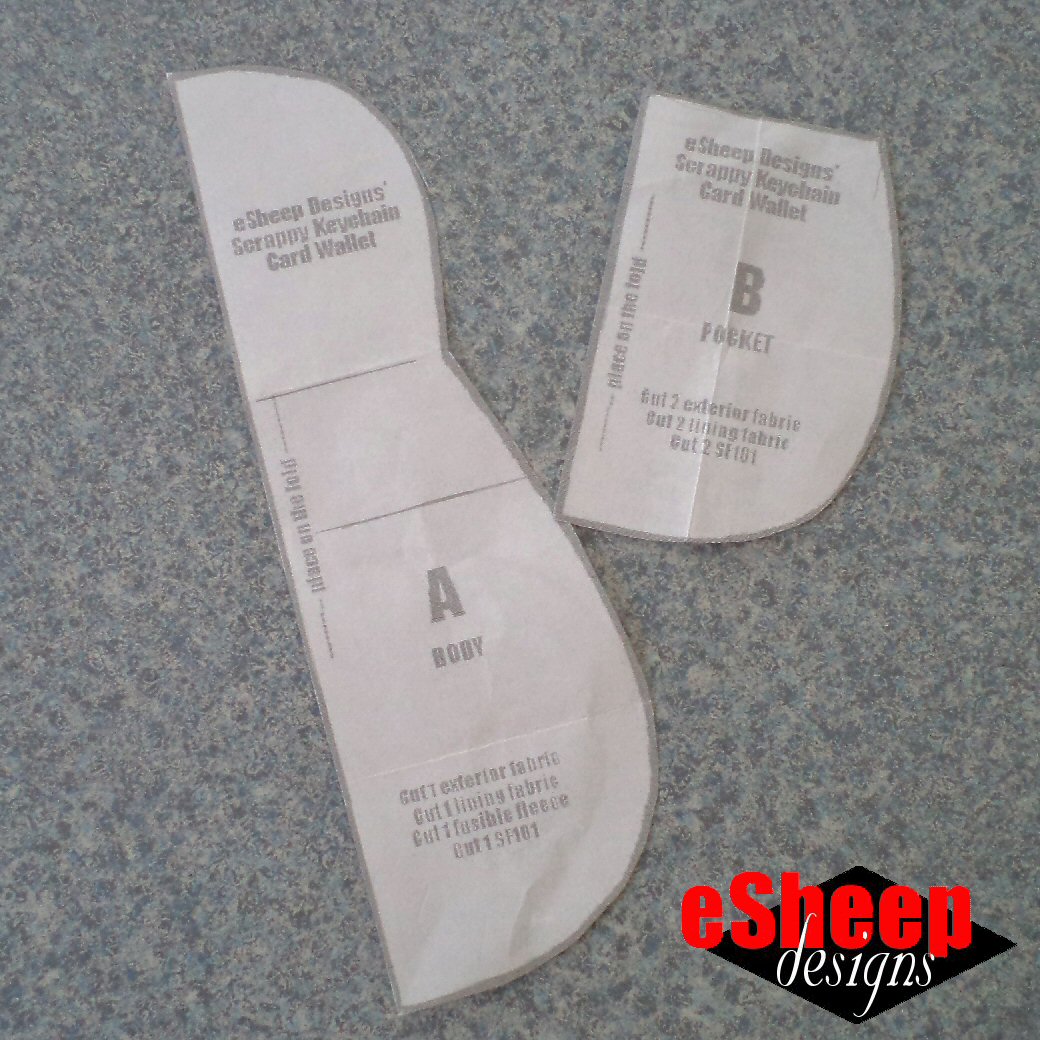
Keychain Card Wallet templates by eSheep Designs
Templates for the Scrappy Keychain Card Wallet...

You'll also need about 18" (45cm) of bias binding, which you can make yourself with a "spare square" of fabric. (In fact, if you decide to make your own, make it 1.5" wide — just under 4cm — instead of 2"; this is a small item and doesn't need such wide binding.)

In terms of hardware, you'll need a snap fastener set, a 1/4" (6mm) eyelet set, and a split key ring with optional lobster clasp.

Scrappy Keychain Card Wallet by eSheep Designs
Fuse, sew and baste...

I used the same fabric for the exterior and lining of the body and another selection for the pocket exteriors and linings. (They were all remnants of a Craftsy purchase from years ago.)

Once the pieces are cut and interfaced, the two pocket linings are matched to the two pocket exteriors and sewn with a 1/4" (6mm) seam allowance. The finished pocket assemblies are then turned right side out, pressed and topstitched.


Watch live classes for FREE at CreativeLive! Sign Up at CreativeLive
[affiliate link]


Baste the pocket meant for the back of the wallet to the exterior body piece.

Next, position the front pocket on the lining body piece and use some clips to hold it together with the exterior body piece (the one that was just basted with the back pocket). Because these edges will be finished with bias binding, everything should be right side out when you do this.

Put a card in the front pocket and fold the flap down on top of it to gauge the best placement for the snap fastener. (The one I made had a very tight fit, so I added a bit of length to the template afterwards.)

Scrappy Keychain Card Wallet by eSheep Designs
Determine placement of snap fastener...

When you do this, be aware that installing the bias binding later will do two things: 1) reduce the depth of the pocket and 2) take up space along the edge of the flap.

Once you're satisfied with where the snap should go, install the bottom half of it on the pocket piece. Then baste around the entire assembly to secure everything before binding.

Scrappy Keychain Card Wallet by eSheep Designs
Bind the edge...

I'm not going to discuss how to sew bias binding here. If you've never done it before or need to have a refresher, check out this post for some ideas. (Like I said above, however, if you're going to make binding specifically for this project, go with a narrower width than the usual 2" option.)

After the whole thing is bound, install the top half of the snap fastener set, after reconfirming that the location will allow it to close properly with a card in the pocket. (Tip for marking: push a pin up through the bottom half of fastener and let it go through the flap at the desired location.)


Check out crafty classes at Creativebug!
[affiliate link]


I had a heck of a time getting a hole punched through the layers of fabric, interfacing and binding to install the eyelet. To make this job easier, I recommend punching a hole into the body piece before sewing on the binding.

Scrappy Keychain Card Wallet by eSheep Designs
Finished front view, opened...

You can then feel around for the opening afterwards and cut through the binding at that same spot to complete the hole.

I'm not going to say anything further about how to install snap fasteners or eyelet/grommets since they come with instructions when you buy them. Maybe one tip is to hammer on something truly solid for best results. (You may have to go outdoors for that.)

Scrappy Keychain Card Wallet by eSheep Designs
Finished back view...

I made this little wallet for a friend visiting from Vancouver Island last month. Always good to test out one's creativity and be able to give the result away.

'Til next...

Saturday, 22 May 2021

Quasi-Tutorial: Almost Origami Coupon/Card Holder

Almost Origami Coupon/Card Holder by eSheep Designs
A new way to carry around coupons and cards...
Presenting week four of "Make it in May".

Back in 2016, I made a shopping list and coupon holder thingamajig for myself and featured it here as a tutorial.

It was my steady companion on grocery shopping days for over three years, before that thing called a pandemic relegated it to my purse indefinitely. (I still don't carry my regular purse when out shopping, nor would I toss a fabric shopping list holder into the average shopping cart.)

Make it in May at eSheep Designs

While it was easy to switch gears and take along just a simple paper shopping list, I didn't have a way to organize the occasional coupon that I'm still receiving every now and then.

Recently — since it's certainly not being used for travelling — I turned to my minimalist wallet for that purpose.

Minimalist Wallet by eSheep Designs
Minimalist wallet as coupon keeper...

Its three compartments make it somewhat easier to sort my coupons, even though I cannot see them.


Then I came across a tutorial for an origami pouch from Darae at indigobird.ca. Her project finishes out at 6.5" x 4.5". I revamped it to a more compact size to fit my coupon and card needs — about a 3.5" square — and present it to you today as a quasi-tutorial. I call it "almost" origami since it's not quite functional just being folded; it has to be sewn.

Almost Origami Coupon/Card Holder by eSheep Designs
Front view...

But once it is sewn, you'll have five compartments in two different heights, perfect for keeping gift cards and coupons in one place. As you can see from the picture at the top of this post, I was able to fit a card horizontally into the middle pocket. (If by chance you end up with tighter seam allowances, cards will still fit vertically.)

Almost Origami Coupon/Card Holder by eSheep Designs
Back view...

Exterior fabric is my Medium Bouncing Ox (Red), backed with remnants of the jumbo yellow and gray version left over from my personal project portfolio.

The inspiration tutorial from indigobird provides a downloadable template for foolproof results. You can DIY my smaller version with a sheet of letter size paper (8.5" x 11") by folding it into thirds.

Almost Origami Coupon/Card Holder by eSheep Designs
Divide a standard 8.5" x 11" sheet of paper into thirds...

Eleven inches divided into thirds is 3.66666 inches, but I didn't bother measuring that out. Instead, I just started folding a sheet of paper. It is derived from origami, after all.

Almost Origami Coupon/Card Holder by eSheep Designs
How to fold...

It ends up that two panels 3 5/8" wide and one panel 3 3/4" wide makes up about 11". (If you live in the metric world, you can go with 9.3cm per panel.) The process is for one side to fold in on top of the centre panel, the other side to fold in on top of that, the bottom part to fold upwards and then the top flap to fold down.

While origami usually requires some level of precision, this one doesn't need to be perfect. (Those of you who can make out the pencil marks on my template can see that the original measurements don't match the text that I overlaid on the image.) If you can fold the sheet to the approximate dimensions, I'd say you're fine.


Watch live classes for FREE at CreativeLive! Sign Up at CreativeLive
[affiliate link]


The next step is to use the template to cut two pieces of fabric — one exterior, one lining — and one piece of SF101 (or equivalent) interfacing. (The SF101 is applied to the exterior fabric.)

When using the template to cut fabric, add a seam allowance around it; I used 1/4" or 6mm. For the SF101, use the template as is. OR, you may prefer to cut the interfacing first, fuse it onto your exterior fabric and then cut around the fabric with your desired seam allowance. You can then use this finished piece as a template for the lining (just make sure to stack fabrics right sides together).

Almost Origami Coupon/Card Holder by eSheep Designs
Cutting and interfacing, then trimming and prepping the seam...

Again with the fabrics right sides together, sew around the perimeter, leaving a turning gap on whatever side that you will be folding first (the right side in my case).

Clip the corners and taper the seam allowance near the corners. Then take the whole thing to your ironing station and press one side of the seam open as shown in the last picture above. (This will make your edges neater when you turn it right side out.)

Almost Origami Coupon/Card Holder by eSheep Designs
Starting with one piece...

Turn it right side out and press, press, and press to ensure that you have a crisp starting point before you fold.

Almost Origami Coupon/Card Holder by eSheep Designs
Making the folds...

Fold and press as shown above. Remember that the side that has the open turning gap should be folded inwards first. Secure by sewing as close to the edge as possible.

Make the second vertical fold and sew that side down as close to the edge as possible. Then stitch across the lower horizontal fold line to create the bottom set of pockets, and fold up. Press again.

Almost Origami Coupon/Card Holder by eSheep Designs
Hand sewn sides...

To finish, stitch up the lower sides. I could not for the life of me get my sewing machine to go through all of those layers, so I hand sewed this part. The advantage of doing so is that you can get right at the two layers that need to be held together instead of punching your needle through all of them.

All that's left is to install a snap fastener to the top flap and first layer of the bottom pocket.

Almost Origami Coupon/Card Holder by eSheep Designs
A five-pocket coupon and card holder...

I'm not giving instructions on how to do that; any packet of snap fasteners will offer directions for installing them.


Check out crafty classes at Creativebug!
[affiliate link]


And here is what the final item should look like. This is the top pocket.

Almost Origami Coupon/Card Holder by eSheep Designs
Last pocket? First pocket?

You can see from these pics where the lining fabric shows up, if that's an important consideration for how you want to allocate your fabric.

Almost Origami Coupon/Card Holder by eSheep Designs
Four remaining pockets...

This can be just as handy as a minimalist wallet in that there is ample room for coins (as long as they're kept in the top pocket, they'll stay put), paper money and cards. You can't beat it for simplicity, given that it's "almost" origami.

'Til next...

Saturday, 9 May 2020

The Hidden Challenges of Making Bifold Wallets

JSdaily Small Card and Coin Wallet crafted by eSheep Designs
A mini wallet made out of home dec remnants...
Presenting my drapery panel and duvet cover bifold wallet... with a scrap of linen thrown in as trim.

Several weeks ago, I mentioned being in the market for a minimalist wallet. The one featured in that post was about as minimal as I wanted to get. It had three separate pockets for coins, cards and bills and still folded up into a compact unit.

Today's wallet more closely resembles the one I am effectively replacing, being roughly the same size and capable of carrying bills without folding them first. There are also more card slots and the coins are carried in a zippered pocket.

Comparing minimalist wallet side by side with today's bifold wallet...

This is another YouTube project, from the same channel that brought the convertible backpack/sling bag to my attention (JSdaily). The exterior of the wallet is actually made out of the same fabric as that bag.

JSdaily Small Card and Coin Wallet crafted by eSheep Designs
Almost the exact dimensions as my old wallet...

As you may have guessed from the title of today's post, however, the discussion that follows will not just be a standard show and tell. (Do I ever just do a standard show and tell? I don't think so; there's always some aspect of the "making" part that's worth sharing in greater detail.)


Today I'm going to enumerate all the reasons why I wouldn't recommend a bifold wallet as a beginner project or why you should never attempt one until/unless you're 100% committed.

What do I mean about that last part? Well, sometimes we fall into the sewing doldrums and just want to make something to snap out of it. Under those circumstances, don't choose a "simple" bifold wallet... not unless you're prepared to be fully engaged and thorough about the project. (Who knows, maybe now is the right time to be committed.)

JSdaily Small Card and Coin Wallet crafted by eSheep Designs
Both wallets have a zippered pocket on the other side...

A basic bifold might appear to be a quick and easy make, but the process can actually be extraordinarily finicky. More so than making a long wallet, believe it or not.

I have the experience to back up that opinion. A few years ago, I made a bifold wallet for my cousin from scratch and ran into several issues that eventually took months to resolve. The time it took was in large part due to the fact that until I was in the right mindset to finish it, I knew it wouldn't go well.

By contrast, the two long wallets that I've made were executed much more smoothly.

JSdaily Small Card and Coin Wallet crafted by eSheep Designs
View of the (6) card slots...

The first challenge of sewing up a bifold wallet is that it has to end up with a defined symmetrical shape; all edges or sides must be carefully constructed in order for the finished item to look nice and neat and not "I made this by the light of a camp fire".

Which is not to say that most other things we make don't have a defined symmetrical shape. It's just that a bifold tends to be small, so any inherent wonky-ness is sure to be noticed and noticeable.

This is where you need to take your time and be patient. Pay strict attention to your seam allowances, sew as straight as possible and maybe hand crank over card slot folds that end up being six layers thick. (Tip: start with the right needle and preferably a new needle.)

JSdaily Small Card and Coin Wallet crafted by eSheep Designs
Original zippered pocket before a zipper facing was added...

Secondly, while most of us make our first wallets out of fabric, oddly enough, a small wallet is one of those rare things that's easier to sew out of vinyl, leather or some other substrate that doesn't fray and require turned hidden seams. (Tip: consider trimming your fabric seam allowances in a stepped fashion on each layer — called grading — so that you don't end up with overly thick finished seams.)

Further to the challenge of using fabric, it's crucial to select material with the right weight for the job. If you choose a heavier fabric for the exterior, don't try to use it for the lining. If you want matching sides, the best option might be to use interfacing to bulk up a light weight fabric for the outside.

In this recent post about my past sewing failures, one of them was a bifold wallet that was attempted with an unwise choice of heavy weight fabric. It's a permanent failure.


Watch live classes for FREE at CreativeLive! Sign Up at CreativeLive
[affiliate link]


The third challenge of bifold wallet making is that even if you're patient and meticulous and have chosen the best materials, the final test of putting it to use can send you right back to the drawing board.

This isn't likely to happen if you follow a purchased pattern that's been tested, but beware if you use a free tutorial (or try to figure it out on your own). Once you fill up the wallet with coins, bills and cards, you might find that it doesn't close properly or simply doesn't look right because it's too lumpy in the wrong places.

JSdaily Small Card and Coin Wallet crafted by eSheep Designs
Experimenting with a zipper facing...

I watched this tutorial as soon as it was released (January 20) and put it on my list to rewatch and make, but I didn't get to it until a month later. (It was the "needing to be in the right head space" thing.)

My fabrics were chosen early on, however. I knew I had enough of the pink twill from the curtain panel (first used on the Oriole bag and matching pouch) to make this wallet match my convertible sling bag.

The black and white leafy print fabric has been seen here before (too many times to mention) and I've previously reported that it's a very thin microfibre. That made it an ideal choice for the card slots and basically for the entire lining.

JSdaily Small Card and Coin Wallet crafted by eSheep Designs
View of bill pocket interior...

If you think about it, many wallets that you buy have nylon pocket linings and card slots. While potentially slippery, that kind of fabric is easier to sew when stacked up several layers thick.

The top edges of my card slots were interfaced, but the Decor Bond pieces were carefully cut to stay out of the side seam allowances (as per the tutorial). Since the exterior is twill, I skipped the interfacing there and instead fused it onto the lining side. (Not to be confused with the bill pocket lining, which was left as is.)

JSdaily Small Card and Coin Wallet crafted by eSheep Designs
Open exterior view...

I had just enough of the "linen" to put a strip of it across the front of the wallet. Once it was zigzag stitched on, I attached a brad and added a couple of rivets. (Really loving the rivets these days!)

Note that the decoration on this side of the wallet is not something that the tutorial includes. If you want to add it, place it just a bit lower than the measurement for the zipper placement at the other end.

JSdaily Small Card and Coin Wallet crafted by eSheep Designs
Close-up of decorative linen strip, brad and rivets...

The snap fastener set that I used here came to me in a large package without tools. I've had consistent issues with installing them (there's a picture of them in this post) and this time was no exception. I keep a fabric scrap with a set attached to it that I use to gauge whether or not one works, and the two parts on the wallet "snapped" fine against it.

However, when I tried to snap the actual wallet closed, it would not close for the life of me! Long sigh later, I correctly assumed that it wasn't the end of the world and that I wouldn't have to take apart the entire wallet to put in a new set. There had to be a solution. With the help of a pair of needle nose pliers, I widened the opening on the receiving end and it did the job.

JSdaily Small Card and Coin Wallet crafted by eSheep Designs
Filled up with 10 assorted coins, 4 bills, 4 credit cards and 6 business cards...

The above shows how this particular wallet looks when filled up with stuff; it's definitely workable. (By the way, it's worth mentioning that I interfaced the coin pocket lining with SF101. My old wallet has a tear in the coin pocket lining and I think you'd agree that often, it's our heavy coins that cause the most damage to a wallet.)

This last photo is a close-up of my (failed?) attempt at getting a cleaner looking topstitch around the zipper by adding a black facing around the zippered pocket opening. The original stitching around the zipper wasn't bad, but my eyes kept being drawn to the clearly visible back stitching at the beginning and end.

JSdaily Small Card and Coin Wallet crafted by eSheep Designs
Doh!

Obviously, I should have pulled the threads to the back and knotted them instead of back stitching. It's what I eventually did on the zipper facing above. However, I did a poor job of aligning the stitching on said facing!

Oh well.

See what I mean about needing to be fully engaged when making a "simple" bifold wallet?

Final word on this tutorial? It's a good one; JSdaily's videos have a proven track record with me and I wouldn't hesitate to recommend her projects. She makes it all seem so easy.

[To minimize broken links down the road, I avoid including external links as much as possible these days, but you should have no problem at all finding this tutorial by searching for youtube jsdaily diy small card and coin wallet; as I stated above, the video dates back to January 20, 2020.]

'Til next...


Saturday, 28 March 2020

Searching for a Minimalist Wallet

Asaco's Craft Memo Minimalist Wallet crafted by eSheep Designs
One of Asaco's Craft Memo's minimalist wallets...
Do you take your regular purse and wallet with you when you go on vacation?

Whenever I travel — particularly if it's out of country — I take a small wallet that holds just the essentials. It would fit the description of what is known as a minimalist wallet. I've had it for many, many years and with the coin pocket lining now torn (although glued for the time being), I've been thinking about making a replacement.

It needs to hold paper money, coins and no more than a couple of cards. My preference would be for a zippered pocket for the coins instead of a snap fastener. I'm not a cash carrying person at the best of times, so any wallet of mine would never need to hold a lot of bills. If the whole thing could fold up into a small package, that would be ideal.

Do an online search for minimalist wallets and you'll get results that are truly minimal. The majority of them would not have any capacity to carry coins and many of them incorporate some sort of elastic band in their design. Again, truly minimal. They also tend to be made out of leather, which requires little finishing and therefore no bulky seams.

Asaco's Craft Memo Minimalist Wallet crafted by eSheep Designs
This version is quite usable with three separate compartments for cash, cards and coins...

While a wallet of this description doesn't have to appeal to any specific gender, most of the minimalist wallets I see online are obviously masculine in design.

Am I asking too much for a minimalist wallet that's not so utilitarian?


Check out crafty classes at Creativebug!
[affiliate link]


Once again, I turned to YouTube for inspiration and found three designs on a channel called Asaco's Craft Memo. The one shown here is from a tutorial uploaded March 22, 2019. I like that it's simply constructed, while still providing three separate places to store cash, coins and cards.

Asaco's Craft Memo Minimalist Wallet crafted by eSheep Designs
Meets my needs for a travel wallet...

Not only that, it's super easy to make. I think I turned this around in half an hour (after watching the video a couple of times, of course).

Asaco's Craft Memo Minimalist Wallet crafted by eSheep Designs
Only requires three main pieces of fabric...

If you don't count the small square for the optional tab piece, this mini wallet requires only three rectangular pieces of fabric, of which two are interfaced. You can make one with just half of a fat quarter.

Asaco's Craft Memo Minimalist Wallet crafted by eSheep Designs
Only part I don't really care for, but it's hidden inside...

The "turning right side out" process ends with a couple of open edges visible on the inside of the main pocket. They're not unfinished, but one can clearly see that they're not sewn together. It's not a deal breaker if you're looking for an easy to construct minimalist wallet.

By the way, I was most impressed by what the crafter was using to sew up her project: this tiny little NEX portable sewing machine!

image courtesy of Asaco's Craft Memo channel on YouTube...

It's worth checking out the video just to see this little machine go... and to see her use and make the tailor's sausage that was the inspiration for my tutorial a couple weeks ago!


Watch live classes for FREE at CreativeLive! Sign Up at CreativeLive
[affiliate link]


This YouTube channel also features two other tutorials for tiny wallets.

This first one — which has an exterior zippered pocket that runs the width of the folded wallet — may be a possible future project if I can figure out a way to modify it slightly.

Image courtesy of Asaco's Craft Memo on YouTube...

Don't know if you can see it clearly, but the inside card pocket is only sewn to the wallet at one end. I'd like it to be attached at both ends so that bills can be better secured underneath. Sort of like my key case.

This last one is likely something that you've seen before. (Seems like everyone has a version of it.) It opens up into a coin holder "tray" of sorts.

Image courtesy of Asaco's Craft Memo on YouTube...

The YouTube link for this channel's videos is here. You should be able to scroll through and find the three projects easily.

'Til next week, be well, be smart, and above all, be kind.
eSheep Designs
