-->
DISCLOSURE: This blog contains Google Adsense ads and affiliate links via which potential commissions are earned when visitors click through.

Search This Blog > > >

Showing posts with label Pride & Prejudice. Show all posts

Saturday, 5 December 2020

My First Eco Market Bag

Pride & Prejudice Shopping Bag by eSheep Designs
My P&P market bag...
I've brought along a reusable bag for grocery shopping since the early 1990s.

My first one was from Sears, made out of a strong cotton canvas and quite massive. I routinely managed to pack all of my weekly groceries into the one bag. I don't know where it's disappeared to, but I miss it, especially since Sears is no longer with us.

When I started shopping with my mom, I switched over from that single bag to the bags sold by Superstore that are made out of recycled plastic beverage bottles. They're black, washable and strong and I don't think we've managed to wear one out in the many, many years since we first purchased them.

In two of my purses, I also keep a bag handy for non-grocery store shopping. They're made out of nylon; one rolls up and has a snap fastener tab to keep it secured while the other folds up and is stored inside a small pouch. They're both what I call "tank top" bags; as in, they look like a tank top when you lay them out.

When I got back into sewing in 2012 and made my first tote bag, it seemed a natural progression to make a so-called market bag at some point.

So why did it take almost eight years?

Pride & Prejudice Shopping Bag by eSheep Designs
Matching pouch for my eco bag...

Here's the thing: my Superstore bags are durable. Not only that, since I like everything about them, I have no reason to replace them. Mainly though, making a market bag requires a significant amount of fabric — even the simple tank top style that I described — and for that alone, I can't rationalize going to the expense. (Especially since those Superstore bags only cost me a buck each when I originally bought them.)


Watch live classes for FREE at CreativeLive! Sign Up at CreativeLive
[affiliate link]


Yes, uses too much fabric at too high of a cost is another of my sewing dilemmas. It's why my eyes pop when I see projects described as needing "only two yards!" Only?

As a person who doesn't have a large fabric stash to burn through, I have to consider carefully the material requirements of a project before committing to it.

Pride & Prejudice fabric by eSheep Designs
A new version of my Pride & Prejudice fabric...

That said, back in April, Spoonflower held one of their popular fat quarter BOGO sales. (They were subsequently overwhelmed by the response, as they did not fully realize how many people were interested in making their own face masks with custom fabrics.) I decided to give one of their newer substrates — organic sweet pea gauze — a try.

Pride & Prejudice Shopping Bag by eSheep Designs
My method of constructing a market bag with one fat quarter of
Spoonflower's organic sweet pea gauze...

At $5.85 (net cost to me) for a 28" x 18" fat quarter, it was well within the ball park for what I wanted to pay for a market bag featuring a new version of my P&P fabric. (What's new about it? The text in red used to be black.)

Pride & Prejudice Shopping Bag by eSheep Designs
Had just enough fabric to make a bag and a pouch to store it in...

I decided that I would make a smaller version of one of those "tank top" bags with it. It would be unlined and I would have to piece together the front and back since I didn't have the unbroken length of fabric that's usually required for this style of bag.

Even though this gauze is thin and it's only one layer, once it's folded up in the traditional way (and stuffed into the little pouch that I was able to make out of the leftover fabric), it's got a bit of bulk.

Pride & Prejudice Shopping Bag by eSheep Designs
It doesn't fold down into as thin a package as I'd like...

If you use some kind of nylon, you'll definitely end up with a more compact unit.

Pride & Prejudice Shopping Bag by eSheep Designs
View of the side seams...

Since the bag is unlined, I rolled the seams to hide the raw edges as much as possible. The bottom corners are boxed.

Pride & Prejudice Shopping Bag by eSheep Designs
Used some scraps to cover the seam under the two handles...

I protected the stress points and seams on the handles by sewing on some reinforcing pieces of gauze. (They were taken from the borders that surround every piece of Spoonflower fabric.)


Check out crafty classes at Creativebug!
[affiliate link]


Many, many variations of this basic bag pattern are available on the internet. Some, like this one, are unlined. Shabby Fabrics has a video tutorial of an unlined version that has a partial inside facing at the top, so that the handles and the opening of the bag show a bit more "nicely". (I mention it because I happen to have the pattern saved.)

Pride & Prejudice Shopping Bag by eSheep Designs
I couldn't have fussy cut this any better had I tried...

Still others are fully lined and some might even be reversible. Some include a built in pocket that the whole bag can be folded into; the famous "strawberry" bag being a well-known variation of this design.

Pride & Prejudice Shopping Bag by eSheep Designs
It's small, but perfect for carrying unexpected purchases...

With stores in our area welcoming back reusable bags, my main objective with this one is to have something on hand to carry small purchases. (This one stays in my crossbody sling bag.) For groceries, I'll still rely on my Superstore bags.

How about you? Are reusable bags once again part of your shopping routine, and if so, are they handmade or store bought?

'Til next...


Saturday, 12 September 2020

Mini Drawstring Pouch

Ae PooiM DIY Mini Coin Pouch Bag crafted by eSheep Designs
A mini drawstring pouch...
I was very tempted to add "not another face mask" in front of the title of this post, because at a certain point while I was making it, it reminded me of a face mask.

Perhaps it's the curved shape of the pouch with two ends that stick out. (Or maybe we're just all starting to see face masks in everything.)

In any case, this project is not a face mask, but if your face mask is as basic as mine is, you might use this pouch to carry it around. That's exactly what I thought of when I first saw it.

It would also come in handy to carry a shopping bag, even if it's a simple plastic one that gets reused.

Or fill it with chocolate gold coins and give it as a stocking stuffer to a special someone.

This is another YouTube project, uploaded by Ae PooiM on August 24, 2020. She calls it the DIY Mini Coin Pouch Bag.

Ae PooiM DIY Mini Coin Pouch Bag crafted by eSheep Designs
My mask has its own home...

I was drawn to it by the looks and unique construction method. As drawstring bags go, this one is different.

As you might already know, I want "different" when I search for things to make and this one checked off that requirement. The fact that it's finished with sixteen little eyelets might put you off, but you have to admit that it gives the pouch an upscale vibe.


Shop Roostery for Custom Home Decor


I'm often guilty of putting my foot down and saying no, that's too much hardware when it comes to the expense of a handmade bag. But y'know what? Every now and then, you have to make an exception and treat yourself.

Ae PooiM DIY Mini Coin Pouch Bag crafted by eSheep Designs
Used up almost all of the gold toned eyelets...

This little pouch is meant to go with my Goddess of the Sea purse, a project that involved an above average amount of hardware, in my opinion. The gold toned eyelets and black drawstring match the embellishments on the bag.

Ae PooiM DIY Mini Coin Pouch Bag crafted by eSheep Designs
Goddess of the Sea bag with matching mini drawstring pouch...

Let me say that it took longer to locate, punch holes for, and then install the eyelets than it did to do the sewing part. Still, the project can be classified as a Quick Craft Mondays type of thing.

Ae PooiM DIY Mini Coin Pouch Bag crafted by eSheep Designs
Sixteen eyelets are not blingy enough... must add two rivets!

In between shooting these photos, I even decided that the ends of this pouch needed a couple of rivets. Truth is, I rarely choose gold hardware, so being in a position to use these is actually a good thing.


Watch live classes for FREE at CreativeLive! Sign Up at CreativeLive
[affiliate link]


I mentioned the unique construction of this pouch. The sides are made up of two folded circles, which means that the lining and the exterior on each side are from the same piece of fabric.

Ae PooiM DIY Mini Coin Pouch Bag crafted by eSheep Designs
Didn't want to have any text going upside down...

With my P&P fabric having text that generally runs in one direction, I didn't want to end up with half of it upside down, so I made sure the circle was folded in such a way as to have the text run from side to side.

Ae PooiM DIY Mini Coin Pouch Bag crafted by eSheep Designs
... so chose to run it from side to side

The gusset is made up of two rectangular pieces of fabric, which in my case featured text again. (The YouTube tutorial provides the necessary dimensions of all pieces required, but I didn't have enough of my P&P fabric — leftovers from the Goddess bag — to harvest 18cm circles. I went with 16cm circles and 28cm long gusset pieces.)

Ae PooiM DIY Mini Coin Pouch Bag crafted by eSheep Designs
View of interior...

You may remember when I made the "not another face mask" basket that I mentioned that the seam allowance of the interior could be adjusted to tighten up the lining. Well, this tutorial instructs you to sew the interior/exterior sides with two different seam allowances... a distinction that I almost missed.

Ae PooiM DIY Mini Coin Pouch Bag crafted by eSheep Designs
Cordage is black paracord...

The measurements are in metric, but the idea is to have the inside seam allowance be a little bit over (7mm) and the outside seam allowance be a little bit under (5mm) 1/4" (which is usually stated as 6mm).

It was a surprising level of attention to detail that was totally unexpected.

Ae PooiM DIY Mini Coin Pouch Bag crafted by eSheep Designs
Used a plastic cord lock instead of sewing one (as tutorial shows)... 

I hadn't had a chance to use any of these cord locks that I purchased a few summers ago, so instead of sewing one out of fabric per the tutorial, one of them came to my rescue.


Check out crafty classes at Creativebug!
[affiliate link]


For anyone who might be thinking, well this is all very precious but it's too small to be of any use to me, consider that this can easily be up-sized into an actual bag for you to carry.

Ae PooiM DIY Mini Coin Pouch Bag crafted by eSheep Designs
View of bottom...

Look up a video tutorial uploaded to YouTube on August 13, 2019 by Diy Soho, called drawstring bag. It's the same concept done up as a purse.

Ae PooiM DIY Mini Coin Pouch Bag crafted by eSheep Designs
Can you imagine this as a purse?

It's oriented differently, with the "ends" serving as the front and back of the purse. One of the ends would be shortened up (the front) and the other (the back) lengthened to be folded over as a flap. The drawstrings would come out from the two sides to function as straps.

I think it'd be cool.

'Til next...

Saturday, 7 March 2020

Pride & Prejudice Five Years On

Latest bit of P&P bling on my
Goddess of the Sea bag...
Fellow designers will know what I mean when I say that it's the height of excitement to see something online made by someone using your creation. That creation can be a pattern or a tutorial or — in my case today — my Pride & Prejudice fabric sold by Spoonflower.

It's been almost five years since the idea came to me to combine two of my favourite things: P&P and sewing. By some stroke of luck, it turned out that those were not just two of my favourite things, they had an appeal beyond what I ever anticipated.

Since I first uploaded my designs to Spoonflower in 2015, I've actually sold seven other fabrics apart from the ones in the P&P collection. However, I have no idea what became of those other fabrics, despite my standard thank you message to the buyer saying that I'd be thrilled to see what was made with the purchase.

Pride & Prejudice being as popular as it is, I've been far more fortunate to have had a peek into what those fabrics have been turned into over the years.

Allow me some time today to share some of my findings and introduce some talented crafters to you.


Check out crafty classes at Creativebug!
[affiliate link]


I don't know whose dog this is, but by golly, Mr. Darcy sure is cute in a whole new way!

Mystery Mr. Darcy dog

Whose dog is this??

I found these images on a Google search some time ago and there wasn't an associated credit attached to them. As I was preparing this post, I could no longer find the images online at all.

Before you think a dog's tux is the most unusual project you've ever seen for some P&P fabric, take a look at this.

Pride & Prejudice fabric covered shoes by Dawn Chaplain
Custom P&P pumps by Dawn Chaplain...

That's a pair of pumps, custom covered by Dawn Chaplain (who sells her creations in her toocutediapercakes Etsy shop). While I can't imagine them being comfortable to wear (and I'm not talking about the height), she has apparently sold these types of shoes to many satisfied customers. Kudos to her!

Another Etsy seller named Jen creates custom headbands and bows and sells them from her shop called JensEnchantedBtq.

Pride and Prejudice fabric covered headband by JensEnchantedBtq
P&P Headband sold by JensEnchantedBtq on Etsy

Unfortunately, a narrow item like a headband doesn't convey the fabric's pattern as well, but the text is legible for one to get the gist of it.

With each designer's permission, Spoonflower also sells fabric via Amazon, eBay and Etsy; I've actually had sales via all three marketplaces. Imagine my surprise, however, when I found this on Amazon.ca:
P&P pencil case sold on Amazon.ca by DmiGo...

This pencil case/pouch thingie sells for $12.99 (CDN; shipping not included) and comes trimmed in your choice of black, blue or pink. The shop is relatively new and has no feedback attributed to it, but I certainly got a kick seeing my fabric featured like that.


Watch live classes for FREE at CreativeLive! Sign Up at CreativeLive
[affiliate link]


Last June, I received a heart-warming email of appreciation from a fellow sewing enthusiast named Colleen. Through subsequent messages, we found out that we're almost neighbours (separated by a "mere" 300 km) and that we share a passion for Pride & Prejudice. Of course, this led to her purchasing some of my fabric, which she has been using very creatively in her sewing projects. (Despite her claims that she's not creative at all — LOL!)

Here is one of her takes on the Summit Pack.

Pride and Prejudice Summit Pack by Colleen C
Cloudsplitter's Summit Pack crafted by Colleen...

This is a more recent project, an interpretation of Noodlehead's Explorer Tote (large version). Colleen works with a lot of found items and recycled fabrics. The black that you see here had a previous life as a denim jean. Like me, she's also been known to reclaim hardware from old (and ugly) purses.

Pride and Prejudice Noodlehead Explorer Tote by Colleen C
Noodlehead Explorer Tote crafted by Colleen...

A couple of weeks ago, she said that she wished my fabric came in a navy blue/white combo because she had greater opportunities to source out blue denim. Guess what happened?

That's right, I now have two new colourways in my P&P collection.


New white on navy and navy on white P&P fabric (mock ups courtesy of Roostery)...

The new fabric will be winging its way to her shortly. Perhaps in the near future, I'll be back with another P&P update, this time with a focus on navy.

By the way, Colleen is one of those fortunate individuals who is happy sewing the same projects repeatedly and is — in my opinion, anyway — quite prolific. (She's probably sewn close to ten Summit Packs.) If you're interested in purchasing her work, I'm sure she has something that she can sell you or she might be convinced to custom make an item. Give her a shout out in the comments below if you want to connect.


Saturday, 18 January 2020

Customizing a Goddess of a Bag

Goddess of the Sea Shoulder Bag crafted by eSheep Designs
Unique zippered side gusset pockets of my new bag...
Back in the fall, I came upon a relatively new purse pattern from Needle and Anchor Supply Co., by designer Carissa MacNaught. Its elevated name — Goddess of the Sea — struck me more than its looks at first, but upon closer examination of the photos that testers had uploaded of their finished bags, I became quite intrigued by the zippered side gusset pockets. (Because as you may recall, I love side gusset pockets!)

With the main body of the bag being a relatively simple shape, my first thought was to put on my thinking cap and "hack" it.

But my second thought was, why not just support the designer and buy the pattern?

Then my third and final thought was, do I really need another purse?

A quick check through the posts here on this blog verified that I've been using the same bag for a year... my Frankenpurse, aka Seth bag. With that in mind, I gave myself permission to tackle a new one and started planning for it.

The rest of this post will detail — in great length (Long Post Warning!) — how I went about customizing and executing this project.


Check out crafty classes at Creativebug!

[affiliate link]


Select & Allocate Fabric


This is often a hugely time-consuming step for me, given the constraints of my modest fabric stash. For this project, however, I knew from the beginning what fabric I wanted to use.

When I sold my first few pieces of P&P fabric via Spoonflower, I had it in mind to make a purse out of it at some point. Over the past several years, while other people have made P&P bags, my own plans have largely stalled. (Although I did make a key keeper coin purse out of a couple of swatches.)

Goddess of the Sea Shoulder Bag crafted by eSheep Designs
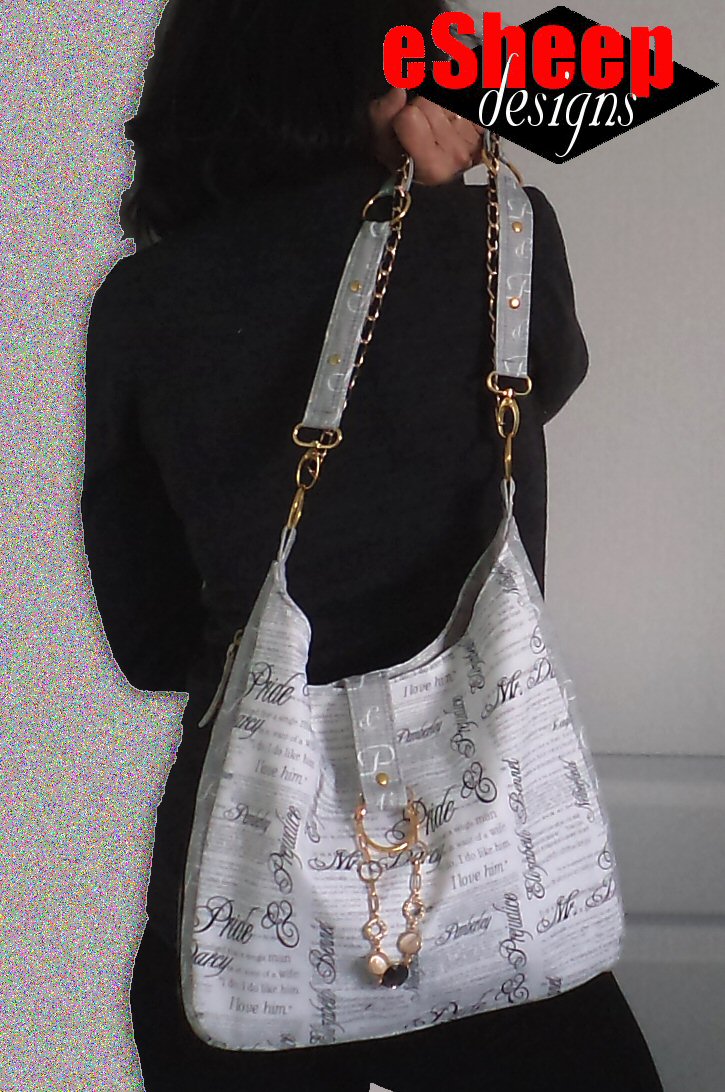
My P&P Goddess of the Sea bag...
These two selections are Pride & Prejudice Text (in White) and P&P — Light. During Spoonflower's 50% off fat quarters sale in November, I picked up a fat quarter of each in lightweight cotton twill. Not only is it heavier than a basic quilting cotton, it comes in a wider width, which I figured would meet my needs for this purse (by that I mean the exterior needs; the lining would be something else).

I still hadn't bought the pattern when the fabric arrived, so my initial fabric allocation plans were preliminary at best. At first, I wanted to use some black twill to provide contrast, mainly because my supply of continuous zipper tape was black... but that would have meant using it for the lining and who wants a dark lining? Then I found a large remnant of this Jysk pillowcase that was last used for my recipe box project and decided that the light grey paisley would be the perfect complement to both P&P fabric selections.

But did I have enough? As it turned out, I ultimately needed extra fabric for all of my pocket linings. For those, I went with a black and white microfiber that I last paired with the same paisley on this project, originally a Jysk duvet cover.

Goddess of the Sea Shoulder Bag crafted by eSheep Designs
Apart from the gusset pockets, it's a simple design...

My original plan was to use both fabrics for the front and back of the bag; i.e., half of each on each side, much like my Seth bag. Once I had the templates to lay down on the fabric, I decided that it would look better to stick with one print on the front and back panels, and use the other on the sides and strap/trim.

Goddess of the Sea Shoulder Bag crafted by eSheep Designs
The inside of one of those zippered side gusset pockets...

Choose Hardware


All of my handmade bags to date have been trimmed with silver-toned hardware; it's all I buy. With this bag being predominantly white, gold accents seemed a "warmer" choice. Fortunately, I already had what I needed in that department.

Some three years ago, I picked up a second-hand white vinyl purse in order to harvest the following:

A crap load of gold-toned hardware to reuse...

The purse itself was discoloured in spots, so I never kept any more of the vinyl than what you see here. But it was a huge score on the hardware side.

For this bag, I used five rings and two lobster clasps. I took the two zipper pulls off the long white zipper and installed them on some black zipper tape for the side gusset pockets. The white zipper with the identical vinyl zipper pull was ultimately used for a vertical zippered pocket that I added to the back side of the bag.

Oh, and lucky for me, the rivet set that I bought last year came with gold toned rivets. (I ended up using twenty-nine of them on this bag!)

With fabric allocated and hardware organized, the real work could begin.


Watch live classes for FREE at CreativeLive! Sign Up at CreativeLive

[affiliate link]


Plan & Document Modifications


I don't generally make bags without adding or taking away stuff. That's been the case since the first bag that I ever made, the Professional Tote. Nowadays, I'm just more organized about it and write down my changes so that I know what else I need to modify in order to make them work.

Goddess of the Sea Shoulder Bag crafted by eSheep Designs
Full view laid out...

Let me state for the record that I like to maintain the spirit of the design when I add or subtract things. I don't see the benefit of changing something to the point where it's no longer recognizable as the source, because then it's really not so much a salute to the designer as look what I can hack your pattern into. It's why I prefer to use the word "customize" to describe what I end up doing.

So what did I plan to customize?

I wanted to add detachable lobster clasps to the strap, to allow more freedom in sewing it up, since it would then be separate from the bag. However, those clasps would add to the strap length, so I had to figure out a way to shorten the strap. (This ended up being accomplished by using the same template for all three sections of the strap; the middle section is normally longer.)

Goddess of the Sea Shoulder Bag crafted by eSheep Designs
All blinged out...

Modifications planned for inside of the bag were partly forced by my diminishing supply of lining fabric. A large full width divided patch pocket had to be ditched in favour of a smaller one, to which I would add a pen loop (as previously detailed in my handy hacks for handmade bags post).

Goddess of the Sea Shoulder Bag crafted by eSheep Designs
Modified interior of bag...

I also wanted two other interior pockets: an open slip pocket (essentially a zippered pocket without the zipper) and a standard zippered pocket. This bag closes at the top with a magnetic snap, so having a zippered pocket on the inside is good for security.

Goddess of the Sea Shoulder Bag crafted by eSheep Designs
Filled to the brim...

Of course, I would also add my handy little hanging loops (also previously described in my handy hacks post) to both ends of the bag. With my generous supply of rivets, I ended up using a few more to add some upscale touches to the pocket and loops.

Goddess of the Sea Shoulder Bag crafted by eSheep Designs
Three things attached to one hanging loop...

One change that I wanted to make that wouldn't be noticeable to anyone except the original designer was a longer zipper "tab" at the top of the gusset pockets. I didn't like the idea of the zippers reaching up that high on the side of the bag, thinking it would create bulk in an already narrow area. The solution would be to double the length of the zipper tabs and take away the corresponding added length from the zipper tape.

Goddess of the Sea Shoulder Bag crafted by eSheep Designs
View of the base where I added some rivets instead of purse feet...

I suppose another inconsequential change is that I didn't need to install any purse feet. (The bottom of my bags would never touch a floor — I use a purse hanger — and the only purse feet I have are silver toned.) To amp up the sparkle level, though, I planned to add rivets to the base.

The only really radical modification I had in mind was for the front and back panels. The original pattern called for both to be sewn together from two mirrored pieces of fabric. I didn't want my white fabric to be sliced down the middle — i.e., spoiling the continuity of the printed text — so my plan was to use the lining template and cut the front panel as one piece.

Goddess of the Sea Shoulder Bag crafted by eSheep Designs
This is the (modified) back side of the bag...

As for the back side, I knew I wanted another vertical zippered pocket (like the one that I added to my Seth bag). However, the way in which this pocket ultimately rolled out was a bit of an accident... which will be explained in the next section.

Cut & Sew


Once I decided that the grey fabric would be mostly trim and contrast, I starting cutting pieces for that fabric, for the lining, and all of the interfacing. As I've said before, I'm slow at cutting, so that task — along with the fusing — took place over a couple of days at least.

After much consideration, I was forced to take the front panel piece from smack dab in the middle of my fat quarter in order to get a centered (fussy) cut. I actually pondered the decision for almost ten days, knowing that it would require the back panel to be pieced together.

Fussy cutting is not my preference if I can avoid it. For a front facing panel on this bag, however, it had to be done to showcase the fabric in the best way.

Goddess of the Sea Shoulder Bag crafted by eSheep Designs
My modified vertical zippered pocket open...

Unfortunately, I totally forgot about fussy cutting the front facing closure "tab" that overhangs the front of the bag.

See all those various sections of strap? They're made out of equal lengths of the grey fabric, which I cut one after another starting at the left edge of the fat quarter. The closure tab piece was placed at the very beginning, and as it turned out, the "P & P" letters weren't centered from side to side down the length of the strip.

That's when I decided to fussy cut a whole new strip for the closure tab and use the original strip as a bit of contrast to tie together the two pieces of the back panel. Since it couldn't be cut as a single piece anyway, why not have a different fabric in between the two halves so that the non-continuous text wouldn't be a distraction?

In the end, I rather like the way the grey fabric seems a perfect background for the white zipper.

Goddess of the Sea Shoulder Bag crafted by eSheep Designs
For an idea of scale...

The sewing part took place over two and a half days and progressed smoothly... well, as smoothly as could be with about a ten day gap in between. I had the strap and lining more or less complete before I set them aside to think about the exterior.

The designer likes to use double-sided tape, but the thought of my sewing machine possibly getting gummed up with it was enough to have me opt out. It's not a requirement; over time, I've learned to keep zippers in place quite well with just a couple of pins and my fingers while sewing. For the strap pieces, a good press with a hot iron should be sufficient if you're also hesitant to use the tape.

As I stated at the top of this post, the bag itself does not have a complicated design. The gusset — despite the added functionality at the sides — is put together like a regular gusset.

Add Finishing Touches


Most of the rivets were installed as I finished each component (i.e., base, strap segments, closure tab, hanging loops, interior slip pocket), but there were a few more to put on after the bag was done. (In between my photo shoots for this post, I added a couple at the end of each of the zipper pulls.)

But you've probably noticed the additional bling, right? It comes from this $1 belt that I took apart:

Belts for bags...

By happy coincidence, the black trimmed chain was just the right length to thread alongside the strap. My mother — who is not normally into blinged up bags — thought that this was very elegant.

Goddess of the Sea Shoulder Bag crafted by eSheep Designs
A new way to use a belt...

The dangling jewels add both weight and "designer appeal" to the ring on the front of the bag. One observation I'd like to make is that the ring by itself did not seem heavy enough... maybe mine is just very lightweight?

Goddess of the Sea Shoulder Bag crafted by eSheep Designs
Bling fit for a "Goddess"?

This pattern is classified as "intermediate", but I had an epiphany about the whole classification thing while reading through the PDF the first time. I didn't think this bag was difficult to make at all, and the fact that it's labeled as intermediate is only because you don't get super detailed, "photo at every step" type of instruction. (Although oddly enough, the instructions for installing the magnetic snap were about as thorough as I've ever seen!) Don't get me wrong, there is sufficient here to get the job done, but probably not if it were meant for a beginner.

image courtesy of needleandanchorsupplyco.com
You can find this pattern by searching for "goddess of the sea shoulder bag"; it's reasonably priced at $7.77. An add-on pack with instructions for a recessed zippered closure — among other modifications — is available for another $2.50. (I prefer the open top.) The designer also has a private Facebook group that will provide support if you run into difficulties.

The size of this bag is perfect for me, so the transition from my Frankenpurse was seamless. There are almost the same number of exterior pockets, and my use of a purse organizer made the switch quick and easy. Highly recommended if you're looking for a simple yet stylish bag with some unique pockets.

Quite satisfying to report that after almost five years, I finally have my own Pride and Prejudice purse!