|
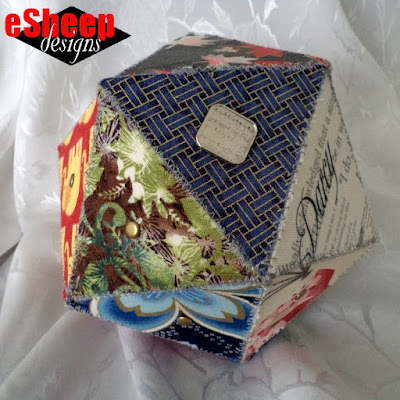
| An icosahedron (ai·kow·suh·hee·druhn)... |
"Without mathematics there is no art."
So said Luca Pacioli, the fifteenth century mathematician who worked
closely with Leonardo da Vinci, the renaissance artist widely assumed
to have employed the golden ratio in both his science and art
creations. Because this is a sewing blog and not a math class, I am not going
to go into any deep explanation of what the golden ratio is, except to say
that it's an irrational number equal to 1.6180 (...); visually, it's similar
to the rule of thirds that's often recommended for good
composition in photos and art.
If you're actually interested in the math, look up phi
and the golden ratio. Back in August, I picked up a (e)book by
Gary B. Meisner called
The Golden Ratio: The Divine Beauty of Mathematics and am
finding it quite fascinating. (The author's musings can be found on
goldennumber.net.)
|
|
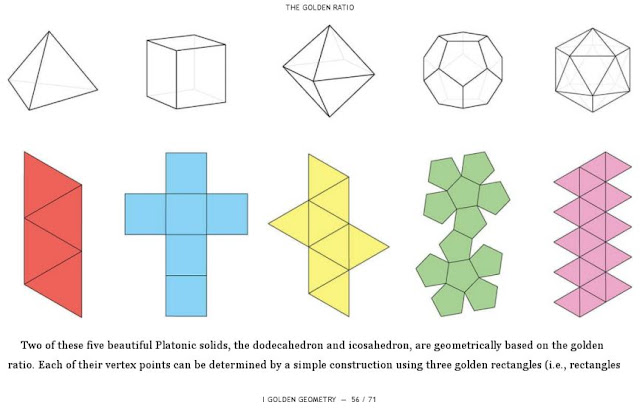
Illustration of Platonic solids from
The Golden Ratio: The Divine Beauty of Mathematics by Gary Meisner |
When I saw the above diagram in the book, I felt a strong pull to make that
twenty-sided polyhedron, because... well, why not? It reminded me of origami
and I was taken with the idea of being able to sew a 3D object that had its
basis in the golden ratio.
Thus begins part two of my series about math in sewing. (My stats last week showed a 29% drop in click-throughs from the week
before. Obviously many readers weren't/aren't interested in the topic...
LOL... which is too bad because there's so much more to come!)

An icosahedron is made up of twenty faces, each one being the same size equilateral triangle. There are twelve vertices, each formed by five triangles coming together. (Apparently if you're into role playing games, you'll recognize the shape as that of a twenty-sided die.)
It's actually not all that difficult to make out of fabric scraps (you can
actually use as few as three different fabrics and not have any same touching,
but you'll have to work out the "how" of that by yourself), as long as you
also have some single-sided fusible Peltex to spare. You'll also
need some clear glue.
Make Template (Using Math!)
But first you need a triangle template, preferably made out of lightweight
cardboard. (I glued my paper template onto a piece of a tissue box.) Go with
whatever size you want, but all sides must be equal.
Follow the method shown here to draw an equilateral triangle.
Start by drawing the base horizonal line. (I made mine 8cm long, which is
just a tad over 3".) Mark the midpoint of this line (in my case, at 4cm) and
draw a vertical line up from there. Then place the bottom of the ruler at
one end of the horizontal line and let the other end of the ruler cross over
the vertical line. Measure out the required length (again, 8cm in my case)
and swivel the ruler so that the length is correct right where it touches
the vertical line. This marks the second side of your triangle. Repeat the
process to draw the third side.
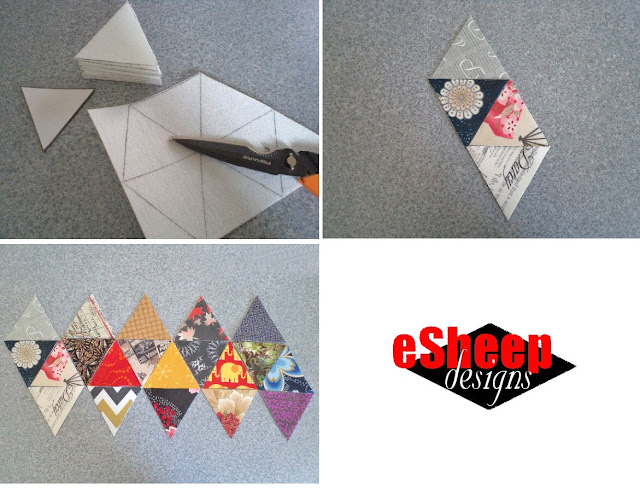
Cut Peltex Triangles
Once you've got your template made, put a bit of double-sided tape on the
back of it – to keep it from sliding around – and use it to trace twenty
triangles onto the Peltex.
|
| Make twenty triangles... |
I managed to find twelve scrappy pieces of Peltex that fit my needs;
the remaining eight were cut from a larger piece.
Fuse Fabric and Cut
Fuse the triangles onto scraps of fabric, let cool and cut away the excess.
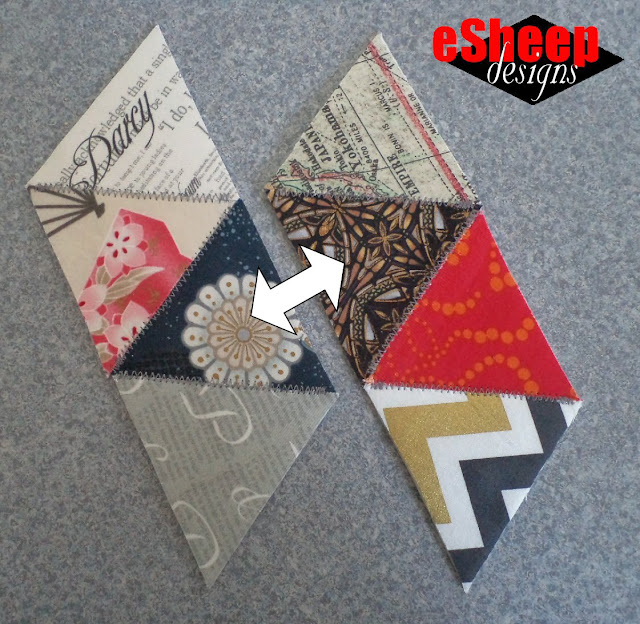
Arrange as desired, in five groups of four as shown above. Take a photo and
get ready to sew.
Sew Pieces Together
You'll use a zigzag stitch to join the pieces together.
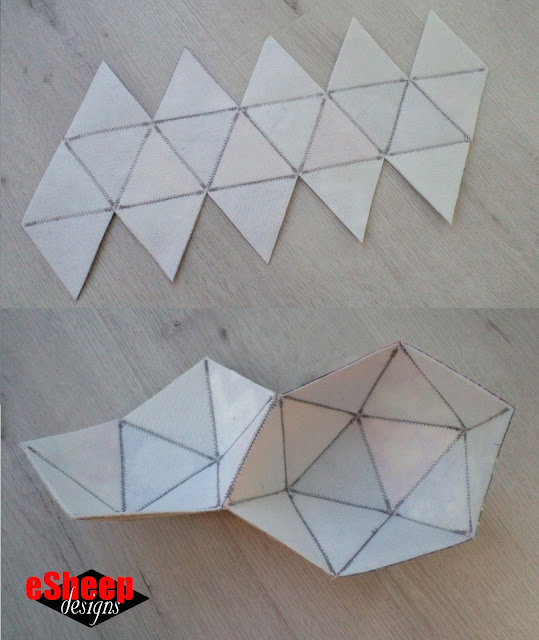
In each grouping of four triangles, butt one piece up against the next
adjacent piece and sew together with a medium wide zigzag stitch. Don't
bother stitching right to the end points, as the resulting vertices need to
be somewhat flexible.
Refer to your photo if necessary as you sew. Once you have five individual
strips of four triangles, join them all together as shown above and below.
|
| All sewn up in flat format... |
You should now be able to play with this piece and know how it fits together
to form a 3D shape.

Here is where it gets a tiny bit more challenging.
|
| Sew as many other edges together as you can manage... |
You probably already know that sewing by hand is required to finish this. To minimize that, see how many other edges you can join by machine. I managed to sew six more (I think), to get to the point where it looked like a clamshell.
Embellish
Before closing it all off, however, you can add some embellishments. I added
a couple of brads (to piece #5 and #17 — they are opposite one another on
the finished polyhedron).

|
| View of the interior after embellishing with brads and rivets... |
On pieces #6 through #15, I installed small bronze coloured rivets. If you have a lot of flat buttons, they would also be appropriate to use as decorations.
If you want to add centered embellishments, take your original
triangle template and add two other lines to it: from the midpoint of each
of the other two edges to the opposite corner. The intersection of all three
lines is the middle of the triangle. Punch a hole in that spot and then you
can use the template to make marks on the desired faces of your icosahedron.
(See bottom right corner of next photo.)
Finish
Begin by sewing a long basting stitch to pull the final edges of the
icosahedron together.

|
| Baste before final hand sewing... |
Use a basic slipstitch to close off the remaining edges and then remove the
basting thread. Hand sewing through Peltex isn't all that enjoyable;
go slowly, take breaks, and use a thimble.
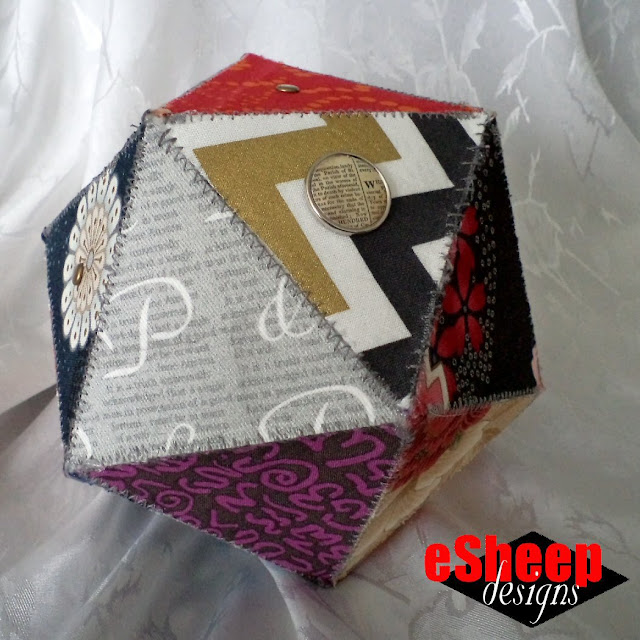
|
| This brad shows a snippet from a page of a book... |
When the sewing is done, use a pair of detailing scissors to snip away any untidy thread ends. Dab some clear glue to each of the vertices and to any edges that you feel could use some extra stabilizing.
And there you have your own icosahedron!

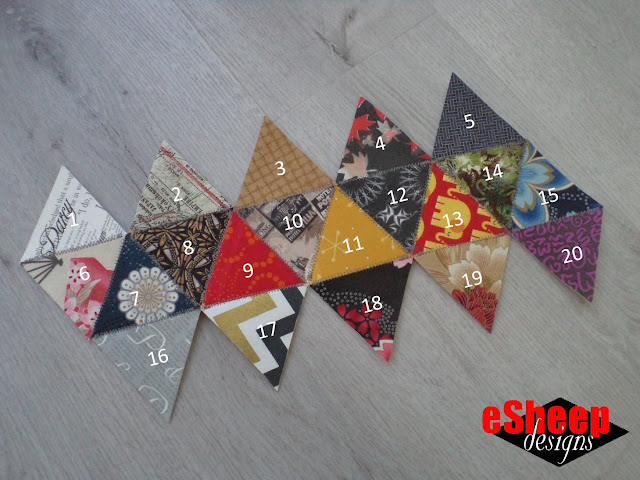
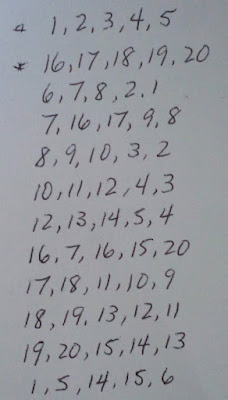
For those of you who are interested in how the triangles make up the
twelve vertices, here is the "layout" per the numbering format that I
added to one of the photos above.
|
|
The unique arrangements around the twelve vertices... (Spot the mistake! Fifth up from bottom, one of those 16s should be a 6.) |
Using my 8cm (close to 3") triangles, the finished icosahedron is about 5.5"
(13.5cm) high and 6" wide. (Kind of hard to measure accurately.) It's a nice
size, both in terms of being scrap friendly and for turning out an
object that's not too big and not too small; it can be held comfortably in
one hand. Oh, and the reason for mixing imperial and metric is because I'm a
Canadian of a certain age. ʘ‿ʘ

|
| This is about 6" measured between widest points... |
I made this as a memento of my decade of blogging. Each of the fabric scraps used to create this very cool polyhedron represents a specific memory for me. (No more space to recount those memories in this post, but maybe sometime in the future!) But you can probably see how if you were to choose some coordinating fabrics – i.e., not random ones like I did – this could be a very pretty item. (And by the way, as a die, it rolls very smoothly.)
Did you enjoy this? Well, whether you did or not – ◔ ⌣ ◔ – I'll be back with
part three of this series in a couple of weeks. I'll be sharing a more
traditional sewing project, but still one that relies on the principles of
mathematics.
And now, it's time to do some math of a different kind; as in, starting a...
As of next Saturday, I am officially down to my final ten weekly
entries for this blog. Yes – as I've strongly hinted at for some time now – my regularly scheduled involvement with this
platform is coming to an end. The past ten years have zoomed by at a
clip. On the one hand, I remember the uncertain beginning like it was
just yesterday, but on the other hand, so much has happened since then
that it's quite clear that many years have indeed passed.
An important lesson learned along the way is to compare yourself only
to yourself. (Because comparing yourself to others only makes you
miserable and envious or prideful and supercilious.) In that sense, what
I've managed to do here this past decade has brought me happiness
and a tremendous sense of accomplishment. There were surprises galore
and feedback from perfect strangers like none I ever dared to expect.
When I completed my first term as a teacher, one of my students – who was
actually older than me – came up and said, "It's been a slice."
What apt words for me to close out this chapter of blogging.




I will miss my Saturday reading of your soooo interesting projects and viewpoints on sewing, human nature and perspective. This chapter will be a great memory for me. Good luck on your next one.
ReplyDeleteI will miss you. Thanks for all the projects and your viewpoints on many subjects. Good luck and God Bless
ReplyDeleteThank you for the well wishes and for your support over the years.
DeleteI especially found this posting very interesting since my son teaches mathematics. I have forwarded him a copy. Good luck on your future endeavors.
ReplyDeleteAh, someone who might appreciate the math part; good to hear! Thank you also for your well wishes.
DeleteOhhh nooo- my dear Rochelle, once again, you’ve challenged my brain and creativity to make fabric shapes! What absolute fun this will be!!! But actually, every single Saturday I’ve read your posts since I retired has lit my creative juices to get making some of the most incredible fabric items online! I will miss my Saturday morning infusion of Sewing Brilliance that you have brought to me, but I will still have a couple of years of your earlier posts to check out before I became a regular reader. I’m excited for your “moving on” to new things and cherish the exchanges we’ve shared! Marie
ReplyDeleteAw, Marie, I can never hope to match your enthusiasm and it's been a gift to be on the receiving end of your generous praise for these past few years. (At least, ever since you've been able to comment!) I deeply appreciate your loyal readership and share your excitement about what might come next. I won't be gone from here, so can always be reached about whatever "post from the past" that you encounter.
DeleteI will miss your posts, but wish you well for the future. Will your articles still be available to view, so I can catch up on the many years before I found you?
ReplyDeleteLike I explained to my mother, I'm not deleting myself from the internet. (LOL) So yes, everything that's here will remain here. I will also still interact with anyone who chooses to comment on anything past and present. Thank you for having been here and for wanting to continue being here!
Delete