|
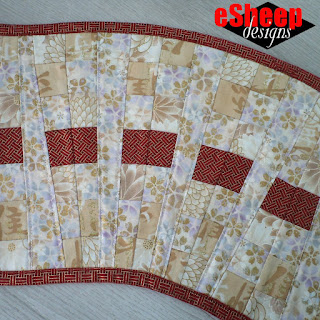
| My bargello quilting project... |
QuiltingDaily.com describes the bargello effect as "the appearance of movement within the patchwork, an optical illusion of
waves flowing and ebbing that is created from the strip sets sewn
together in an off-set, mathematical pattern."
Thus I welcome you to part three of my Math in Sewing series. Today I'll be demonstrating how to do some basic bargello quilting to make something rather unusual.

|
| Sample quilt block... |
In reality, after seven strips of fabric were sewn together first and then
"sliced" in an appropriate fashion, the only sewing required to form this
block was eight vertical seams.
By the way... long post warning!
This is a project that I started planning in mid-September and worked on
for a couple of weeks. The sewing itself, however, was completed in a day
and a half. The idea came from Liza Decor's YouTube channel, in a video uploaded on August 7, 2023. (The
improv quilting
technique that I featured here a couple of years ago was largely inspired
by a video of hers.)

|
| Start with seven strips of fabric... |
While her video shows most of the process of sewing this up, she doesn't
provide complete measurements. (To be fair, she uses the video to market
the rulers that she sells and employs in this project.) This is why I took
a couple of weeks to plan out the project, first creating a
Word file
for myself (so that I could refer to it without running the video
repeatedly) and second, working out the missing measurements.

|
| My different lengths of strips sewn together with a 1/4" seam allowance... |
I made some guesses and used some math to come up with what I figured
would be decently accurate measurements for this. (Oh, by the way, what
"this" is, is a wavy table runner.)
|
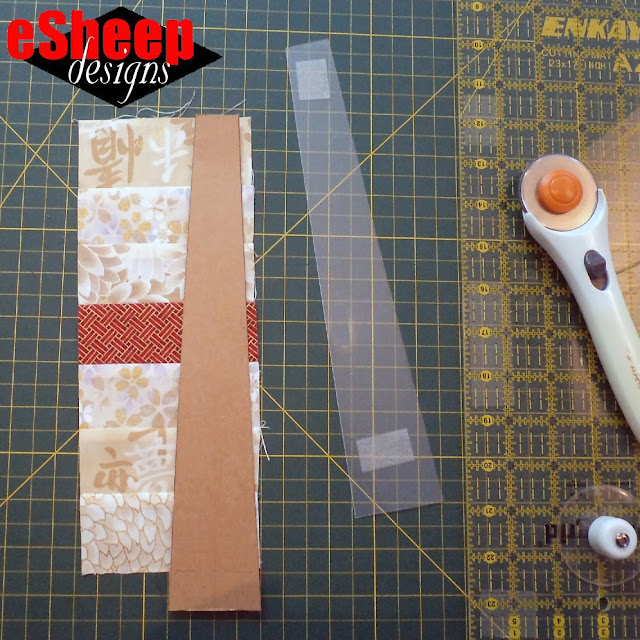
| Showing you how to cut the required panels using a small section of my pieced fabrics... |
The video provides the information that the strips of fabric are 2" wide,
with no indication given on length. Once I decided that the ruler she used
looked to be 1" wide at the narrow end and 2" wide at the opposite
end, I worked it out that the strips needed to be over 33" long... 36"
would be ideal; WOF would be "safer" (More on that later.)
|
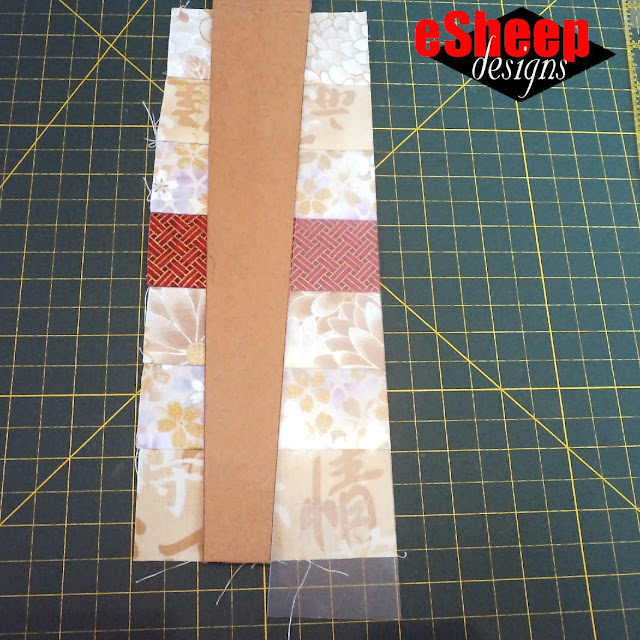
| Alternate the orientation of the template across the pieced fabric... |
She used up to nine different fabrics on her version of this table runner,
but I wanted to keep things simple and went with just four. I chose a high
contrast red for the center strip and binding, while three other neutrals
did the job for the strips, the backing, and the "separator" panels
(that's what I'm calling the non-pieced panels that are used between each
pair of pieced panels).
NOTE: If you scroll back up to the third photo from the top,
the numbers on the strips show you how to arrange three fabrics so that
no two same squares end up beside each other after sewing.

|
| Two adjacent pieced panels (one turned upside down) ready to be put right sides together and sewn... |
All fabrics were Robert Kaufman selections that I've had for many, many
years. (Originally from Craftsy.) I didn't think that I was that fond of the backing fabric, but after
seeing the finished piece, the gold accents – which is featured on all of
the selections – really tie everything together. The photos don't do the
fabrics justice.
Speaking of photos, sorry for the poor lighting in some of these. It was a
couple of very dark and dreary days when I was making this. I think the
sun managed to make an appearance for only a couple of hours in the middle
of the second afternoon. Then on the third day, it was extraordinarily
sunny and I couldn't avoid the shadows.
Watch live classes for FREE at CreativeLive!

[affiliate link]

Preparation
If you're interested in trying this, you'll first need 7 strips of fabric
measuring 2" x (at least) 36". The middle strip should be a high contrast
to the others; i.e., if the other strips are light coloured, make the
middle one dark or vice versa. Sew together with a 1/4" seam allowance and
press all seams to one side.
Now measure the height of this resulting panel of fabric. Depending on how
well you adhered to a 1/4" seam allowance, you should get a finished
height somewhere in the neighbourhood of 10.5".

|
| Showing how seams should be pressed... |
Grab a piece of paper and draw a tall rectangle using whatever measurement
you got as the height and 2" as the width. At the top edge of the
rectangle, make a mark 1/2" in from each side. Draw lines from these marks
all the way down to the respective bottom corners of the rectangle. Cut
out this skinny angled shape – it should be 2" wide at one end and 1" wide
at the other – and glue onto a piece of cardboard to make a template.
Trace around it to make a second one. (Or better yet, if you have some
sturdy plastic, use it to make a second template.) Put some double-sided tape on the
back of the templates so that they will stay in place on the fabric.
[Why two templates? Having two helps you plan your cuts – to
confirm that you have sufficient fabric, for example – since you can lay
one down and move the second one to the other side, and so on.]
I've shown in the previous pictures how the templates are used to cut the
pieces required. (Just ignore the fact that my templates are longer than
they needed to be.) You'll need twenty-two (22) pieced panels.
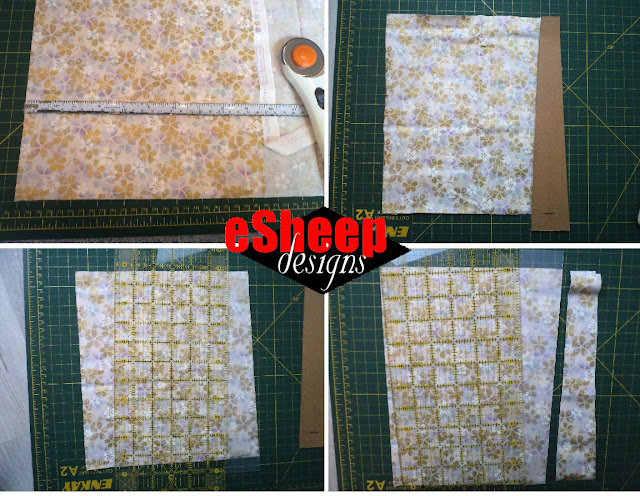
Here is another set of photos showing how the "separator" panels were cut.
|
| Cutting the twelve "separator" pieces... |
A 20" wide piece of fabric was folded in half for this. It was enough to accommodate the template going across it six times, yielding the required twelve (12) panels. I found that the best way to cut was to butt the edge of my ruler up against the edge of the plastic template, then take away the template and make the cut.
Make Blocks
The process to put this table runner together is really rather simple.
Take two pieced panels, match them up right sides together and sew along
one edge with a 1/4" seam allowance. Press both seams to one side.
Do this with all twenty-two panels to create eleven connected pairs.
|
| Three blocks plus one smaller block... |
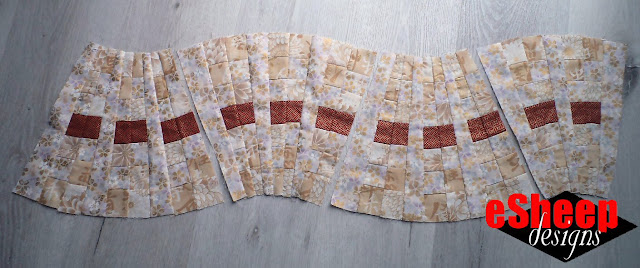
Then, take the separator panels and the pairs and lay them out as shown so
you can make the required blocks. (Press the seams on the separator panels
inwards.) If you lay out everything beforehand according to the photo
above, you shouldn't have trouble keeping track of the correct orientation.
Once the four blocks (three consisting of three pairs and one with two
pairs) are done, join them together and press the seams inwards again. If
any outside edges are uneven, trim them up.
Apply Fusible Fleece & Backing
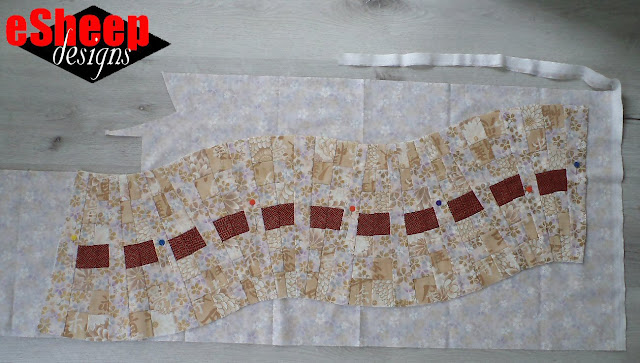
Lay the entire panel onto some fusible fleece (fusible side up), then pin,
cut, and fuse.

|
| Reinforced with fusible fleece... |
Once cooled, lay the panel on top of the wrong side of whatever fabric you've chosen for the back and pin well. (If you happen to be a quilter and have some spray basting on hand, you may want to use it.) Unless you have large amounts of fabric around the perimeter, don't trim away the excess backing just yet.
Quilt
The next step is to do some quilting.
|
| Adding a backing panel... |
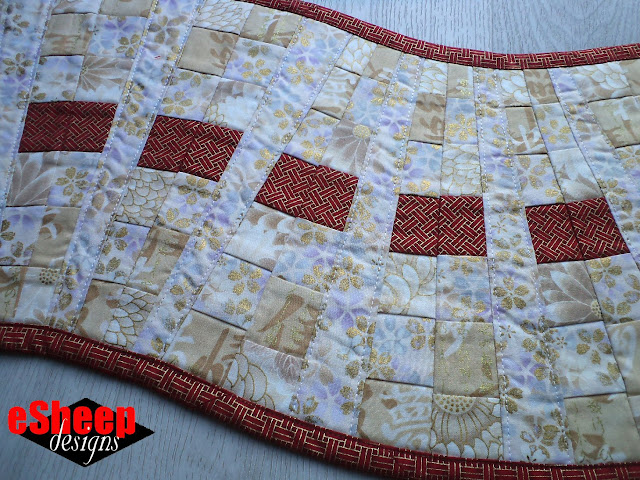
I chose to quilt lines along the inside edges of the separator panels. You definitely don't need to overdo it unless quilting is your passion.
Once the quilting is done, run a basting stitch along the entire
perimeter.
Now you can trim back the excess fabric around the panel and give the whole thing a good press. (Having a hot iron at the ready is essential for this project.)

|
| All quilted and backing being trimmed... |
Now you can trim back the excess fabric around the panel and give the whole thing a good press. (Having a hot iron at the ready is essential for this project.)
Bind & Finish
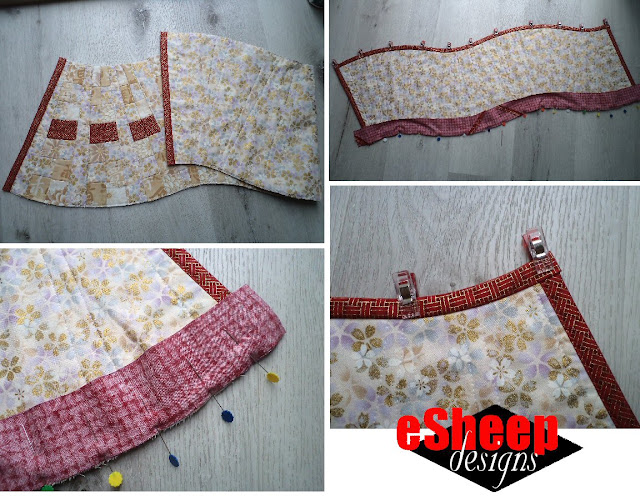
Next you'll need some 2" bias binding. I used this method on a 16" square of the red fabric and ended up with just a little bit more than I needed, so that was good.
|
| The process of binding... |
I didn't bother folding it and instead just used it as shown above; i.e., stitched it to the back side with a 1/2" seam allowance, then wrapped it around to the front, folded, pressed – an important step to make the final sewing so much easier – and sewn. (If you have a preferred method of attaching binding, go with it.)
For neater corners, I bound each edge separately. I did the straight sides
first. With the curvy edges, I left about a half inch at the ends to wrap
the raw edge inside.
|
| Bound and finished! |
Once the binding is attached, give it good press all over and this
bargello quilted wavy table runner is done!
Now let me tell you about a couple of "oopsies" that I made. You know how
you're supposed to turn the template upside down to alternate the
orientation of the pieced panels as you make the cuts across the fabric?
Well, for whatever reason, I got distracted early on and ended up making
two identical cuts in a row!
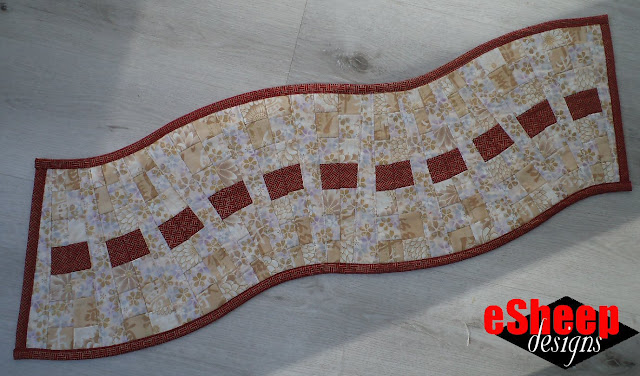
|
| Top side (doesn't the "dashed line" remind you of stitching?)... |
The only way that I can even explain how that might have happened is due
to my template – as you can see from the photos – being longer than what I
needed. (That's because I made my templates before I sewed my
fabric strips together, which was "oopsie" number one.) That being the
case, the wider end of the template was beyond the edge of the fabric and
I must not have noticed that it was at an odd angle when I made that
second (identical) cut.

|
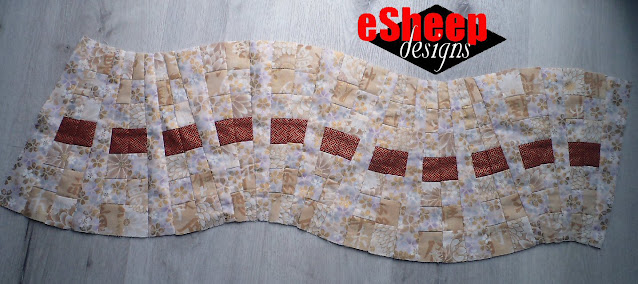
| Examples of the "wonkiness" caused by my cutting mistake... |
In any case, with my pieced fabric strips at about the exact length needed
to accommodate the required twenty-two cuts, I didn't dare try to
compensate for the mistake, in case I ended up short of fabric. So I just
plowed on, knowing that the resulting pieces would be problematic to match
up evenly. The sides being at the wrong angle means that the
math part is off, which will affect the look of the finished item.
When I sewed together the pairs for the blocks, I did the best that I
could to line up the red segments, but some of them just can't be made
even, not without affecting the rest of the panel. Not only that, but
each section is slightly tilted so that the implied "dashed line" is not
smooth. In the end, I know that it's wonky (and why) but the result is
still pleasing, so I'm not devastated. ◔ ⌣ ◔
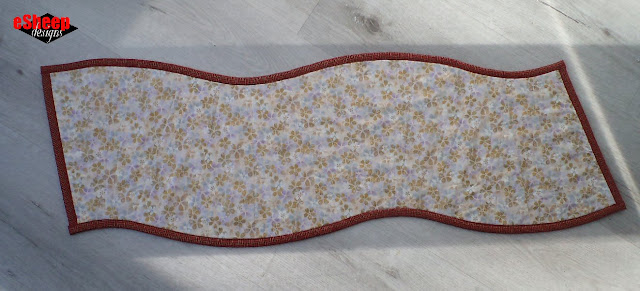
|
| Back side (finished dimensions about 34" x 10.25")... |
One more observation relating to the math. Since I didn't use the entire
length of my template, the widest edge of my pieced panels is
less than 2". That being the case, the whole wave effect is
reduced. If you go to the original YouTube video, you'll see that her
table runner is definitely curvier than mine.
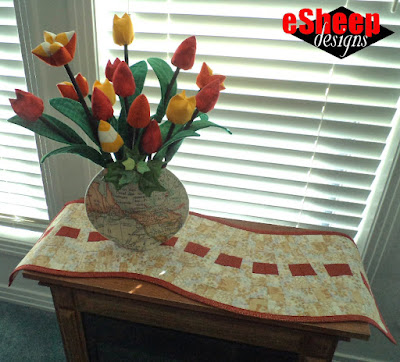
|
| One potential use for my table topper... |
But now you have the basics to experiment. Use narrower or wider strips,
use fewer strips, make fewer blocks (for a shorter topper) or make more
blocks (for a longer topper). You have the tools and you now understand
how math affects the outcome.
A Bonus Lesson Learned
Those who are truly knowledgeable about wedge rulers (and the math behind
them) will have noticed that I made no mention of degrees. The fact
is, I did not find out about the nature of these rulers until
after I had finished this project and writing up this post.
I decided against editing it too much and opted instead to extend this
series.
After all, what better way to illustrate that knowledge of math can light
the way to a solution, but that better knowledge of math can yield
a better solution?
Therefore, stay tuned for yet another math-related post about DIY-ing a
more accurate wedge ruler! I will then offer my own pattern for a similar
bargello project that you can attempt, as a parting holiday gift from me. 😁
Before I go, just wanted to remind people that Spoonflower's annual
November fat quarter sale is on until Monday night. It's
been diminished somewhat, since for the first time, it's only 40% off, not
50%. (You can click through using the link at the top of the left
sidebar.)
'Til next...




That is so nice, and completely not what I was expecting
ReplyDeleteThank you; very pleased to hear that I can be surprising so late in the game. ;-)
DeleteHi Rochelle, very very interesting… the beauty of the fabrics shows up in your “wokiness” pic and they are just awesome!!! I loved your display end pic! Wowie- all your glorious home decor sewing together! That truly inspires me! I found the vase book for $1 at a thrift store and I’m planning my fabrics! I really do want the fish fabric one. Then the flowers!!! They are on my list also! I’ve never been interested in table runners, but that pic just changed everything! Thanks for sharing! Marie
ReplyDeleteHey, great score on the book, Marie! Thanks for all the compliments, but I'm most appreciative of the fact that what I've featured here has inspired you to make your own versions. (I love my vase and tulips!) Like you, I never saw a need for table runners, but something different like this will certainly catch my attention. BTW, be sure to share with me what you eventually make!
DeleteOhh Rochelle, I just looked up bargello quilting and now I’m inspired again … because… I’ve been collecting jelly-rolls and only had one jelly-roll item to make. This can definitely put my collection to good use! I will miss my Sat morning inspirations from you when your blog ends! Thanks, Marie
DeleteOh yes, those with jelly rolls at their disposal can have great fun with bargello quilting. I've seen what can be done with a good collection of coordinating strips... some of it's amazing. About those upcoming Saturday mornings, hopefully you'll find inspiration elsewhere, but if not, you can use that time to craft all these things on your "to do" list!
Delete