|
|
Pieces starting to take shape... |
It had been about a month since I had done any serious blog post writing —
perhaps a record for me, who knows — and I was already on the final leg of
this "jackets to duffle" experiment, which I formally committed to in this post from last week (which was mostly written in December).
Normally, for such a large project, I would be preparing blog posts as I progressed.
This time, however, it was just days upon days of scribbling in my notebook,
drawing lines on the reverse side of my jackets, cautiously cutting into
them and finally, piecing and sewing.
I took the requisite photos at various junctures, but did not take to the keyboard until I was about an hour away from completing the transformation.
I took the requisite photos at various junctures, but did not take to the keyboard until I was about an hour away from completing the transformation.
And of course, since you can clearly see that this is "part 1" — and this post is already long enough — you won't see said transformation until
next week.


Allocating Fabric
In the previous post, I described the "no fun" part of working out the fabric
allocation. In the end, the handle straps came from the short jacket sleeves,
the end pocket bottom (i.e., below zipper) pieces F came from the back of the short jacket, the end
pocket top (above zipper) pieces G came from the sides of the short jacket, the base D came from
back of the long jacket, etc.
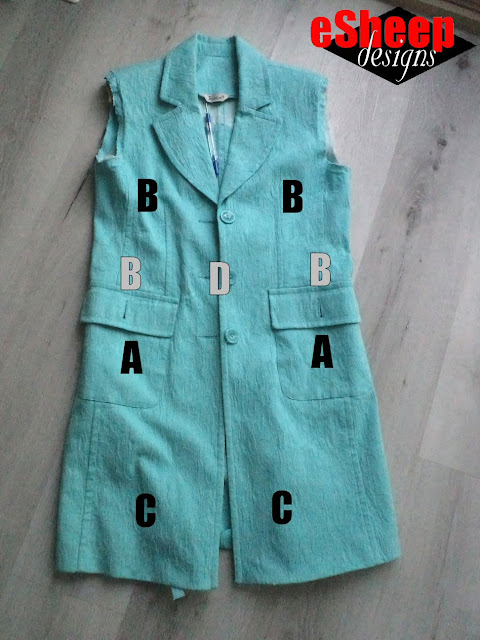
[NOTE: In these following photos, the white letters refer to pieces taken from the back.]

|
| Deciding what pieces will be cut from where from the short jacket... |
The side panels required the most preparation. Due to size constraints, they had to be sewn together from seven pieces (E, B, A, B, two other small pieces from the remains of the short jacket and C) for each side
panel.

|
| Deciding what pieces will be cut from where from the long jacket... |
I actually drew lines on the back of the fabric, but since "the fabric" was a fitted garment, I couldn't trust using those same lines to cut pieces. (In the meantime, I hoped that whatever fabric remained after all this would allow me to piece together a shoulder strap, but that wasn't a must have.)
Cutting, Piecing and Interfacing
I ended up cutting out "blocks" of fabric (i.e., around my drawn lines), then laying them out on the cutting
mat to re-measure and cut per requirements.

|
| Back view of the bottom half of a side panel showing six distinct pieces... |
I started with the most challenging piece(s): the side panels. They
consisted of a middle piece from the long jacket that featured the
pre-existing buttoned down flap pocket, a couple of matching strips on
either side of that, and at the ends, the chest pocket from the short jacket along with two other pieces.

|
| One side panel completed... |
A full width panel (piece C, taken from the bottom of the long jacket) was then sewn
across the top of this before I interfaced the whole thing with fusible fleece. (I believe this entire piece measured 16.5" high by 22" wide.) The handle straps were stitched down over the top as the final
step.
Fabric-Saving Way To Make Straps
Speaking of straps...
Needing something along the lines of 42" for each, it obviously
wasn't going to come from any one continuous piece. I had already
determined that the sleeves of the short jacket would provide the majority of the length for
the handles.
They were pieced together in much the same way as one would make bias
tape from scraps... except that I wasn't picky about a 90 degree angle.

|
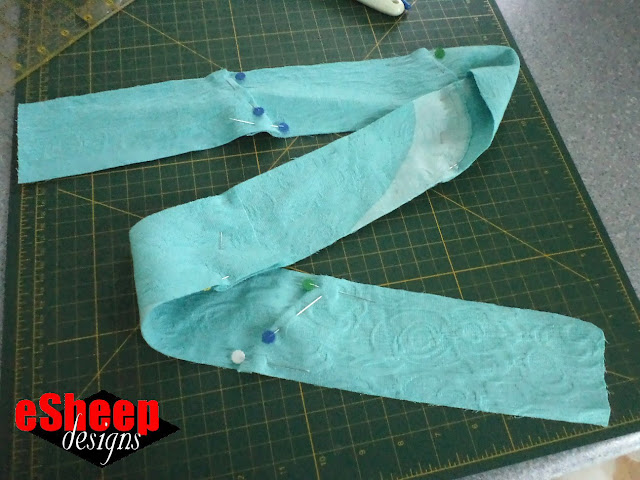
| Pieced shoulder strap... |
In the above picture, you can see how six pieces of fabric were worked
into the shoulder strap. Once I had a strip of the desired length, I
pressed it in half lengthwise and added some interfacing:
Decor Bond on both halves for the grab handles; fusible fleece on
one half for the shoulder strap.

|
| Another way of making straps without turning... |
The ends of the handles were left with raw edges (since they were eventually seamed), but the shoulder strap needed to have finished ends. The second picture above shows how to accomplish that.

|
| Closeup view of the joins on the strap and handles... |
This method of making straps saves on a bit on fabric when you don't have a lot, and you don't have
to turn it right side out. I used a width of 3", aimed for a 1/4" seam and
ended up with straps about 1.25" wide. (If you press well and pin well,
sewing this up is not difficult at all.)
You'll also notice in the photo above that I sewed each grab handle to
itself for about a 4" section in the middle to provide a more comfortable hand grip.
Solving the "Mystery" of the End Panel
There was actually a very good reason for making the side panels first: I
didn't know precisely how big the end panel needed to be until I knew the actual girth
of the bag.
After attaching the zipper to the main side panels and then adding the base (which measured 11" wide by 22" long) to create a big tube, I was finally able to measure around the open ends.
The opening was just shy of 42". Since I designed the bag with the intention
of it being about 10" wide and 11" tall (by 21" long), it wasn't that hard to come up with a
workable template. I then cut a muslin to check for accuracy. As you can see,
the fit was fine, so it was onwards and upwards to make the end panel pocket
assembly.

|
| Zipper prep for the end panel pockets... |
Luckily, it turned out that the sleeves of the long jacket were able to
provide the complete fabric for the underside of the end pocket assembly.
The upper part of the pocket was made up of the back of the short jacket and a
bit of the satin lining from the long jacket.

|
| Top of the zipper pocket assemblies completed... |
All exterior pieces of this bag were interfaced with fusible fleece. The pocket pieces above have the fleece installed between the outer fabric and satin lining.

|
| Completed end panels... |
Putting together the end panels was easy enough. The hard part was to sew
them onto the ends of this humongous tube that I now had on my sewing table. (It was sort of hilarious... I should have had my hubby shoot a photo of me at the sewing machine with this thing standing up higher than my head.)

|
| The fit is perfect... |
I ended up with some minor puckers around the edges, but they weren't
significant enough to contemplate redoing it. Having to work with
fabric that was already pieced together — the seam that you see in the photo
above was an actual seam from the jacket — means that there will be sections
that are extra thick and difficult to control.
Making a Snug Fitting Lining
I mentioned before that I was going to follow the instructions from the
video tutorial by sewingtimes when it came
time to make the lining. Not to say that she's the only one who's ever
demonstrated this sort of "fixed in place" lining, but I didn't want to have
a typical loose lining that wouldn't stay put. In a large bag, that's a
messy look.

|
| A lining that's fixed in place! |
Take a look inside my finished bag and you'll appreciate the difference.
It's sewn in place along all four edges of the base.

|
| Reclaimed pockets... |
While this whole project was already an effort in recycling/upcycling, even
within the confines of that, there were other opportunities to rescue and reuse.
First, it was the pockets of both jackets being placed on the side panels of
the bag, to continue functioning as pockets. That was a nice "save", even though the chest pocket of the short
jacket is small and likely not much good for anything other than some
pens or a comb.

|
| Hot gluing some buttons together... |
Where I gave myself a pat on the back for ingenious thinking was in reusing
the buttons that came off the jackets. I made them into bag feet!

|
| Buttons as bag feet! |
The short jacket had four buttons exactly. I hot glued all of those onto the
"underside" of the larger buttons that came off the long jacket. Then I
sewed them onto the base panel of the bag, reinforcing them with pieces of
Peltex.
In my original discussion about my reluctance to make a duffle, one reason was that I would constantly worry about it getting dirty. These feet won't totally solve the problem, but they will help. (Not only will I be ever vigilant about where I put this bag down, I also plan to spray the whole thing with ScotchGuard before using it.)

|
| Epaulettes repurposed as strap anchors... |
Another reuse opportunity came from the long jacket's epaulettes. Once I
decided that a shoulder strap was in the cards, I repurposed the epaulettes
into strap anchors at both ends of the bag. (They were sewn into the side seam when the end panels were attached.) The original buttons were then
(re)sewn on so that the strap can be removed.
Oh, and do you recall this?

|
| Trim from back of jacket... |
I no longer had enough buttons (only had one left),
but with the help of some fabric scraps from the short jacket, I made a couple of self-covered
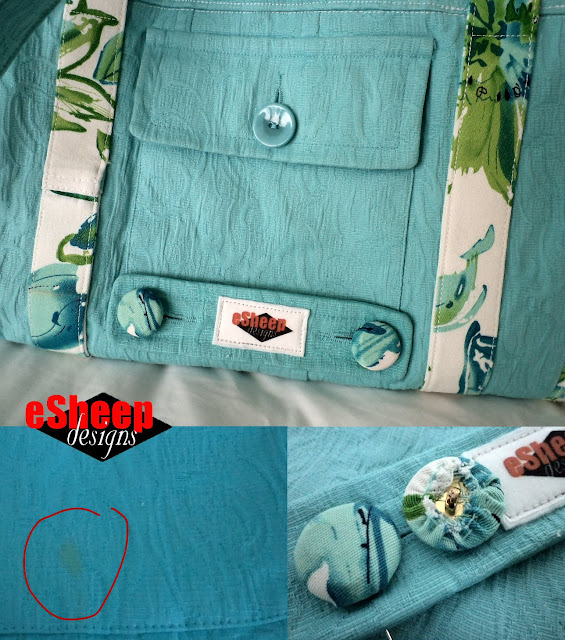
buttons to turn this whole thing into a detachable "name plate".

|
| A name plate hiding a stain on the pocket...! |
This wasn't planned. A couple of days after the official photo shoot, I was
picking through the fabric remnants and it occurred to me that this piece
deserved to be turned into
something.
When I realized that I had once again created a significant item without
adding a designer tag, it all fell into place like a puzzle. Particularly since there was a slight stain at the bottom of one of the side pockets!
Are you on pins and needles to see the rest? No? Of course not, it's just a
duffle bag after all. (I'd be truly amazed if this was exciting to anyone but me!)
But if your interest is piqued, you'll be able to see this duffle in all its
glory next week.


Hi Rochelle, I find your sewing adventures quite interesting and look forward to them every Sat morning before I crawl out from under my bed covers! I did laugh at your ingenious use of buttons for feet! I too worry about getting my lovely sewn bags dirty on the bottoms… just this week I ordered a vinyl covered tote bag from Vera Bradley’s outlet sale and it was worth the $10 to investigate how she covered the entire outside of a cotton bag with vinyl … her bag doesn’t even attach to the separate vinyl cover except around the top edge! Reading sewing patterns and sewing blogs is the very best education for a sewer, and your blog is top of my list for innovation and inspiration!! Thanks Marie
ReplyDeleteMany, many, many heartfelt thanks for your ongoing enthusiasm for the blog, Marie. I am glad it provides someone other than me with education.
DeleteI've come across these (clear) vinyl covered totes before. Without seeing your recent purchase — it may be fantastic — I've always felt that I'd prefer an exterior made out of laminated fabric rather than an additional "enveloping" layer of vinyl. Was communicating with fellow blogger Daryl a couple of weeks back about a product called Liquid Vinyl (from Thermoweb) that would also be something to try next time.