
|
|
DIY a custom pro sports banner... |
My personal situation is proof enough that sports memorabilia is not
necessarily the exclusive domain of a man cave, but if ever you wanted
to contribute a unique sewing project to your man's special space, I've got a
project for you.
Today's post is about how you can design a custom wall hanging/banner
featuring the name, number and team colours of a favourite player.
If you're artistically inclined and have experience using a graphics
program, you can totally do this on your own, but if not, I'm here to lend
a hand.
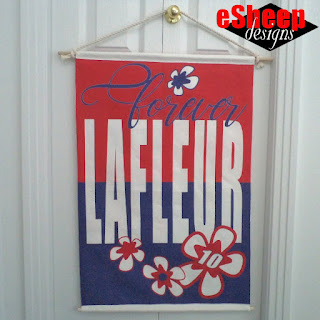
|
| Fat quarter turned wall hanging... |
Having never seen the wall hangings go on sale before, I was intrigued by
them and whipped up a couple of designs that came this close to
being ordered. At the last moment, it occurred to me that I could DIY my
own version with a fat quarter of linen cotton canvas and wind up with a
slightly larger wall hanging than the ready-made one that
Spoonflower sells.
Not to mention — even while factoring in the sale price and my having to
DIY my own hanger — it would still save me a lot of
moolah.

Here's the thing: an 18" x 27" fat quarter of linen cotton canvas sells for $15 regularly. Fat quarters and fabric in general goes on sale quite often, so by all means wait for a sale — up to 50% off — and pay less. Wall hangings likely won't go on sale that often and they regularly sell for $59; price includes a wooden magnetic hanging system. (Shipping is extra for both, and I imagine is higher for the complete wall hanging.)

Here's the thing: an 18" x 27" fat quarter of linen cotton canvas sells for $15 regularly. Fat quarters and fabric in general goes on sale quite often, so by all means wait for a sale — up to 50% off — and pay less. Wall hangings likely won't go on sale that often and they regularly sell for $59; price includes a wooden magnetic hanging system. (Shipping is extra for both, and I imagine is higher for the complete wall hanging.)
By the way, if you haven't already noticed, there is always have a small
image link near the top of the sidebar at left that lets you know about
Spoonflower's ongoing sales. (They are sitewide, not just for my
shop.)

|
| Mockup of sports banner with horizontal stripes... |
If you've read my posts about Spoonflower in the past, you already know that their fabric is printed on demand and that selections come with a white border around them. That border is quite useful as extra material for hems and seams. So for a design that's printed at 18" x 27", in all likelihood, you'll be able to have a finished (i.e., hemmed) item that's still more or less 18" x 27".
So there you go: Spoonflower takes care of the printing. Create an
account, upload your file (making sure the design is oriented on its side;
i.e., horizontally) and purchase your fat quarter of linen cotton
canvas... oh, and you'll also get a 10% discount because you're now a
"designer". Those of you who know how to use a graphics program from
beginning to end can run off now and design your banner.
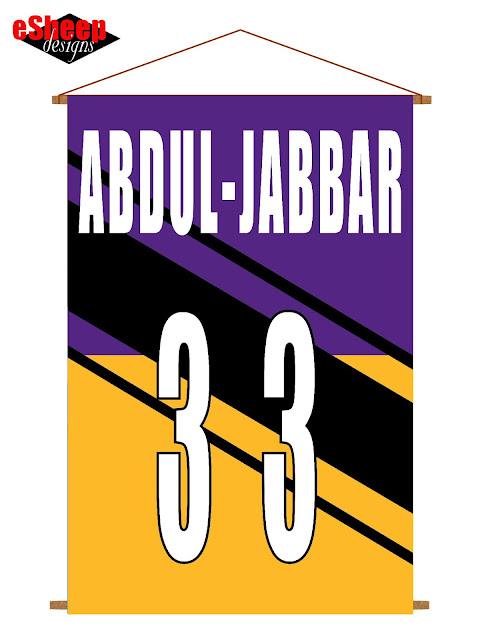
|
| Mockup of sports banner with diagonal stripes... |
For the rest of you who are wondering what form of help I might be
offering, here's where I've done some work to create two basic designs.
As you can see from the examples shown above, they are fairly simple;
one has horizontal stripes and the other has diagonal stripes.
I've made both available in PhotoShop and
Paint Shop Pro file formats for downloading, on an "as is"
basis. (Note that no preview is available for the PSP file
format.)
Photoshop Diagonal (eSheepDesignsDiagonalBanner.PSD file)Photoshop Horizontal (eSheepDesignsHorizontalBanner.PSD file)Paint Shop Pro Diagonal (eSheepDesignsDiagonalBanner.PSP file)Paint Shop Pro Horizontal (eSheepDesignsHorizontalBanner.PSP file)
If you have either of those programs and can use them in a rudimentary way
— or know someone who does/can — just plug in the required text and colour
codes on the various layers, save a final copy as a JPG (or TIF), create
an account to upload to Spoonflower and purchase.
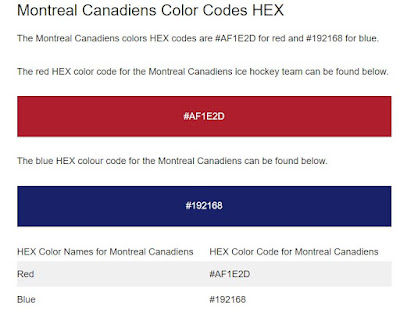
|
| Montreal Canadiens hex codes courtesy of teamcolorcodes.com... |
To access the proper hex codes for all of the major league sports teams'
official colour schemes, go to a site called teamcolorcodes.com.
It's a tremendous resource that even includes official fonts and team
logos. (Before you start thinking about adding a logo to your wall
hanging, you may want to consider copyright restrictions that most
print-on-demand services like Spoonflower have in place.)

To show you what the process entails, here are some screen shots from
Paint Shop Pro
demonstrating some basic edits.
Here is what you'll get when you load up the
DiagonalBanner file. On the Layers palette,
the three layers are identified as Background,
Diagonal Stripes and Name & Number. (As you can see, the
design is already oriented correctly for use in Spoonflower.)
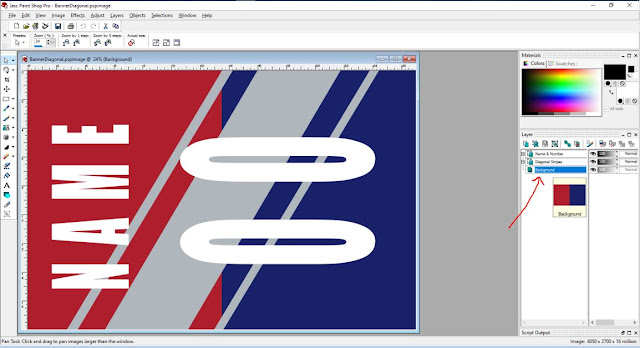
|
| Main Paint Shop Pro screen... |
If you hover your mouse over the Background layer, you'll see that it's made up of two rectangular boxes, one red, one dark blue. To change these, specify the colours that you want on the Materials palette, select each half in turn and use the Flood Fill (bucket) tool to execute.
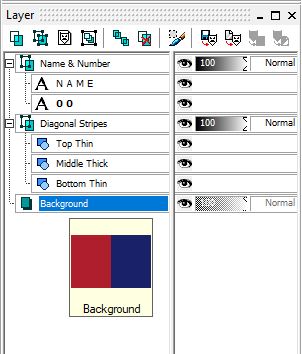
Click on the plus signs next to the other two layers to expand them to show
all of the elements contained within each layer. (Clicking on the "eye" icon
turns an element or layer from visible to invisible.)
|
| PSP Layer palette... |
The other two layers are vector layers. Name & Number is
specifically a text layer. You can edit the actual text and you can change
the properties of the text.
Double-click on a text element and you're automatically in edit mode.
Editing text is straight forward, just type whosever name and number you
want instead of "0 0" and "N A M E". If the name is short, you may want to
add a space or two between each letter. Alternatively, if the name is long —
like Kareem's — you'll have to compress the whole element afterwards to make
it fit. (I wouldn't bother changing the font size though.)
Double-click on a non-text vector element — like Middle Thick from the
Diagonal Stripes layer — and you're automatically in
properties mode. Click inside the fill box and you'll open up the
Material selection box. Enter your desired hex code for the element
in the HTML box (circled in red below).

|
| Changing vector properties in PSP... |
Click OK and the middle diagonal bar will be changed to your desired
colour.
To change the properties of a text element, you'll need to right-click on
it to bring up a drop down menu from which you can then select
Properties.... I would recommend that you leave the name and number
white, however; if you need them to stand out against a light background,
add an outline to them by using a positive Stroke width.

For those of you familiar with using PSP or Photoshop, none
of the above is new or complicated. For those who have never touched
either program, it may seem daunting, but perhaps you know someone who can
assist.
I'll be back in a couple of weeks to
show you how to sew these up
once you receive your fat quarter from Spoonflower. (Not like you
can't figure it out, but I actually made myself a double sided banner and
want to share that option.)
'Til next...


No comments:
Post a Comment
You have the power to brighten my day. Leave me a comment; I'd love to hear your thoughts... you can even remain ANONYMOUS! And rest assured that I acknowledge all comments, either here or via email. (That is, if you don't see a response from me here, I would have responded privately to the person.) Spam or generic comments with unrelated links, however, are promptly removed... and I may take appropriate action or report you to Google. Thanks for reading! (✿◠‿◠)