|
|
What can this possibly be? |
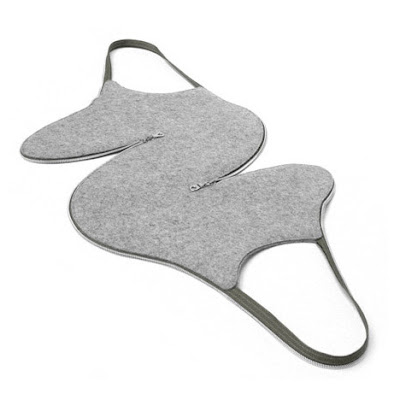
His bag creations are all made out of a single curvy piece that zips up along
itself and can be stored flat.
You've probably seen the bags before, but may not have known their origin.
They appeared on the fashion scene about fifteen years ago. (Speaking of
origin, I have no idea whether Mr. Jakus is the true originator of those
curvy concepts; my guess would be that he's not.)
While I am intrigued by the simplistic shape of his UM bags, I'm not
sure that in actual use they would be practical or user-friendly.

|
| Josh Jakus' UM Carry Bag... |
Once you get over the coolness factor, you may discover that one zipper
holding a whole purse together is not ideal.

|
| UM Carry Bag unzipped... |
Perhaps it's more useful in one of the smaller pouch formats (for which I
know some independent designers have come out with their own patterns).

|
| Josh Jakus UM Bag collection... |
I didn't realize until recently just how easy it is to draft a pattern for
something like this (more on that later). Let me follow up that statement,
however, with the fact that it may not be that easy to sew something
like this.
By the way, the original website and social media accounts for Mr. Jakus
are no longer accessible. I assume the photos reproduced here originally
belonged to the designer; in any case, no copyright infringement is
intended.

Mr. Jakus' creations are made out of industrial wool felt. At first I thought the zipper tape was applied directly against the wrong side of the material (that is, exposed zipper tape with no lining) but I've since seen photos of the interior and the zipper is definitely sandwiched between two layers of the felt.

|
| interior view of zipper installation on a Jakus bag... |
If you can find a similar type of wool felt (maybe check out your thrift
stores for old woolen blankets), the sewing part would be infinitely
easier to do than attempting to make one of these curvy creations out of
regular fabric that frays and needs to have a finished edge. (That said,
it's always nice to have the option of something a little less bland than
plain woolen felt.)
A couple of months ago, I came upon an instructable by
Jenna Fizel that demonstrated the process for designing one
of these bags. (Her contribution — which includes various patterns
available for downloading — won the
2007 Homemade for the Holidays competition at
instructables.com.)
Apparently, all you really need to do is draw a lopsided open ellipse
(about eighty percent of the way to being closed) and then join the start
point and end point with a straight line. Here's my attempt (the blue is
the hand drawn curve; the white is the joining of the end points):

|
| Draw an open curve and close the two ends with a straight line... |
Next, cut out the shape and trace a copy of it. Cut out the traced copy.
This results in two pieces that can now be taped along the straight edges,
forming a symmetrical curvy shape.

|
| Create a symmetrical template... |
It's now a template to cut your material.

I intentionally did this on a small scale to test the process. (The template shown above is about 5.5" tall.) After cutting out my scrap of fabric, I proceeded to hand baste it together, end to end onto itself, simulating what a zipper would do.

|
| Testing the curvy challenge by sewing all the way around... |
It totally worked. The bottom has a twisty parallelogram look to it. (I
stuffed it with cotton before sewing it closed, so that I could see it in
3D format.)
So that proves that you can DIY your own pattern for these one of a kind
curvaceous pouches. That part is easy.

|
| Another view... |
Figuring out the best way to sew a zipper along that winding, curvy edge
is probably not as easy. I definitely think that these patterns call for
zipper tape "by the yard". That way, you don't have to worry about getting
the right length and you can also separate the tape and sew each side
independently. (Alternatively, if having the whole thing unzip into a flat
piece isn't that important, one could install a zipper along just a
portion of the edge for a more traditional pouch.)
I may take another kick at this with a larger test piece, with fabric on
both sides. We'll see how it goes, if it goes anywhere. ;-)


No comments:
Post a Comment
You have the power to brighten my day. Leave me a comment; I'd love to hear your thoughts... you can even remain ANONYMOUS! And rest assured that I acknowledge all comments, either here or via email. (That is, if you don't see a response from me here, I would have responded privately to the person.) Spam or generic comments with unrelated links, however, are promptly removed... and I may take appropriate action or report you to Google. Thanks for reading! (✿◠‿◠)