
 |
| Is it apparent that the hemline is not original? |
Sometime during the past few years, I came across this trick of shortening jeans that retains the original hemline. I was so impressed! So when I recently bought a pair of jeans that I didn't need (at 90% off; yes, that's right — I shelled out $6.99 for a $69.99 pair of jeans), I knew I had to try it out.
As we all know, cutting off the hems on a pair of jeans and re-doing them produces so-so results. The naturally distressed look of the hemline is gone and in the meantime, we have to struggle with sewing what amounts to six layers of denim at the side seams.
 |
| Only a dog is going to get this close, but here you can see a seam above the original topstitching... |
Not fun! No wonder I avoided doing it as much as possible, even in some cases wearing higher and higher heels to compensate. Years later and years older, the higher heels option is not so practical anymore, so I am happy to report that this will be my go-to method of re-hemming jeans from now on.
See if you don't agree.

I originally saw this method described in an odd way which seemed to over-complicate it. Luckily there were photos showing the desired outcome. Instead of measuring and then trying to add, subtract or do a quadratic equation with the numbers, it's just easier — if you're doing this for yourself or a family member — to go the trial and error method of folding and pinning and trying it on.
 |
| Fold over the hem so that it's just about 1/2" shorter than the desired finished length... |
As shown in the picture above, just fold the leg over so that it's about a 1/2" shorter than the desired finished length.
The 1/2" measurement works because that's about the height of a standard hem on a pair of jeans, and that seam will be restored to the total length after the sewing is done.
 |
| This picture shows the result that we are going after... |
The above picture shows the folded edge from the previous picture tucked back inside.
 |
| Step 1, fold out (shown on left leg); step 2, fold back in (shown on right leg)... |
Do the same thing to the other leg and of course, try it on for size to make sure that all is even. (You can use safety pins to hold the seam temporarily.)
 |
| Sew as close to the edge of the original hem as you can... |
If the length is to your liking, flip the folded portion back out. Sew right next to the edge of the original hem, as indicated by the orange arrow above.
 |
| The excess fabric inside can be trimmed away after sewing... |
Turn the folded material back inside and press the seam with a hot iron when you're done. (Trim away the excess fabric inside if you want. I've done this twice now and both times I've just left it as is.)
This method works best for straight leg jeans of course, but both pairs of my mine had an obvious flare to them and they turned out fine. Unless you're trying to shorten a significant amount, this should still work for bootcut jeans.
But don't you agree that it's just so simple? (And is foolproof in that it doesn't even involve cutting?)

My second alteration was a more challenging project, although I was surprised by how straight-forward it ended up being. My mom had been given a couple of new shirts and she wanted the sleeves shortened. They're cuffed sleeves, so I went online to see if I could uncover some tips on how to go about this.
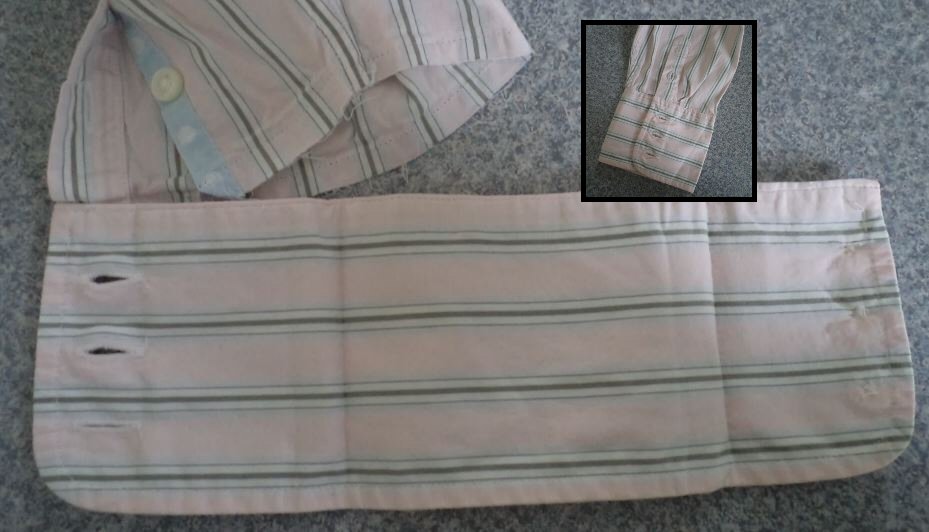
 |
| Mom's shirt sleeves successfully shortened! |
That's my finished handiwork in the above picture. If you were able to examine the shirts up close, you'd see spots where I had a challenging time with the sewing, but all in all, Mom — and I, to be honest — was impressed with what I did.
I removed about 3.5" from each sleeve, which required putting in a new opening above the cuff, since the original one was within the 3.5" length that I cut off. However, I did harvest all of the original parts so that I could replicate the look.
In fact, the first step to doing this kind of alteration is to take a seam ripper and dismantle everything... but do only one sleeve at a time so that you have a reference.
 |
| Remove the cuff... |
Start by removing the cuff.
 |
| Remove two facings... and a button in this case... |
Then take off the two facings that protect the raw edges of the opening above the cuff. There will be a large one that overlaps a smaller one.
 |
| Keep track of how the pieces are attached... |
When you remove the smaller facing, the raw edges of the fabric will be revealed. There will be a folded triangular piece at the top of the slit. This tiny little triangle has the important "job" of hiding the top raw edge of the smaller facing.
 |
| The slit opening of the sleeve with facings removed... |
After cutting off the desired length, I reproduced the slit with the folded triangular piece at the top of the sleeve.
 |
| Take off the excess length and then reproduce the slit opening on the sleeve... |
Then it was a matter of "putting back together" with the pieces that had been removed, in reverse order. (Taking photos as you go is always recommended.)
 |
| Pin each facing back on and sew into place... |
The last step is to reattach the cuff.
This original sleeve had two pleats to enable it to fit into the cuff. Due to the inevitable increase in width after cutting off some of the length, the new pleats were wider.
 |
| Reattach the cuff and the alteration is all done! |
My sewing wasn't always primo — there were some surprisingly thick layers in some areas — but Mom assured me that she didn't care as long as the finished item was wearable!
 |
| Ta da! (I even sewed the small button back on...) |
For a first time attempt at this kind of alteration, I'm quite stoked that I was able to pull it off. And the jeans? Like I said, my go-to method from now on!
Do you have any short-cut techniques for alterations that have saved you a lot of time?
I've been meaning to try that method for shortening jeans, but always seem to go back to how I've always done it. Sure does look easy. Truth be told, I haven't hemmed jeans in ages - with skinny jeans I just cuff them. Now shortening shirt sleeves - I've done that.
ReplyDelete