 |
| Three — count 'em, three — Sunny Glasses Cases! |
It's the Sunny Glasses Case by Sherri of Thread Riding Hood, first featured here about a year ago. (Please refer back that post for pertinent links to the original project and pattern downloads. It's a freebie!)
The first one that I made went to my mother when she said that she liked it. I then made another for me that I never got around to using. Some time later, I made a third one for an aunt.
A few months ago, a different aunt admired Mom's case, so Mom gave it to her.
I then gave my unused one to my mom to replace hers. When a cousin saw it, Mom was almost ready to give hers away again, when I interjected and simply asked my cousin if she would like me to make her one.
Here it is.
 |
| Sunny Glasses Case made with fabric from my Canadiana collection... |
I didn't mind revisiting it because it's a fun and useful item. And it's the sort of thing that you get better at with each one that you make. Well, maybe. Usually. Yeah, more on that later. ;-)
The first one that I made was constructed out of pieced remnants of my Winter in the City fabric. It has a directional print, so I used three strips of it to piece together the exterior fabric so that everything would show right side up. It was also a cotton twill and having now made six of these cases — with the last two using just quilting cottons — I prefer a heavier fabric for this project.
 |
| Interior fabric is quite an appropriate choice for a glasses case... |
The exterior fabric used for the case above is the Tiled & Mirrored 3D selection from my Canadiana collection, in a lightweight cotton twill. It's the second one that I've made with that same fabric; I bought a yard of it last year.

Today I'm going to go through the steps for making this super popular eye glasses case, for my own benefit more than anything. While Sherri's original tutorial is thorough, I am only ever going to make the one with a magnetic snap, so I've summarized the instructions specifically for that version, omitting references to three other variations. I've also added my own suggestions to the mix, which you are — of course — free to follow or not.
For the original full meal deal — since this is not meant to replace her tutorial — you'll need to visit Sherri's blog at ThreadRidingHood.com.
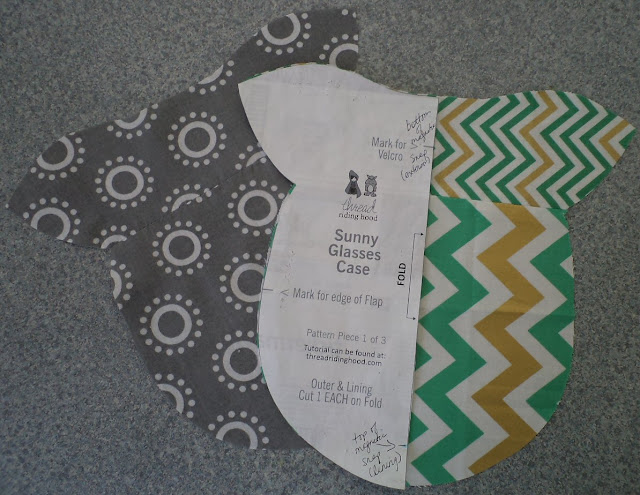
#1... First, cut out everything that you need according to the fabulous pattern templates. (Truly, I mean, she even gives you a template to cut the fusible fleece; I would have just told you to cut it 1/4" smaller than the fabric!)
 |
| Cut one exterior and one lining piece... doesn't this look like a funny head with ears?? |
I sewed together scraps left over from my hanging file organizer project to get the full fabric pieces.
 |
| Also cut some fusible fleece (for exterior fabric) and some plastic canvas (although I recommend Peltex)... |
#2... Apply the fusible fleece to the wrong side of the exterior fabric.
[For this particular case, I decided to use a remnant from a fleece blanket instead of fusible fleece, just as an experiment. In place of the plastic canvas, I used a piece of a cutting mat. My preference is actually to use Peltex, for reasons that I will share later.]
#3... Installing the magnetic snap is the next order of business.
The Mark for Velcro that's printed near the top of the template along the fold line is where the bottom half (female) of the magnetic snap should be installed on the exterior fabric. (If you're planning on making more than one of these cases, you may want to write this down on the template itself like I've done here.)
 |
| Use the back piece of the magnetic snap to determine where to cut into your fabric... |
At the other end of the template, make a small mark 1" (2.5cm) up from the bottom (along the fold line) and label it as the location for the top half of the magnetic snap to be placed on the lining fabric.
 |
| Add some fusible fleece scraps underneath the fabric for extra holding power... |
It's always a good idea to put small pieces of interfacing underneath your magnetic snap hardware to provide additional support and prevent tearing.
 |
| Pin fabrics right sides together in preparation for first bit of sewing... |
#4... Pin the fabrics with right sides together and add the side marks for the flap edge on the exterior fabric.
 |
| Sew along the top and along the bottom... |
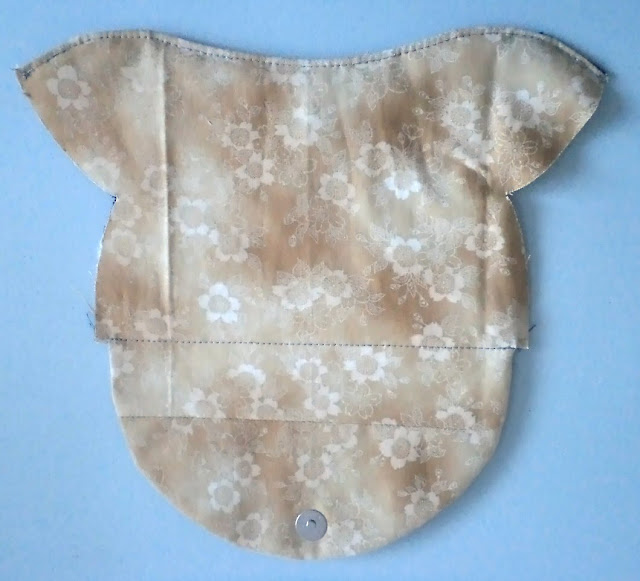
#5... Sew along the edge of the interfacing (i.e., with a 1/4" seam allowance) in two places: 1) across the top from point to point (the part that looks like ears), and 2) along the bottom from one flap edge mark to the other (the big curved edge).
 |
| Notch the curved edges and then cut a horizontal slit at the two flap edge marks... |
#6... Cut notches in the curves and make a horizontal cut at the two flap edge marks, being careful not to cut into the stitching.
#7... Turn right side out and press. If you take the time to press really well, you won't need to pin this edge as much (or at all).
Now you'll see a different project, because I actually missed doing this next step when I made the chevron case.
#8... Topstitch (at about 1/8") along the "top" edge.
 |
| Turn right side out, press and topstitch... |
#9... Sew a horizontal line from one flap edge to the other. This will create a separate compartment for the plastic canvas/Peltex piece, which can now be inserted.
#9a... If using Peltex, center and fuse it into place (against the lining fabric).
 |
| Good reasons to use Peltex instead of plastic canvas... |
The part about me preferring to use Peltex instead of plastic canvas is two-fold. First, I always have Peltex on hand. Second, the lining of this case ends up being a bit loose, and I find that using Peltex — with the fusible side applied to the lining — results in a much cleaner finish.
Now it's time to manhandle this into shape and finish up.
#10... Pin the sides so that the "ears" meet up with the two flap edges that were cut into the side seams. Do this with the exterior fabric on the inside as shown here. Sew with just under a 1/4" seam allowance.
 |
| Sew together the raw side edges... |
#11... Trim away the seam allowance to 1/8".
 |
| Trim away half of the seam allowance... |
#12... Flip the case right side out and then topstitch from one bottom corner all the way around to the other bottom corner, at just over 1/8". I like to reinforce the stitching at the flap edges.
 |
| This case was made from Robert Kaufman scraps... |
And that's it... not very complicated and it gets easier each time. (The only thing that might trip you up is when you think you can remember all the steps and then miss one of them!)
 |
| The exterior is made out of three pieces of fabric... |
This is made out of the scraps left over from my cousin's wallet and my Summit Pack. (I had to make a three-way join in order to get enough fabric.) Having made four of these cases with pieced fabrics, I think it's a great project for using up scraps. (I even pieced together a lot of the fusible fleece.)

Here is the original case that I started out photographing, also made with pieced fabrics.
 |
| Notice the lack of topstitching along the front edge?? |
By the way, here is a comparison shot of the interior of this case with the Peltex and one of the others made with plastic from a cutting mat (which I assume would be similar to plastic canvas).
 |
| Peltex support on left, plastic cutting mat on right... |
With the plastic as the support, the fabric is loose inside the compartment. With the Peltex, it's very tidy. Which would you prefer?
However you choose to make it, just make it. For a glasses case, it's truly a superior design to those flat, opened-ended slide-in things. Using different fabrics, it has loads of appeal for gals and guys of all ages. Thanks again to Sherri for the awesome freebie!


Yes your pattern looks like a cute animal with ears. I see you won the Friday Spotlight for this at SewCanShe. Congrats!
ReplyDeleteThis would be a perfect retreat gift or project kit for attendees. I plan to make a few for gifts.
ReplyDeleteGreat idea! Thanks for stopping by.
Delete