-->
DISCLOSURE: This blog contains Google Adsense ads and affiliate links to Creativebug via which potential commissions are earned when visitors click through.

Search This Blog > > >

Saturday, 29 October 2016

Pattern Review: The Summit Pack

Summit Pack pattern by Cloudsplitter Bags & Designs
Image courtesy of Cloudsplitter Bags & Designs...
Let me introduce to you today a relatively new pattern, the Summit Pack by Cloudsplitter Bags & Designs (full link at the end of this post).

As you can see from this cover photo, it's a sling bag in a style that is appropriate for all ages and genders. I was checking out Craftsy's site revamp (and wondering if it was an early Halloween prank) when I decided to see how they may gummed up the indie pattern side... and up popped this pattern.

How fortuitous! I had been contemplating making a pattern for this type of a bag for the past year and a half and here someone had already done the hard work for me. ;-)

Let's be clear, this is a complex thing to conceptualize, so full marks to Sydney (the designer) for figuring it out and offering up the pattern. It's definitely not for beginners, but then — while it is somewhat elaborate in number of pieces and features — it's really not an advanced project either. If you are a confident intermediate sewer with bag making experience, can follow directions, and can approach a project without rushing, you will be able to make this bag.


Let me evaluate this pattern in five separate categories, starting with value for money.

Price Point: 5/5

The Summit Pack is very affordably priced at only $6 USD. At that price point, I was ready to buy it the moment I saw it, but wanted to search for some more information first.

Cloudsplitter Summit Pack crafted by eSheep Designs
The Summit Pack ended up being bigger than I expected...

Unfortunately, I could not find very much about this bag online. It is fairly new, having been released only this past July, but I would have thought that the pattern testers would have posted more photos of their bags or said something about their experience in making them. I saw four or five pics of these bags via Instagram, but I am not on Instagram to be able to access anything more than the Google search results, so could only see small shots of the finished front of the bag. (I ultimately found several completed projects being sold on Etsy — for over $100 each — but that was after I had made my own bag.)

But like I said, six bucks? Sold! I picked it up the day after I first saw it.

Instructions: 4.5/5

The whole PDF is easy to read and to understand, which may well be the most important attribute of a pattern. The written instructions are clear and concise. You might say that there is just enough detail to get it done and maybe not quite enough to make it absolutely foolproof; hence my rating.

I was never truly confused at any point, but I did experience a few instances of "does she really mean..." and would have appreciated an extra few words of confirmation or affirmation. I read from one of her testers that you need to take the designer at her word, so I will second that thought.
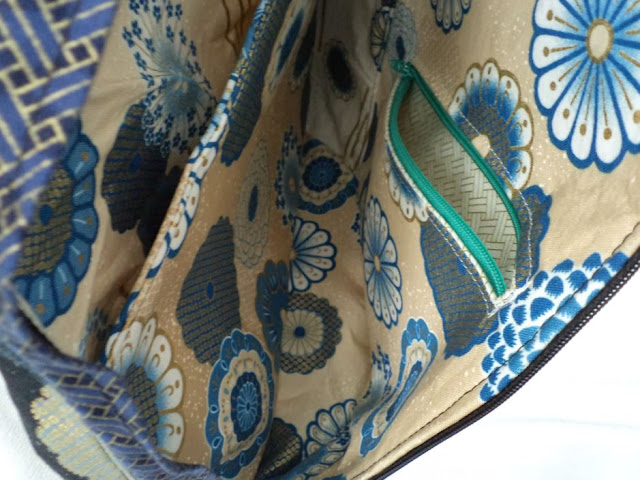
Cloudsplitter Summit Pack crafted by eSheep Designs
Summit Pack's main compartment: at left is a padded "gadget pocket",
a standard zippered pocket is opposite...

My issues arose from the two main zippers. Up until it was time to install them, I was under the impression that my white zipper was for the big main pocket and my black zipper was for the lower arched pocket. In her list of materials, she had identified one of the zippers as "with larger pull and wide zipper tape." For whatever reason — because it wasn't made clear — I assumed that that was the zipper leading into the bag's main compartment.

Cloudsplitter Summit Pack crafted by eSheep Designs
Back view of my Summit Pack...

My other zipper issue led to my one main headache in the sewing process, and it has to do with the fact that once you start using zippers of smaller or larger size (in terms of the zipper tape width), you will affect the overall size of the piece to which you are attaching the zipper, even if you follow the seam allowance. (On a piece that has two potentially variable zipper sizes on it, you could very well end up with a situation where your lining piece will not match the exterior.) I thought that a mention could have been made about that possibility to warn us ahead of time.


Get Betz White's Flight Bag class with your free Creativebug trial...
http://www.shareasale.com/r.cfm?u=960352&b=404942&m=42943&afftrack=&urllink=www%2Ecreativebug%2Ecom%2Ftrial%2Fcreate%2Daccount%3Fredirect%5Fon%5Fsuccess%3D%2F
Check out my review here...


Photos: 4/5

The photos that accompanied the step by step instructions are more than adequate, and I've seen so much worse in that department that I am just being picky here. (Less picky people might say that there are just enough photos.) However, there were a couple of spots where — while trying to fit together some of the curved pieces — I wondered, should the end go all the way up to here, or just to here? Should this be even with this or this? A few more pictures (or maybe some measurements) to clarify would have made it perfect.

Cloudsplitter Summit Pack crafted by eSheep Designs
This is the inside of the lower front pocket... the entire card slot assembly also serves as a patch pocket...

As with all patterns, once you've made one, the second one will be so much easier. Which is fine if you intend to make multiples, but in making that first one, it's essential to feel like you're proceeding in the right direction from the start. In this case, when you're trying to manage so many different pieces, you just know that if you let one mistake "go", it will likely bite you in the butt later. It's a concern that having a few more photos — or a few more words — might have alleviated.

Cloudsplitter Summit Pack crafted by eSheep Designs
I customized the front of my Summit Pack by adding yet another zippered pocket!
(The hanging loop is also my addition.)

Oh, and back to my original thought about not being able to find much info/photos about this pattern, it would have been helpful to see more shots of a (different?) finished bag from various angles, of both the interior and exterior. The PDF actually didn't even include a photo of the back of the bag.

Templates: 5/5

Exemplary is how I would describe the quality of the many pattern templates that are provided with the PDF. Of the 39 pages, 14 are for pattern pieces. Since there are still other rectangular pieces required, Sydney has helpfully included a cutting list page that you can refer to as you cut your fabric and interfacing.

Pieces that need to be taped together are very clearly marked and the joins are essentially foolproof. Each template indicates how many pieces need to be cut out in what fabric and in what interfacing. If you read what's on each piece, you should have no difficulty whatsoever in understanding what to cut and how to cut (with pattern side facing up or down).

Cloudsplitter Summit Pack crafted by eSheep Designs
Bottom view of the Summit Pack...

Be aware that if you're normally the sort to just take a look and then cut merrily away, you may want to exercise a little caution. The way this bag is shaped and constructed, you need to have several mirror image pieces for the back/lining.


Watch live classes for FREE at CreativeLive!
[affiliate link]


Design & Usability: 5/5

As I said at the beginning, I had been wanting a pattern like this, so I was pre-sold on the design. Not like I've been on a constant search, but I'm pretty sure there aren't many patterns out there for this type of bag. Of the few that could be considered similar, none have the same aesthetic appeal. The teardrop shape and general curviness of this bag set it apart from the usual rectangular versions.

This one came out a little bigger than I expected, however, so if I do end up making another — or develop my own — it will definitely be a scaled down version.

Usability? I've gone out with it and it seems to hold a lot more stuff than one might expect. It's not as humongous as a normal backpack so is unobtrusive. It's comfortable to carry. (I added padding to the strap.) All in all, it looks good and functions well.
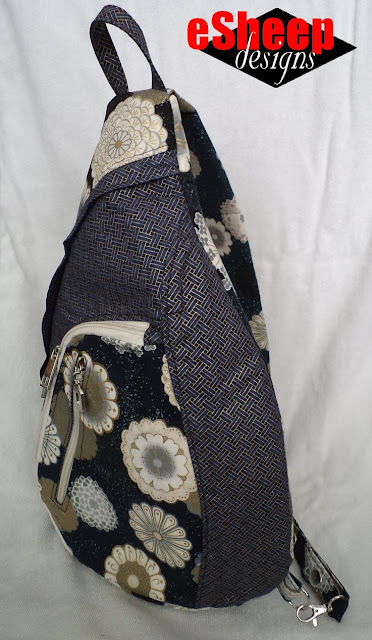
Cloudsplitter Summit Pack crafted by eSheep Designs
Summit Pack side view...

On a personal note, it's odd that while I'm not a backpack sort of gal, this is now my second backpack sort of project! (And I've actually been using my modified Summer Sling bag since September.)

Final Score: 94%

Bottom line for the Summit Pack? Highly recommended, for many reasons.

First, it's not often that you can find a bag pattern that you can make for a guy. (That in itself is significant; although my guy says he'd want his to be smaller.) Second, the design is not your run of the mill, "been there and seen it many times before" type of design. While not original as a bag, as a pattern, it's definitely different. Third, it's a practical bag and highly usable. And fourth, while it's already a multi-purpose, multiple-pocketed bag, you can still customize it. I'll show you what I did with mine next week, as well as give you a rundown of the sewing experience and where I had my (relatively minor) difficulties.

Want the pattern? Check out Sydney's shop here.


Saturday, 22 October 2016

Remembering Our Moms and Dads...

eSheep Designs
My mom working away at her sewing machine...
... and how they helped make us who we are.

This post is dedicated to a fellow blogger who lost a parent suddenly this past week. Hearing the news, it made me think about how our mothers and fathers shape us in ways that we often don't consider until after they're gone.

Those of us who grew up inside nuclear families over half a century ago had relatively uncomplicated, simple upbringings. Our inner perceptions of those years likely haven't changed much over the decades. We remember a time when dads worked and provided for everyone while moms likely stayed home, acting as the glue that kept families together.

As kids, we had freedom and security in a way that is both undefinable and incomprehensible by today's standards, mostly because today's idea of security involves weird and crazy over-protective concepts that didn't exist back then.


So I wonder: are today's parents still the primary influences on their children the way my generation's parents were? Sadly, I doubt it. The very medium by which I am communicating this thought has taken over the shaping of today's generation. There are so many uncontrollable external influences — typically uncensored and unvetted — on kids today that the influence of the family unit may well be lost in the mix.

That wasn't the case "back when". Take something as basic as politics... and I promise that's all I'm going to say on the subject.

My political leanings were shaped quite early on by my father. I learned to type — on a manual typewriter — at the age of nine because my father used a typewriter. My strong interest and eye for photography was cultivated by my father. Dad also selected and bought books for me (remember Scholastic Books?) on a monthly basis during my early school years, turning me into an avid reader, and over time, an avid writer.

eSheep Designs
My dad's typewriter...
However, unlike today's over-compensating and over-doting parents, I don't recall ever being told by my dad that I was awesome or that he was proud of me. I don't think I suffered for it... much. Although as a teenager, I did have moments of wondering — what do I have to do to get some praise?

In any case, after one of his many hospital procedures before he passed, he told me, "I don't know what I'd do if you weren't here"... well, that made up for any slights that I may have felt during my youth.

That said, I was and always will be my mother's daughter. In a way, it's fitting that she is my "remaining" parent. She and I share a closeness that would never have been equalled in a relationship between my dad and me.


Check out Creativebug's Bag of the Month series for free...
and continue for only $4.95 a month!
[affiliate link]


My mother now lives only five minutes away from me. We connect via phone twice a day. In warm weather, I might arrange to meet her for her morning walk halfway between our homes. She is independent, very vibrant and quite healthy. However, she did reach a milestone birthday this year and I can tell that it's made her more contemplative.

During a recent conversation, I asked Mom how she learned how to sew. Oddly enough, the question had never arisen before, even as my own sewing hobby came to be revived over the past several years. I just had a mom who used to sew and it never occurred to me to ask how she came to acquire the skill.

Apparently, when my aunt moved away after getting married, Mom inherited her sewing machine. She started using it and because money was tight, ended up making her own clothes and then clothes for her nieces.

Her method was to take existing clothing and just trace the basic shapes around them. She did not ever buy a pattern. And yet, she would turn out pieces — dresses and later pantsuits — with obvious individual styles.

eSheep Designs
Some of Mom's dress designs (circa 1960s)...

Take a look at her basic shift/sheath dress at top left above. (This was her "go to" favourite style to sew: a mashup of a fitted shift and a loose sheath that had sleeves.) The other pictures shown are variations that she came up with for the top half of similar dresses.

Here is another, with some closeups of the detailing that she incorporated into each and every one of her creations.

eSheep Designs
Look at the yoke and darts and seaming on this dress!

On occasion, with the same materials, she would make four or five dresses (for her, my aunt, my cousin(s) and me) and they would all be different! She was even "commissioned" by her friends to make clothing. When I discussed this with her last week, she didn't even seem to be aware of how talented she was back in her day.

I like to think — even though she never formally taught me to sew (I learned at school) — that I inherited some of her creativity and natural aptitude for the craft. Her work had to have been a source of inspiration, even if I didn't actually know it at the time.


Watch live classes for FREE at CreativeLive!
[affiliate link]


When I moved her out of my parents' home after Dad died, we gave Mom's old Singer sewing machine to one of the movers. (It didn't work anymore and the guy said that his mother would love it for display purposes.) Yes, there were memories tied to it, but she knew that downsizing meant getting rid of "stuff" and what better time to do so than during a relocation. It would have ended up in Mom's (new) basement had she kept it... which is where Dad's typewriter is, by the way!

In any case, memories are not all about physical things. As long as our brains stay alert and active — and yes, that's the challenge — our memories are always with us. (Or available via our diaries and photographs.) As long as we take the time to sit down and share stories about the people who have influenced our lives, they continue to live on long after they've left us.

That's probably how it's been since the dawn of civilization.

So the next time you talk to your mother or father, ask something that you've never asked before. Or play the "tell me something I don't know about you" game. Collect another story to remember them by when they're no longer here.

Are there any obvious interests or talents that you inherited from your parents that you would like to share?


Saturday, 15 October 2016

Extreme Designer Handbags

The Art of the Handbag by Clare Anthony
The Art of the Handbag by Clare Anthony...
Some time ago, I took out a book from the library called "The Art of the Handbag" by Clare Anthony. It covers a brief history of what we call the handbag and then goes into many chapters featuring designer versions of handbags that one might consider as better in the form than function department.

Some are intriguing, but others border on the ridiculous. (And just when I thought that bag designs were getting mundane and unoriginal... but that's a topic for another time.)

It inspired me to Google further work from the designers in the book to see what other outlandish creations they've made.

I'll begin with a name everyone will know. Apparently this Chanel hoola hoop bag (which is actually featured in the book) was widely seen when it came out in the fall of 2012, but it hadn't ever passed my eyes until now. As I've said before, I'm not much of a fashionista!

Chanel's prototype hoola hoop bag...
Mr. Karl Lagerfeld himself described the bag as meant for the beach, hence its ridiculous size. (And here you and I thought that big tote bags were good enough for the beach!)

Oddly enough, when production rolled out on the design, it was in the form of a "mini" version that was probably only about a 10" circle at the most. (Pricing wasn't similarly mini as you might guess; it retailed for $2,400.) I thought it ironic that from such a huge idea came a tiny little bag that was probably quite restrictive in terms of how much it was able to carry.

Shoebag by Azumi & David
Heel Kelly Bag in Orange by Azumi & David...
Do you like shoes? (I do.) It's often said that women can't have enough shoes or bags, so husband and wife designers Azumi & David must have thought it appropriate to combine the two. They have been making these shoe bags since 2001, featuring shoe styles of all types.

This one shown here (retailing for £250) is more bag than shoe compared to one from the book (which closes with a metal purse frame and looks just like a bootie with a handle on it).

I'm not sold on the concept, but I do see an upside... you can set this purse down on the ground because, hey — the bottom's just a shoe!


Check out Creativebug's Bag of the Month series for free...
and continue for only $4.95 a month!
[affiliate link]


How about "purse as weapon"? Alexander McQueen specializes in knucklebox clutch designs that could be deemed illegal in many places. This one is actually a more delicate looking version than the one from the book. (And if you like it, it's available for only $3,895.)

image courtesy of AlexanderMcQueen.com...

Debra Gavant's thing is "handbag as sculpture" and I must say that as bags or as sculptures, personally, most of her creations escape me (interpretation and appreciation of art being in the eye of the beholder, of course).

Image courtesy of DebraGavant.com
Debra Gavant's "chicken" bag...

As you might imagine, this interpretation of a prepped chicken is one of her more outlandish creations. (And I have no idea of what it would cost to own this chicken...)

Bea Valdes bag
image courtesy of luxussilk.wordpress.com...
At the other end of the style scale, Bea Valdes specializes in works of art with ornate stones and beading. (I can imagine every bag of hers being heavy to carry!)

This bag here is called the Maharlika Evening Bag with peacock feathers. Wasn't able to track down the cost for this piece, but I've seen pricing for her other pieces up to $2,000.

Along with other wristlets and uniquely shaped clutches, she also creates stupendous looking statement necklaces using the same beading techniques.


Watch live classes for FREE at CreativeLive!
20% - 30% off classes this weekend!
[affiliate link]


Jerome Olivet bag
image courtesyy of thisbag.net...
Jerome Olivet is a minimalist French designer with a knack for making things with odd shapes that look slightly "otherworldly".

He works with both PVC and leather; this particular bag (also featured in the book) is called an 09 Pod and is made out of calf leather, retailing for $259.

There is a sense of the importance of ergonomics in his designs. Most of his bags are created to hug the body and therefore end up with rounded and contoured edges.

Apart from uniquely shaped bags (and there is indeed something named Love Bag that I will leave to you to hunt down and appreciate its — ahem — stimulating shape), he also creates accessories for the home.

James Piatt "The Founding"
image courtesy of jamespiatt.com...
Ultra mod not your style? How about alarmingly edgy? James Piatt has made some pretty "out there" creations in my humble opinion. Check out this one called Foundling, a satirical take on celebrity parenting.

Made out of copper, it's a crying baby obviously, but apparently it also includes a selection of charms meant as a nod to some noteworthy (?) celebrity parents. (Details are on his website if you're interested.) Price for this one? $989. Also available in leather for $789.

Two of his other more outrageous designs include a hanging dead cat and a rifle. Yep.

dice bag by moschino
image courtesy of moschino.com...
Lastly, the house of Franco Moschino actually has some pretty traditional designs in terms of bags, but I chose this one to illustrate the outer limits of his/their imagination.

Yes, that's a set of faux fur fuzzy dice. (And way too big to hang from your rearview mirror.) You can have it for $1,285. It would be a conversation piece, right??

Apart from bags, Moschino also puts out a whole line of clothing, shoes and other accessories for men and women.

So what do you think? Did you enjoy this walk on the wild side of handbags?

If you found the topic fascinating, I recommend you check out the book... it was available as an electronic download at my library, so you may not need to extend a whole lot of effort to take a look. ;-)


Saturday, 8 October 2016

Never Too Old For a Stuffie

eSheep Designs sheep stuffie
Meet my new mascot!
I once told a young lady in her early twenties that "you're never too old for a stuffed animal".

And how can anyone argue that point when for eons, guys of all ages have risked ego-crushing embarrassment at fairs and carnivals trying to win stuffies for their girlfriends??

My hubby and I went to our summer fair for the first time in years this past July. And you know, even though I saw an amazing number of "real seniors" (i.e., people older than me) on the grounds, it occurred to me that the midway is really a place for the young. And even though my other half would have happily demonstrated his various skills at those impossible games had I asked it of him, I was just mostly appalled by how much it would cost to try anything.

Not to mention that I didn't see any stuffie that appealed to me. :-)


It wasn't that case earlier this year. Back in May, I saw this tutorial for a sheep stuffie pillow featured on AllFreeSewing's Seams and Scissors blog and fell for its cuteness factor. (The creator is Stephanie Woodson, who blogs at SWoodsonSays. Full link to the tutorial can be found towards the end of this post.)

As usual, I didn't jump into the project right away, filing it for future reference. It was almost three months later by the time I gathered up materials to make my version of this ultra cute sheep.

eSheep Designs sheep stuffie
Preparing to cut my fabric...

From another crafting project, I had a package of assorted pieces of felt, but they were small pieces. While I had sufficient black felt, I would need a new supply of white. Never one not to "make do" somehow, since I still had some of the white fabric left over from my skirt project, why not make this with fabric instead of felt?

Besides, haven't I been changing up things on found patterns all year long?

With that thought in mind, I also found a different ("easier") way to make the eyes and mouth. (Embroidery floss? Satin stitching? Not for me, thanks.) I did away with the need for the white felt under the eyes and just used some ready-made "googly eyes" that I found at the dollar store. Also, if this sheep was going to become the official eSheep mascot, it had to have some red in it. Therefore, I used red felt for the mouth and then some more for the back electrical cord.

Yep...

eSheep Designs sheep stuffie
Planning my electric sheep stuffie...

This was going to be an electric sheep, after all. (I used fabric glue to attach the felt on the back.)


Check out Creativebug's Bag of the Month series for free...
and continue for only $4.95 a month!
[affiliate link]


Had I used felt for the body, it would just be sewn all the way around from the right side; i.e., no turning required since felt doesn't fray. Using fabric for the body meant that it would have a different look along the edges if I didn't do something else different.

As you can see in one of the photos above, I adjusted the size of the body template by about a quarter of an inch. My plan was to topstitch along the edge of the body so that the finished item would have the same look as the original.

eSheep Designs sheep stuffie
Pinning along the seam to prepare for topstitching...

I stuffed the sheep with a half bag of cotton balls, shoved them to one side and then pinned and carefully sewed up the side opening. It has just the right amount of fill for my purposes. The final step was to secure the eyes and the mouth using double sided tape and fabric glue respectively.


Watch live classes for FREE at CreativeLive!
10% off classes this weekend!
Plus — New customers can get 25% off with code: APWELCOME25
[affiliate link]


Here is the back view of my eSheep...

eSheep Designs sheep stuffie
Back view of my electric sheep...

What do you think? Is he cute?

And if you know me at all by now, you would know that I needed to have a place and a purpose for him before he came to be. I snagged some fishing line from the other half and hung this mascot from the ceiling over my sewing machine. May it inspire creativity!

eSheep Designs sheep stuffie
Finished mascot hangs over the work area in my sewing room...

If making this for a child as a toy, of course, one would have to reconsider some of the changes I made. However, as you can see, it would make a great crib mobile (you can adjust the template to make the sheep in other sizes). For that purpose, I would recommend cutting out an additional circle of black felt and gluing it onto the back as a tail. (Assuming you don't want to follow my lead and turn them into electric sheep!)

Swoodson sheep pillow
image courtesy of
swoodson.com...
To make one of your own, click here for the original tutorial. The original's even cuter — and arguably looks more like a sheep — but I'm always willing to go a different route based on what I have on hand and what I can easily find.

By the way, while this is the first stuffie that I've actually made, there have been a couple that have attracted my attention. The first one was a very classy looking penguin. The second was a cool looking cat.

This third one, while technically not a stuffie, deserves a mention just because it's so unusual and intricate... a fabric Mad Hatter Tea Set (which I will never make because it's all hand-sewn)!

free "stuffie" patterns
images courtesy of wee wonderfuls (Hillary Lang), super pop (Kris DeGraeve), and Purl Bee (Molly)...

These two stuffies in particular need to be packed really tightly to keep their shape, which is likely the reason I haven't attempted them. The thought of having bits of polyester fill all over the place as I try to close a seam by hand is just not the kind of punishment I am willing to take on any time soon.

Now I'm ready for some stuffie-making stories! Do you have any experiences to share? Any favourite free patterns to pass along?


Saturday, 1 October 2016

Latest Trends in Purse Accessories

Purse Hook on Summer Sling Bag crafted by eSheep Designs
My new purse hook becomes an integrated part of my bag bling!
First of all, let it be firmly stated that I am neither a trend setter nor a trend follower by any means. Nor am I any sort of self-described fashionista with insider info on what's new and hot.

Therefore, the title of my post today is merely meant as a catch-all phrase to group together a bunch of purse-related things that I recently found (mostly on eBay) that I wanted to share with those of you who don't have the time or inclination to look. This usually includes me, but I just recently came back from a period of two weeks during which I was mostly off the internet. As I was leaving feedback for a recently completed eBay transaction, I was easily enticed into looking around. ;-)

When I made my customized version of the Summer Sling Bag, one of my additions was a hanging loop to allow the use of a purse hook. At the time, the purse hook I had was several years old; it was a basic one from a breast cancer fundraising campaign with a pink ribbon emblazoned on it. Nothing special, it wasn't foldable and had to be carried inside my bag with the rest of my stuff.

When I wrote up the blog post for the sling bag, I provided a link to all manners of purse hooks and it got me searching for a new one. The one that I ultimately chose is a nifty version shaped like a purse with rhinestones all over it, shown here and at top. Coincidentally enough, it ended up fitting perfectly along the inside of the ring that trims my sling bag. That's right: it adds bling to my bling! (It also adds weaponry — you'd be amazed by how much damage can be inflicted by swinging a bag with an unsecured flap that has something heavy attached to it!)
"Purse" purse hanger
How my purse shaped purse hanger works...

In and of itself, a purse hook is functional. For something functional to provide bling to a bag is awesome, don't you think?

Here is another totally cute purse hanger that fits the bill as functional bling. This one is shaped like a pair of flipflops. (Price: $4.33 USD)

purse hanger sold by eBay seller intertradego
image courtesy of eBay seller intertradego...

And here is yet another purse hanger format ($2.99 USD) that is designed to be attached to your bag as bling...

purse hanger sold by eBay seller suntekstore
image courtesy of eBay seller suntekstore...

Bag bling and zipper pulls in the form of a tassel is all the rage. And while I've seen tutorials for making tassels that look professional — and realistically, will not be cheap to make — this dual purpose one (can be a keyring also) is pretty elegant and won't set you back big bucks at only $2.65 USD. (I'm pretty sure that one like this can even be taken apart to serve as two zipper pulls!)

bag bling sold by eBay seller 6godwater
image courtesy of eBay seller 6godwater...

By the way, if any of the items in this post appeal to you, I urge you to take the time to sift through eBay for the best offers. Prices vary and I am by no means endorsing any of the sellers mentioned here. And by "best" I don't just mean check the price. As a regular user of eBay, I try to look for sellers with a 99% or higher positive feedback rating. (I realize that eBay is not anyone's favourite option due to potential problems with quality and unreliable delivery, but often I'm just not willing to pay five times the cost — in particular, in terms of purse hardware — to get my stuff elsewhere.)


Check out Creativebug's Bag of the Month series for free...
and continue for only $4.95 a month!
[affiliate link]


The next items that I came across are helpful to keep your purse or bag organized.

These little things are quite interesting and I would assume they might actually be useful. Price is 99¢ CDN for a set of two.

plastic hangers from eBay seller fat-mango
image courtesy of eBay seller fat-mango...

Next up is what I call a deluxe, multi-functional purse organizer. I am, of course, a fan of purse organizers, having designed a couple of them myself, but who needs to do the hard work when you can buy this for only $2.41 USD? (I also saw them at Dollarama this past week for $3.50 CDN.)

purse organizer sold by eBay seller lusomuch
image courtesy of eBay seller lusomuch...

This thing has a section of mesh pockets on top of regular pockets on both sides, a couple of zippered pockets along the top edges, and a large open central area — with handles for easy removal — to keep all of your messiness in one place! There are even some snap fasteners along the ends to make the unit thinner if needed.

I'm sure I could figure out how to make one, but really, what would be the point?


Watch live classes for FREE at CreativeLive!
[affiliate link]


Finally, I've often found that changing a strap can give a bag a whole new look. Here are three of the many, many purse straps are available via eBay, from pricey to not so pricey...

This is an example of the embellished leather straps that are currently available on eBay. (Can't say that I'm a fan of the look, however.) It's about 35" long and priced at $41.99 USD.

flowered leather purse strap from eBay seller shining-forever
image courtesy of eBay seller shining-forever...

I get that it's real leather, but really — forty-two bucks for a strap?

At a more reasonable (but still kinda pricey) $9.10 USD each, these are Chanel-inspired straps in faux leather and chain.

faux leather and chain purse strap sold by eBay seller beststore.ty
image courtesy of beststore.ty...

These braided velvet purse straps are available in lengths up to 47" and are relatively bargain priced at $1.89 USD.

purse straps sold by eBay seller modtimes2018
image courtesy of eBay seller modtimes2018...

Last but definitely not least — while we're on the topic of straps — I stopped by Janelle's blog (Emmaline Bags) last week and found out that she is introducing a new line of strap anchor hardware to her shop. Some are really distinctive looking. What's more, she's also released a free bag pattern to show you how to showcase them, so if you're wanting to add a new and exciting feature to your handmade bags, be sure to take a look.

Are you an eBay shopper? If not, why not? If yes, what's the absolute best purchase you've ever made on eBay?