-->
DISCLOSURE: This blog contains Google Adsense ads and affiliate links via which potential commissions are earned when visitors click through.

Search This Blog > > >

Showing posts sorted by date for query sunny glasses cases. Sort by relevance Show all posts

Saturday, 7 May 2022

The Sewing Equivalent of Dumpster Diving

#10 Tribute Hanging Plate by eSheep Designs
Tempus fugit...
As sewers, we often need quick and easy projects to jumpstart our mojo. I don't know about you, but I often get into a funk about what to take on next, even if I've identified projects that I actually want to do.

One suggestion that I have is to dive deep into your box or bag of scraps and see if any of them "speak" to you.

You may find that the effort leads to the completion of unexpected treasures. Not to mention jumpstarting the mojo.

Today's post is about two different projects that I cobbled together (one very recently and one from over a year ago) using discards that I found in my scraps box.



Do you ever chuck entire unfinished projects into your scrap pile?

I did that with a pin cushion idea that I had, made out of two leftover pieces of my Winter in the City fabric. (It was my favourite design out of the ones that I came up with during my first attempt with Spoonflower.)

Winter in the City coaster by eSheep Designs
One side of the rejuvenated project...

I had just completed some throw pillows and sunny glasses cases with the fabric and had a couple of pieces left over that looked like they could be turned into a miniature pillow/pin cushion. My enthusiasm died, however, after I decided to bind the edge with piping and subsequently had issues doing it.

That was 2017.

Winter in the City coaster by eSheep Designs
Reverse side...

In March last year, I found it while digging to the very bottom of my scrap bin. I didn't take a before picture, but it was the two pieces of fabric stuffed with polyfil and finished off with some ragged red piping. It was truly rather sorry looking.

I unpicked the binding and tossed it aside, removed the polyfil, and put a piece of fusible fleece between the two pieces of fabric. Then I quilted it as you see here.

Winter in the City coaster by eSheep Designs
This coaster has been well used over the past year and some...

Using regular binding that wouldn't call as much attention to itself (and also narrower than the previous version), I finished it off properly and it's been sitting on my desk ever since.

It's home for my cup of coffee or water whenever I'm at the computer. From something that was ignored and virtually forgotten at the bottom of my scrap heap for years, it is now something functional that I see and use every day.


Watch live classes for FREE at CreativeLive! Sign Up at CreativeLive
[affiliate link]


Part of this next item was also an entire project that was abandoned before it could be finished. (It was supposed to be a customized peanut shaped zippered pouch.) I cut the number 10 out of the leftover floral linen piece. The oval fabric is from a dress; I had used part of it to make a couple of no sew masks for Mom last year.

#10 Tribute Hanging Plate by eSheep Designs
Finding fabrics that complement each other well...

Two weeks ago, I decided to go scrap diving to find something that would inspire me to make a memorial piece for a hero from my teen years. I had no idea of what that would be, however, until I saw this sitting in front of our fireplace...

1070
House number sign...
We kept this when we sold our vacation home. (It used to be propped up on the ledge inside the front window. That is, it wasn't permanently installed outside; we wouldn't have taken it if that had been the case.) Hubby and I decided that it would be the perfect memento of our old home, even though the sign itself was purchased in faraway Mexico.

Once I took notice of the first two digits, I decided that my tribute project would be modelled after a door plate or a house number sign.

#10 Tribute Hanging Plate by eSheep Designs
Determined to add hand finished touches...

The dress fabric was a knit, so I interfaced it with some Decor Bond to make it easier to handle. It was eventually fused onto Peltex to provide structure for hanging.

The floral linen had already been interfaced previously with some SF101. As a result, it wasn't fraying so I didn't bother finishing the edges in any way. (The numbers are fused onto the background with pieces of Stitch Witchery.)

#10 Tribute Hanging Plate by eSheep Designs
One of two flowers I stitched onto the background...

Apart from the white stitching around the numbers, I used a couple of different red threads to add some other decorative bits to the background. (It helps that the fabric's print looks like stitching.)

#10 Tribute Hanging Plate by eSheep Designs
Closeup of other hand stitching...

No, I do not normally like hand sewing, but in this case, it was truly therapeutic... and an intentional and genuine labour of love.


Check out crafty classes at Creativebug!

[affiliate link]


There is a closeup of the brad that I attached to the number 1 at the top of this post. It's a clock with hands held at about twelve minutes after ten.

#10 Tribute Hanging Plate by eSheep Designs
My finished tribute to Flower...

I don't look for meaning in everything, but in this case, I couldn't help but notice. First of all, it's ten, then it's ten plus twelve which is twenty-two. April 22nd marked the passing of a hockey hero who lifted people out of their seats in anticipation like no other before or after.

"My Way" lyrics
It totally sucks to lose the unique individuals who made huge, indelible marks on your childhood. Judging by the emotional rollercoaster that I've been riding these past couple of weeks — while watching old footage, new tributes, and finally, an absolutely surreal funeral — le numero dix certainly did that for me.

Good night, sweet prince.

'Til next...

Saturday, 4 December 2021

Last Minute Gifts to Sew

alt text
Last minute holiday gifts to sew...
Before writing up this post, I did a quick search online for whether people truly appreciate handmade gifts.

The general consensus seems to be that a handmade gift is a gift beyond the mere item. The handcrafted part involves a gift of time and thought that no mass produced item can match. (Our respective mileages may vary for individual recipients, of course.)

With that in mind, I've picked out five projects that have been featured previously, as suggestions for last minute gift-y things that you can sew up relatively quickly for people on your list.

While they can all be appreciated by anyone (a couple are unisex and appropriate for all ages), the last two are designed as specific ideas for fellow sewing enthusiasts.


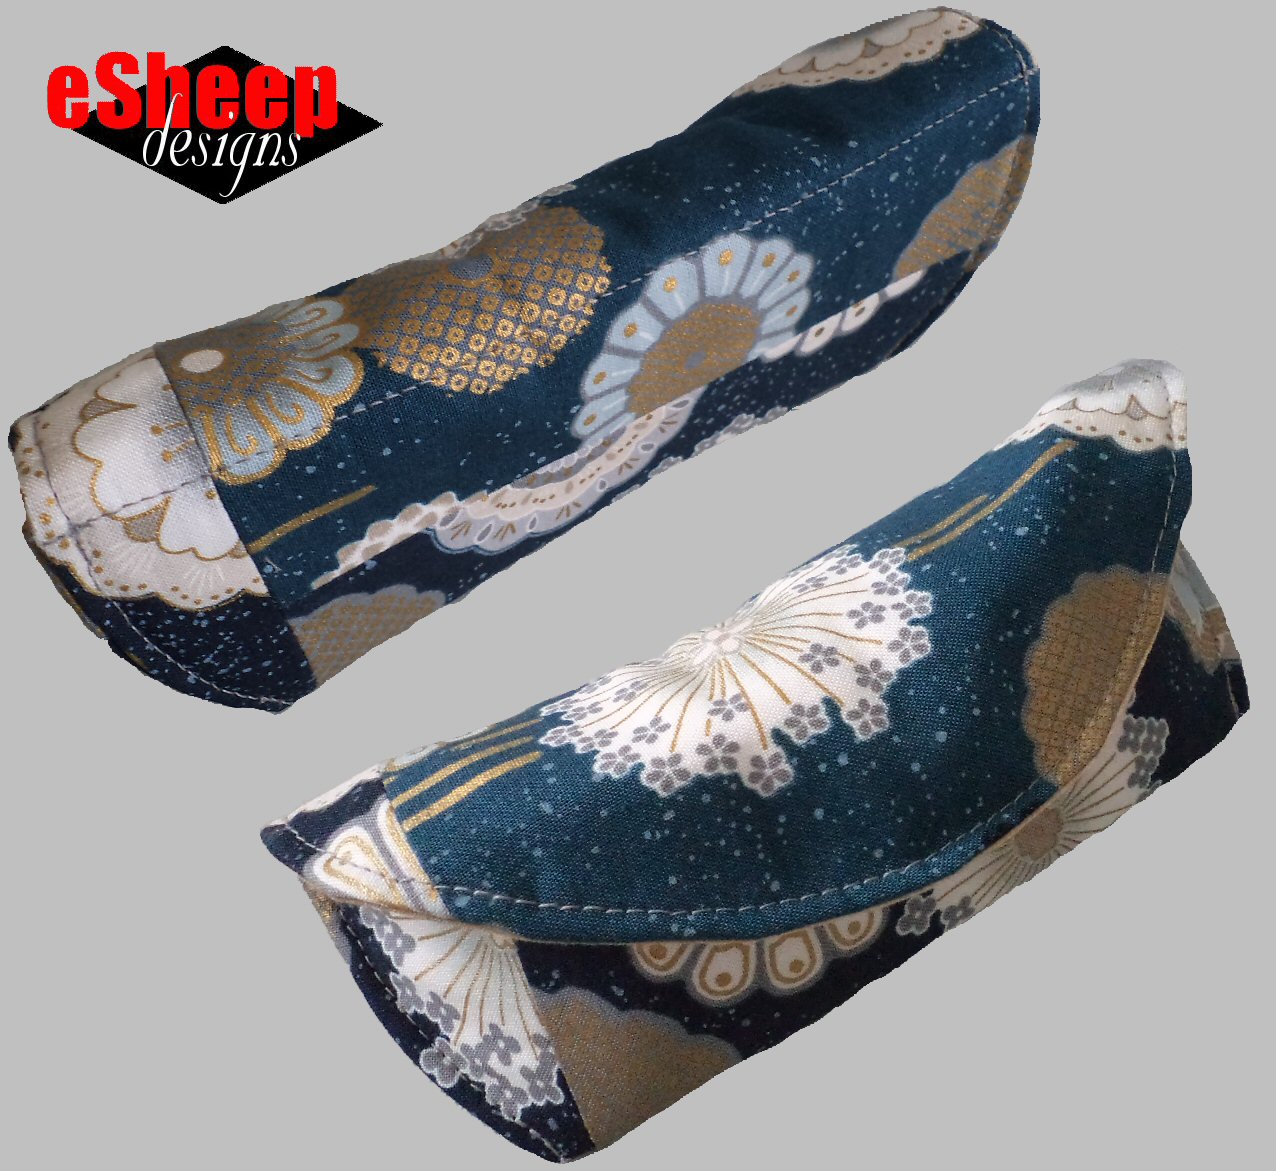
First up is the ever popular sunny glasses case from a free pattern by Sherri Sylvester. First featured here in 2017, I made three more a year later as gifts. (They have, in fact, all been given away as gifts; I no longer have any of these.)

Sunny Glasses Cases crafted by eSheep Designs
Thread Riding Hood's Sunny Glasses Cases...

For a case that can be sewn, it's uniquely designed in that it resembles a hard shell protective case. As a project, the fact that I've made five of them is a testament to the quality and usefulness of the item; I am usually loathe to make anything more than once.

It's so appealing that even though I like to have my sunglasses hanging from a loop in my purse, I've often thought over the past year about making one for myself... just to have.

For gift giving, you might pair it with some trendy sunglasses, if you are familiar with the recipient's tastes. (Or, if the person is question is approaching "that age", perhaps a pair of fashionable reading glasses!)


Watch live classes for FREE at CreativeLive! Sign Up at CreativeLive
[affiliate link]


My other suggestions are all origami-themed, with the first two actually being made from folding one piece of sewn fabric.

This triangular coin purse pattern can now be found everywhere, but the version courtesy of Sew4Home is still my favourite, hands down.

What's different about it is that the exterior is made out of ribbon. Every other variation that I've encountered show them being made (all) out of fabric.

Sew4Home Origami Ribbon Coin Purse crafted by eSheep Designs
Sew4Home version of origami triangular coin purse...

As with the Sunny Glasses Case, I have made five of these in total (one isn't shown above) and still use the one I kept for myself (the one with the button instead of the snap). While I wasn't sure at first, they ended up being fun to make. If you have a varied selection of ribbon, it's easy to get a unique result each time.

For the gift, consider pairing this up with a collectible coin of some sort. For instance, the Royal Canadian Mint puts out all sorts of coins every year to commemorate birthdays, anniversaries, and even sports and pop culture.

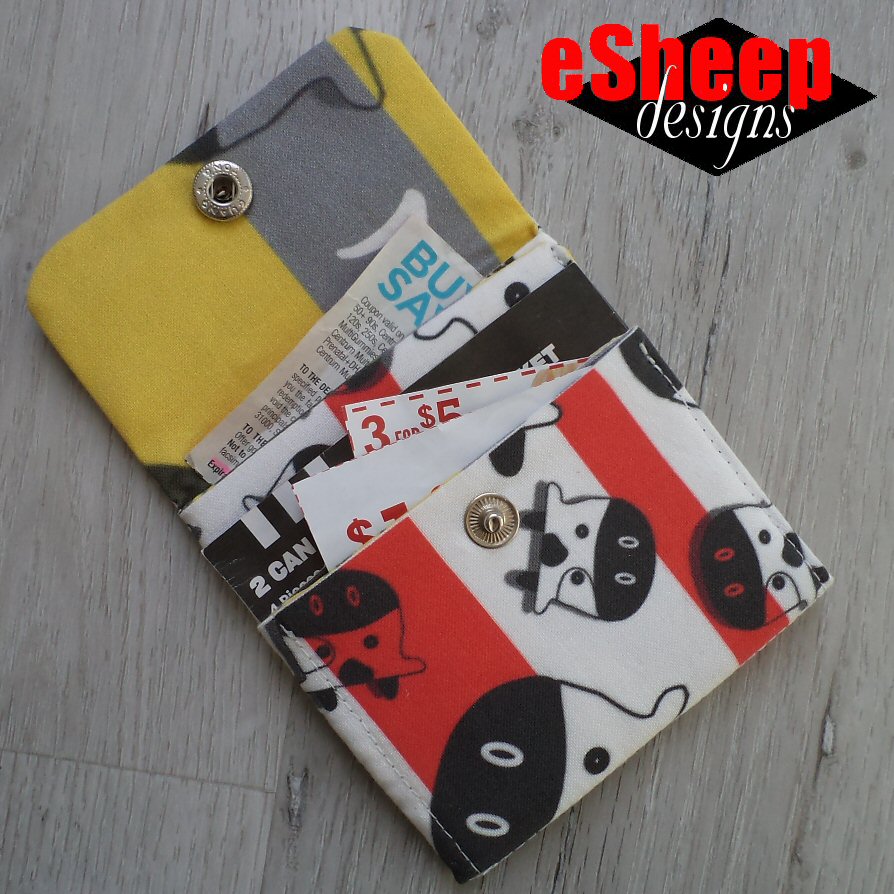
My third last minute gift suggestion is the almost origami coupon or gift card holder, for which I provided a quasi tutorial earlier this year.

Almost Origami Coupon/Card Holder by eSheep Designs
Actually quite a versatile item...

The idea is that if you're going to give away something as ubiquitous as a gift card, you may as well put it in something that's a little less commonplace. Made with appropriate fabric choices, it's a unisex item that has lasting value as a mini travel wallet or a loyalty card sorter.


Check out crafty classes at Creativebug!
[affiliate link]


My final two suggestions — as presented — are meant for fellow sewers. However, with a little imagination, they can be repurposed for something else entirely.

First is this origami pouch sewing kit:
Origami Pouch Sewing Kit by eSheep Designs
A 6 pocket origami pouch outfitted as a sewing kit...

Fill it up with sewing notions as I've done here and it can be an emergency sewing kit for anyone.

Back in September, someone left a comment on SewVeryEasy's YouTube channel wanting help in locating a tutorial for an exploding sewing box. I left a response with a link to mine and soon found the project trending on my blog stats.

Exploding Sewing Box by eSheep Designs
A fun project to make as well as to receive!

After submitting it to CraftGossip as well, it went sky high.

Never had one of my projects trend over two thousand per cent!

While this will take a tad longer to make than the other projects, it might be worth the effort for the surprise factor when received as a gift. Mine is used as a needle keeper, but it can be filled with other sewing notions as well.

I know this has been a sneaky "clip show" post, but seeing as I have gained a couple of new readers (I may have eight now; ha, ha) over the past few months, perhaps — for their benefit — this has been a worthwhile repeat. ¬‿¬

In any case, with December now upon us, happy holiday sewing!

'Til next...

Saturday, 22 September 2018

Quasi Sew-Along: More Sunny Glasses Cases

Sunny Glasses Cases crafted by eSheep Designs
Three — count 'em, three — Sunny Glasses Cases!
I rarely make more than one of anything these days, but this little item has been very popular among those who have seen it.

It's the Sunny Glasses Case by Sherri of Thread Riding Hood, first featured here about a year ago. (Please refer back that post for pertinent links to the original project and pattern downloads. It's a freebie!)

The first one that I made went to my mother when she said that she liked it. I then made another for me that I never got around to using. Some time later, I made a third one for an aunt.

A few months ago, a different aunt admired Mom's case, so Mom gave it to her.

I then gave my unused one to my mom to replace hers. When a cousin saw it, Mom was almost ready to give hers away again, when I interjected and simply asked my cousin if she would like me to make her one.

Here it is.

Sunny Glasses Case crafted by eSheep Designs
Sunny Glasses Case made with fabric from my Canadiana collection...

I didn't mind revisiting it because it's a fun and useful item. And it's the sort of thing that you get better at with each one that you make. Well, maybe. Usually. Yeah, more on that later. ;-)

The first one that I made was constructed out of pieced remnants of my Winter in the City fabric. It has a directional print, so I used three strips of it to piece together the exterior fabric so that everything would show right side up. It was also a cotton twill and having now made six of these cases — with the last two using just quilting cottons — I prefer a heavier fabric for this project.

Sunny Glasses Case crafted by eSheep Designs
Interior fabric is quite an appropriate choice for a glasses case...

The exterior fabric used for the case above is the Tiled & Mirrored 3D selection from my Canadiana collection, in a lightweight cotton twill. It's the second one that I've made with that same fabric; I bought a yard of it last year.


Check out crafty classes at Creativebug!
[affiliate link]


Today I'm going to go through the steps for making this super popular eye glasses case, for my own benefit more than anything. While Sherri's original tutorial is thorough, I am only ever going to make the one with a magnetic snap, so I've summarized the instructions specifically for that version, omitting references to three other variations. I've also added my own suggestions to the mix, which you are — of course — free to follow or not.

For the original full meal deal — since this is not meant to replace her tutorial — you'll need to visit Sherri's blog at ThreadRidingHood.com.

#1... First, cut out everything that you need according to the fabulous pattern templates. (Truly, I mean, she even gives you a template to cut the fusible fleece; I would have just told you to cut it 1/4" smaller than the fabric!)

Make a Sunny Glasses Case with Magnetic Snap
Cut one exterior and one lining piece... doesn't this look like a funny head with ears??

I sewed together scraps left over from my hanging file organizer project to get the full fabric pieces.

Make a Sunny Glasses Case with Magnetic Snap
Also cut some fusible fleece (for exterior fabric) and some plastic canvas (although I recommend Peltex)...

#2... Apply the fusible fleece to the wrong side of the exterior fabric.

[For this particular case, I decided to use a remnant from a fleece blanket instead of fusible fleece, just as an experiment. In place of the plastic canvas, I used a piece of a cutting mat. My preference is actually to use Peltex, for reasons that I will share later.]

#3... Installing the magnetic snap is the next order of business.

The Mark for Velcro that's printed near the top of the template along the fold line is where the bottom half (female) of the magnetic snap should be installed on the exterior fabric. (If you're planning on making more than one of these cases, you may want to write this down on the template itself like I've done here.)

Make a Sunny Glasses Case with Magnetic Snap
Use the back piece of the magnetic snap to determine where to cut into your fabric...

At the other end of the template, make a small mark 1" (2.5cm) up from the bottom (along the fold line) and label it as the location for the top half of the magnetic snap to be placed on the lining fabric.

Make a Sunny Glasses Case with Magnetic Snap
Add some fusible fleece scraps underneath the fabric for extra holding power...

It's always a good idea to put small pieces of interfacing underneath your magnetic snap hardware to provide additional support and prevent tearing.

Make a Sunny Glasses Case with Magnetic Snap
Pin fabrics right sides together in preparation for first bit of sewing...

#4... Pin the fabrics with right sides together and add the side marks for the flap edge on the exterior fabric.

Make a Sunny Glasses Case with Magnetic Snap
Sew along the top and along the bottom...

#5... Sew along the edge of the interfacing (i.e., with a 1/4" seam allowance) in two places: 1) across the top from point to point (the part that looks like ears), and 2) along the bottom from one flap edge mark to the other (the big curved edge).

Make a Sunny Glasses Case with Magnetic Snap
Notch the curved edges and then cut a horizontal slit at the two flap edge marks...

#6... Cut notches in the curves and make a horizontal cut at the two flap edge marks, being careful not to cut into the stitching.

#7... Turn right side out and press. If you take the time to press really well, you won't need to pin this edge as much (or at all).

Now you'll see a different project, because I actually missed doing this next step when I made the chevron case.

#8... Topstitch (at about 1/8") along the "top" edge.

Make a Sunny Glasses Case with Magnetic Snap
Turn right side out, press and topstitch...

#9... Sew a horizontal line from one flap edge to the other. This will create a separate compartment for the plastic canvas/Peltex piece, which can now be inserted.

#9a... If using Peltex, center and fuse it into place (against the lining fabric).

Good reasons to use Peltex instead of plastic canvas...

The part about me preferring to use Peltex instead of plastic canvas is two-fold. First, I always have Peltex on hand. Second, the lining of this case ends up being a bit loose, and I find that using Peltex — with the fusible side applied to the lining — results in a much cleaner finish.

Now it's time to manhandle this into shape and finish up.

Make a Sunny Glasses Case with Magnetic Snap

#10... Pin the sides so that the "ears" meet up with the two flap edges that were cut into the side seams. Do this with the exterior fabric on the inside as shown here. Sew with just under a 1/4" seam allowance.

Make a Sunny Glasses Case with Magnetic Snap
Sew together the raw side edges...

#11... Trim away the seam allowance to 1/8".

Make a Sunny Glasses Case with Magnetic Snap
Trim away half of the seam allowance...

#12... Flip the case right side out and then topstitch from one bottom corner all the way around to the other bottom corner, at just over 1/8". I like to reinforce the stitching at the flap edges.

Sunny Glasses Case crafted by eSheep Designs
This case was made from Robert Kaufman scraps...

And that's it... not very complicated and it gets easier each time. (The only thing that might trip you up is when you think you can remember all the steps and then miss one of them!)

Sunny Glasses Case crafted by eSheep Designs
The exterior is made out of three pieces of fabric...

This is made out of the scraps left over from my cousin's wallet and my Summit Pack. (I had to make a three-way join in order to get enough fabric.) Having made four of these cases with pieced fabrics, I think it's a great project for using up scraps. (I even pieced together a lot of the fusible fleece.)


Watch live classes for FREE at CreativeLive! Sign Up at CreativeLive
[affiliate link]


Here is the original case that I started out photographing, also made with pieced fabrics.

Sunny Glasses Case crafted by eSheep Designs
Notice the lack of topstitching along the front edge??

By the way, here is a comparison shot of the interior of this case with the Peltex and one of the others made with plastic from a cutting mat (which I assume would be similar to plastic canvas).

Sunny Glasses Cases crafted by eSheep Designs
Peltex support on left, plastic cutting mat on right...

With the plastic as the support, the fabric is loose inside the compartment. With the Peltex, it's very tidy. Which would you prefer?

However you choose to make it, just make it. For a glasses case, it's truly a superior design to those flat, opened-ended slide-in things. Using different fabrics, it has loads of appeal for gals and guys of all ages. Thanks again to Sherri for the awesome freebie!


Saturday, 23 September 2017

Winter in the City Glasses Cases

Sunglasses Case featuring Winter in the City fabric by eSheep Designs
A nifty sunglasses case!
Earlier this year, I featured a bunch of projects made by fellow Pride & Prejudice fan, Jane Vivash, using my P&P Spoonflower fabric. One of them was an eyeglass case.

When we finally connected again in July, she gave up the information as to where the pattern comes from... and better yet, it's a freebie! It's a tutorial posted on a blog called Thread Riding Hood (isn't that clever?), run by Sherri Sylvester, who is also a resident of the Great White North.

With link to tutorial saved, I put the project on the back burner because I really didn't need one of these. (I don't normally store my sunglasses in a case, preferring to hang them in some way for easier access.) And until I had the perfect scrap of fabric to commit to it, it wasn't a priority.

Sunglasses Case featuring Winter in the City fabric by eSheep Designs
Finally found a good use for my Winter in the City fabric!

In early August — during an unprecedented flurry of creative activity on my part — I wound up with a couple of 3.75" wide strips of fabric left over from the throw pillows that I showed you last week.

I had a lightbulb flash about how this remnant could be pieced together for use on the exterior of this case, which I confirmed with some quick measurements upon printing out the pattern templates.

It turned out to be a handy workaround for making the case out of any fabric with a directional print. The way the three strips are pieced ensures that the print remains right side up on the finished item.

Winter in the City fabric by eSheep Designs
Front and back views of my fabric piecing...

If you look at the picture above left, the first strip is upside down, the second strip is right side up and the third strip is upside down. (And given the shape of the pattern template, there's only one way that it will fit on that piece.)

The project calls for a piece of plastic canvas to provide the structure for the bottom part of the case. As is usually the case with supplies that are beyond the norm, I didn't have any and wasn't about to go out and look for some. I "made do" with an alternative that turned out to be highly effective if you find yourself in similar straits: Peltex. It's firm and holds its shape. (Haven't tried this myself, but I'm thinking that those super thin flexible cutting boards/chopping mats sold in dollar stores would also be a good substitute for the plastic canvas if you can't find any.)

Sunny Glasses Case materials
My two pieces of fabric (outer one interfaced with fleece) and piece of Peltex...

Cut, fused and ready to go... finally!


I didn't take any photos of the process, but it was a fairly easy sew. It took me two hours to get done, but it was a Sunday afternoon, I wasn't moving fast and — as may have been shared in the past — I'm very slow at the cutting part.

Here's a view of the interior. The lining was a piece of Walmart kitchen tea towel that was left over from the pocket linings of my Make it Yours proof of concept bag. The horizontal stripes contrast well against the vertical imagery of the City fabric.

Sunglasses Case featuring Winter in the City fabric by eSheep Designs
My tea towel lining...

The case has four options for finishing it off, from a basic hook and loop tape closure to a version that straps onto a vehicle visor. I opted for a magnetic snap, the installation of which needs to be done at the beginning.

Sunglasses Case featuring Winter in the City fabric by eSheep Designs
A magnetic snap was my closure of preference...

The pattern provides markings for locating a magnetic snap, so no fear about that. (I should say right here that the tutorial was top notch in how it covered the steps, along with photos of each. I would quibble a bit with the overall format of the instructions, but it's a minor quibble and it certainly won't prevent you from being successful if you read carefully.)

Here's a back view of the case — with the cover open — to show how the fabric piecing turned out.

Sunglasses Case featuring Winter in the City fabric by eSheep Designs
Back of case with cover open...

And here is the view of the back with the cover closed.

Sunglasses Case featuring Winter in the City fabric by eSheep Designs
Back of case with cover closed...

Let me say that this is a good introduction to making a 3D item that confident beginners should be able to manage.

Speaking of the 3D part, reading the instructions thoroughly is essential the first time out, as the final steps may not be as obvious as you think. (That's another reason why it took me a couple of hours; I kept having to walk up and down the stairs going from computer to sewing machine to get some clarification.)

But once you've made one, you won't need the instructions.


Watch live classes for FREE at CreativeLive!
[affiliate link]


When I showed Mom this project, she said she liked it and asked me to make one for her, so I gave that one to her. The other strip of fabric then became this second glasses case.

Sunglasses Case featuring Winter in the City fabric by eSheep Designs
The fabric was pieced together in an identical way for this one...

This one only took about a half hour to make!

Sunglasses Case featuring Winter in the City fabric by eSheep Designs
Other views... and to confirm, using the Peltex is sufficient to allow the case to stand up as seen here.

Here's the link to Sherri's Sunny Glasses Case tutorial. Definitely recommended as a scrap buster! What's more, it's one of those rare things you can sew up for a guy. (UPDATE: Wanna see some more? Check out this post here.)

By the way, "winter in the city" literally happened this past week... and since fall didn't officially arrive until yesterday, it was technically still summer at the time!

Yes, this happens in September, but not often...

But in light of all the other weather calamities happening elsewhere, I wasn't about to complain about a bit of snow that melted away by the afternoon. (That said, I had just returned from twelve days in warmer temperatures, so it was a bit of a jolt!) We're on schedule to be back to normal for next week, thankfully.