|
|
Modified Taylor Unisex Bag... |
Several weeks ago, my Mom gave me some donations to take to Goodwill. She also showed me a hobo bag that hubby and I got for her years ago from Puerto Vallarta, Mexico.
She said that she had always found the bag too big, but that she liked the fabric.
Should she donate it or could I use it to make something?
I asked if I were to make something for her along the lines of my crossbody sling bag, would she consider using it. When she said yes, I took the bag home to see how I could turn it into something practical for our pandemic shopping times.

|
| The original hobo bag... |
My first attempt at a similar remake was last year's Route 66 Ollie bag, when I transformed a long forgotten Las Vegas souvenir into something new and usable.
As you might expect, the first step is to deconstruct and see what results in terms of usable fabric.

|
| Seam ripper to the rescue! |
Taking it apart was no simple job, considering that the fabric is yet another tapestry-like material. (Luckily it was interfaced, unlike the Route 66 stuff.)
Once taken apart, it was clear that I had some pieces that could be used again without any alteration. There was a single welt pocket under the flap of the original bag that was totally functional as is. The strap, while too wide for the size of bag that I would be contemplating, was reusable as such, as was the flap.
Several years ago, I downloaded a free pattern from Huff 'n Cuffs via [old] Craftsy called the Taylor Unisex Bag. While there was nothing extraordinary about the bag itself, a striking version made by Carissa MacNaught (she being the creator of the Goddess of the Sea bag) caught my attention; it showcased a fabulous black and yellow fabric that was superbly fussy cut.

|
|
A winter photo shoot... |
Entirely because of that picture, the pattern has remained at the back of my mind over the years. So when I mulled over what kind of crossbody bag I could make for Mom, it didn't take long for me to print out a couple of the templates to see if I had enough reclaimed fabric to accommodate a modified version of the Taylor Unisex Bag.
It turned out that I only needed to make the gusset about a half inch narrower to ensure that I had the necessary fabric to make a reasonable facsimile of the bag's exterior.

|
|
Back view showing reclaimed welt pocket... |
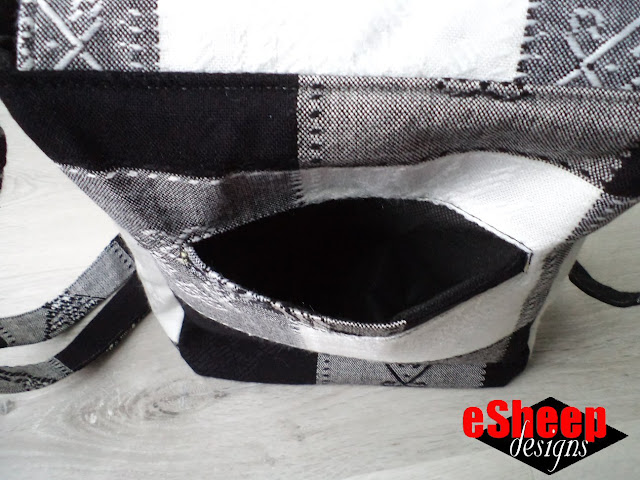
My reasonable facsimile would feature pockets on the front and back as the pattern dictates, but they would not extend from seam to seam. The other notable difference is that the flap rescued from the original bag was an inch and a quarter shorter than called for in the Taylor pattern and had a curved instead of straight edge.

When doing this type of "makeover", one must be open to improvising. The fact that I had an entire back panel all ready to go was worthy of celebration. What does it matter that the original pattern called for a full width slip pocket?

|
| Welt pocket not as big as a full width slip pocket, but I didn't have to make it! |
I did have to do some work. I applied fusible fleece to every piece of exterior fabric to give the finished bag some body.
The Taylor pattern also calls for the front zippered pocket to be full width. I only had so much of the main fabric to work with, however, so my best bet was to fall back on a traditional zippered pocket and use some of the lining fabric as the pocket lining.

|
| Standard zippered pocket instead... |
That said, since this flap was shorter than called for, I positioned the zippered pocket higher, with the result that it is deep and roomy, much more so than per the original design.

|
|
For idea of scale... |
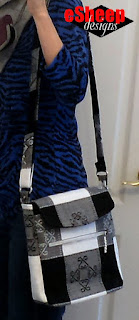
No real biggie. In use, if Mom puts stuff in that big zippered pocket, that will take up the space at the bottom of the bag.
Speaking of the lining, when I posted about the Route 66 Ollie, I mentioned that a bag's lining doesn't have to follow the exact some construction as the exterior. That is, if you have a front/back/gusset style exterior, it's not necessary to repeat that for the lining. It would be easier to sew up a simple front/back with boxed corners type of lining.
As long as the top of the lining fits snugly against the top of the exterior when it comes time to sew the two parts together, you're golden.

|
|
View of base... |
As indicated above, I had to reduce the width of the gusset by a half inch. To achieve this, I simply sliced the gusset template in half lengthwise, cut 1/4" from each side and then taped it back together. (Remember this whenever you need to adjust the size of a symmetrical piece: change it in the middle.)

|
| Side view... |
Due to the nature of the precut fabric, I had to cut the gusset as two separate pieces. It turned out to be the best option anyway, considering that I was able to make both halves match; i.e., the sides look the same.

|
|
View from the top... |
Given a choice, I decided — for Mom — that she didn't need to have the Puerto Vallarta embroidery showing on the new bag's flap. As you can see, I flipped it over.
Per the Taylor pattern, the bag's interior is unadorned. Usually I would add at least a zippered pocket to the inside of any bag, but since this was Mom's version of a stripped down pandemic purse, it didn't seem necessary.

|
|
Bag interior with water bottle support strap... |
I did, however, add a "strap" to corral a water bottle, since she always likes to have water with her. I used a narrow scrap of the exterior material and bolstered it with some Peltex to create this, embedding the ends into the side seam once the bag was turned right side out.

|
|
A simple but useful addition... |
I added a similar contraption to the inside of my Dubstepper messenger bag years ago.

Remember the "firmed up bottom" that was needed for the Ollie bag? Well, this one one needed the same fix. After I turned the bag out and put some things inside, I felt that it needed extra support at the base. A 3" x 9" piece of Peltex came to the rescue.

|
|
Back again... |
Because of all the changes that I made to this bag, it's difficult to say how long it would normally take to sew. (For me, it was four days from deconstruction to finished bag.) It doesn't appear to be a difficult pattern, although a bag with a gusset is always more difficult than one with a boxed or otherwise straight seamed bottom construction.

|
| Front... |
If you want to make your own Taylor Unisex Bag — and hey, it's named that way for a reason; with the right fabric, it would be a good choice for a guy — get your free copy of the pattern at huffncuffs.com.
Mustn't forget one more thing. I had scraps left over, so in the spirit of reuse until nothing can be reused anymore, I made a matching zippered pouch.

|
|
A matching zippered pouch... |
Does this give you any inspiration to check if you have forgotten bags and purses that you can transform into something not so forgettable?
'Til next...


Good save..and recycle! I find a narrow gusset bag to be 'pandemic friendly' and I hope that your mother does too.
ReplyDeleteDo you find it difficult to sew with fusible fleece? (I do with only Pellon SF 101.) I see how well it holds the bag up. Good to know!
Y'know, I've been sewing with fusible fleece since I got back into sewing (had never used it before) and while it will make seams bulkier, the final result of giving the item a certain amount of body makes it worthwhile. In this case, there were small darts at the bottom corners of the bag that were finicky to sew. Any time I encounter that sort of situation, I will trim away some of the fleece. Or in the case of seams, one could always cut the fleece smaller and leave it outside of the seam allowance. Definitely give it a try!
DeleteMom only managed to use the bag once before we decided that she should once again step back from doing the shopping thing. But she did like it!
Nicely done Rochelle!
ReplyDelete