-->
DISCLOSURE: This blog contains Google Adsense ads and affiliate links to Creativebug via which potential commissions are earned when visitors click through.

Search This Blog > > >

Saturday, 26 September 2015

What Do You Like LEAST About Sewing?

card by crummyrummy from someecards.com
Courtesy of crummyrummy from someecards.com...
A few posts ago, I commented on my distaste for hand sewing.

Some months past, I was doing my usual procrastinating on starting a really simple sewing project when I decided to sit down at the computer and google what others like least about sewing.

This card by crummyrummy came up first. Interesting thought, but I've never come across people who out and out ask me to make things for them... other than my husband, who thinks I should be able to sew anything.

Not finding much on my first search, I decided to apply a stronger word and came up with all sorts of results for what people hate about sewing. Now, I'm of the opinion that one should never actually hate something about what one supposedly likes to do, so in this post, I'm merely going to refer to what I like least about sewing.

I came up with a few things.


Getting started

Did you see my comment above about procrastinating? I am not a procrastinator by nature and have always done things ahead of time and well ahead of other people's deadlines. When it comes to sewing, however, I sometimes find myself very slow to get started. It's almost as if I don't like the process of starting a new project. Or maybe it's...

Cutting fabric

You can't sew without cutting fabric and I truly dislike cutting fabric. (I came across other people who shared this opinion.) It would be so much easier if I had a robot helper who could do all of that for me and then just lay out the pieces next to my sewing machine. I could then happily sew all kinds of neat and nifty projects because — truth be told — I have not pursued projects simply because I can't convince myself to cut the many pieces of fabric for them. Sewing just...

Takes so much preparation time and effort

Yeah, there's that too. If only sewing was just sewing. But there's the selection of fabric, gathering of materials, measuring and cutting and laying out of pattern pieces and usually extensive interfacing...! (This took up my entire first day on my recent Flight Bag project.) It all takes a lot of time and I would never rush that part of it, because I truly believe that if I don't put in my best effort at this juncture, I'm short-changing myself with regards to the finished project.

And finally, there's this fact...

"I can buy this for cheaper than it costs me to make it!"

Sewing can be an expensive hobby. This complaint has been made by many crafters. Case in point, the roll-up toiletry case that I've been working out a pattern for on and off over the past year or so, I managed to BUY for $4.99! (Four freakin' ninety-nine?? I said when I first saw it.)

The thing is, I'm of an age that can recall when this wasn't the case. When my mother sewed clothing, when I first sewed clothing, it was definitely cheaper to make our own than to buy. I remember when stores had fabric departments. (They also had big thick pattern books that you could flip through and then find your own copy of in these huge filing cabinets.) Nowadays, you're required to go off the beaten path to find fabric stores that charge you an arm and a leg for a yard of interfacing... or a spool of thread... or five buttons. Luckily, with online purchasing options or some creative thinking, a little of that pain can be alleviated. (The trade-off is that you are forever waiting for "stuff" to arrive... if it arrives.)

A while back, I posted about how it was not my "norm" to spend $35 to $50 buying a purse. Now that I think about it, spending that amount to make a purse is not so different, and I have a hard time justifying that expense also. (Yeah, I know the justification... it's one-of-a-kind, unique, handmade, blah, blah, blah.)

It's probably why — LOL — I spend more time writing about sewing than actually sewing! (And speaking of writing, don't you think this is an ironic topic for my 100th blog post??)

Sooo.... what do you like least about sewing?


Saturday, 19 September 2015

Creativebug Class Review: Betz White Flight Bag

Betz White Flight Bag crafted by eSheep Designs
I'm pleased with how my Flight Bag turned out...
Before I present my review of Betz White's Flight Bag class offered over at Creativebug as promised, I want to mention that Wendy's Pride & Prejudice hat took second place in the competition! (I updated the end of the post from last week with a brief message that I received from her.) I'm over the moon!

But back to the topic at hand, I recently spent a weekend making this very functional bag and thought I'd provide my thoughts on how the class was presented. It is classified as an "advanced" class, but on Craftsy where Ms. White sells the essentially same Jet Pack Bag pattern, the project is labelled as "intermediate".

Having completed it, I think "intermediate" fits... when I think of an advanced pattern or project, I picture something that has more features and even more pieces to put together (although this project was no slouch in the "number of pieces to cut" department).

The bag took me two and a half days (about twenty hours) to complete, although I never spend several consecutive hours uninterrupted whenever I sew, so I'm not certain how many of those twenty hours were actually spent on the project. But it gives you an idea.

The Creativebug User Interface

Watching a class on video works pretty much as you would expect. You can pause at any point in time. You can add notes. I will caution that my browser (I use Google Chrome) hung up whenever I left a lesson on pause for a lengthy period of time, so you may find that it's easier just to let a particular chapter play itself out and then go back to it again.

Betz White Flight Bag class offered by Creativebug
Screen shot courtesy of creativebug...

If you close down your browser entirely, it will remember where you left off and give you the option to resume or start over. One thing that I don't like about the video player is that there is no actual "fast forward" or reverse button, per se. You need to drag the "progress dot" (for lack of a better term) to move to where you want to go, which is hit and miss most times.

The class gives you access to a PDF that provides the templates (pattern pieces) to cut out your fabric. You'll need three different fabric choices (exterior, exterior trim/accent and lining). Virtually all pieces will have to be interfaced with something, so be prepared to spend some time prepping for this project! I recommend that you run the video in the background while you do this; it'll give you a chance to hear the instructions for the first time. In terms of time required, the class itself runs just under two hours in total (although for some reason it says one hour on the intro screen).


Notable differences from a Craftsy class? Well, there is no "direct line" to your instructor, and at present, Creativebug does not appear to have a huge number of active users with whom you can communicate if you run into a problem. Although I personally don't see where any problems could crop up (and a reminder again that this has been flagged as an advanced class), one never knows.

Class Overview

Okay, what does the class cover and how well does it do the job? In short, everything and very well.

Again, it's not a beginner project, but Betz takes you thought every step required — I'm talking cutting, interfacing, pressing, sewing, attaching hardware, all of it — so that even if you are an adventurous newbie looking for a project to task you beyond your skill set, you will have the know-how to be able to power through this thing.

The only issue is that without some prior experience, a few of the components are challenging and you may not get the best looking results. Just looking at the finished bag, you can tell by the rectangular shape that if you don't sew straight, it will likely be noticed. You may imagine that sewing around those corners to get a perfect curve is not a breeze. If you've never tried it, it won't be easy. Even if you have tried it, it's still not easy, but it's ultimately doable. I even rose to the occasion and edge-stitched around the gusset on both sides, a step that I absolutely refused to tackle on my Bella and Genevieve bags!

Betz White Flight Bag crafted by eSheep Designs
I was in the mood to pull out all the stops in making this bag...

Betz provides clear, concise instruction at a relaxed pace, exactly what you require any instructor to be. (The video chapters are structured so that you can follow right along and make your bag at the same time.) She also offers some interesting tips and nifty suggestions along the way when she runs into "real life" problems during her demo. Overall, she's easy-going on camera and doesn't look out of her element. I guarantee that the viewer will not be frustrated into thinking, "I can't do this..."

So kudos, Ms. White, on a great class and a great project!

Areas for Improvement

I do have a slight critique to offer, however, and I believe it's constructive. While I'm always happy to encounter a pattern that uses a 1/4" seam allowance, sometimes it's not quite enough. I'm referring to the strap tabs being attached by just a quarter inch of fabric.

Oddly enough, this didn't strike me as an issue until after I had completed the entire exterior of the bag; at which point, I had to go back and do some artful bar tacking to ensure that the tabs were more securely attached and would not pull out over time.

I added a row of reinforcement stitching to the bottom of the strap tabs...

In lieu of doing this (which wasn't easy considering the zipper was already installed and very much in my way), I would suggest that you embed the strap tabs deeper than a quarter inch (you can go half an inch without increasing the length of the original strap tab fabric). Moreover, when you sew that seam, it doesn't hurt to run over the stitching several times to reinforce.

Other suggestions that I would make for anyone taking on this project: 1) add a piece of Peltex to the bottom (always good to have extra support on the bottom of a bag, particularly one like this that may carry some heavy stuff), 2) cut the interfacing for the exterior back pocket pieces and zipper strips smaller to keep the bulk out of the seams, 3) tape the top and bottom front panel pattern pieces together when you cut the fabric so that their edges will ultimately match, and 4) maybe attach the bottom half of the twist lock hardware before you complete the pocket lining so that that anchoring piece is not visible inside the finished pocket.

Those are just small things, but I think overall, they can produce a superior result.


Final Verdict

All in all, I'd say that for free or for $4.95, this class is a bargain. You may not think that a hour and fifty minutes is enough to cover the making of a structured, functional and professional looking bag, but here's the proof.

As she says in the introduction, it's a great skill-building class; it gets a 5/5 from me.

Want to get started? Click here to sign up for your free 14 day Creativebug trial, which provides unlimited access to all premium content, along with the ability to keep this class forever. Or, if you're reading this sometime in November, click here and use the promo code COZYCRAFTS to get one month free access!


Saturday, 12 September 2015

Pride & Prejudice Inspired Hat

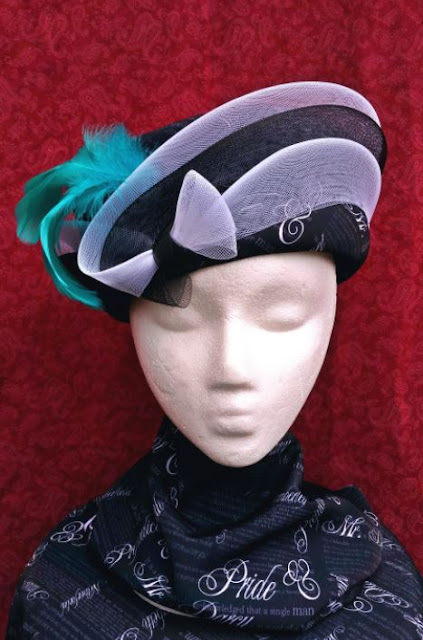
Hat by Wendy Dudley; Pride & Prejudice fabric by eSheep Designs
A hat made out of my Pride & Prejudice fabric!
It's an unbelievably exhilarating feeling when you see something grand, and then slowly come to the realization that you're actually looking at a representation of a dream come true — a dream that you didn't even know you had.

I was lucky enough to have had this amazing experience a couple of weeks ago.

It started with receiving a message via my Spoonflower account from someone who had purchased my Pride & Prejudice fabric. She had completed her intended project with it. When I saw the photos of what she made a couple of hours later, I knew that the results were too extraordinary not to share.

Back in July, Wendy Dudley purchased a yard of my Pride & Prejudice Text (in Black) fabric in a silky faille. (It's a polyester with crisp colour reproduction and excellent drape, as you can see in the photo above and ones upcoming. The basic cotton sample that I have does not show the white text at all as clear!)


At the time, she communicated to me that she was planning on making a Jane Austen themed hat for The Mad Hatters Society Facebook Group's "Booked" Competition and that this fabric was perfect for it. (That is, the challenge was to make a hat based on a book: "I chose to do a hat based on Pride & Prejudice by Jane Austen. She's my favorite author. I have always admired her sharp, sarcastic wit and think we would have gotten along great. I love the fact that there are many references in Jane's letters to [her sister] Cassandra about hat trimming, which was a common past time for women during that era. My favorite quote is "Next week I shall begin my operations on my hat, on which you know my principal hopes of happiness depends." - Jane Austen letter to Cassandra Oct 27, 1798")

After admitting to being a major procrastinator, she said she hoped that the project would not only get finished, but that it would turn out as envisioned! Now, I cannot vouch for what she originally envisioned, but from my viewpoint, she did an outstanding job. It simply amazed me to see these pictures...

Hat by Wendy Dudley; Pride & Prejudice fabric by eSheep Designs
Side view...

Inspiration for the design? "I have never been a huge fan of the bonnets, so I used the turbans and military styled hats of the Regency era as my inspiration. For anyone who has watched almost every movie & TV adaptation of Austen's work, you will notice a strange thing: the main characters are relegated to bonnets... but the antagonistic, busybody, and downright catty women have the most fabulous hats! That was another inspiration."

Hat by Wendy Dudley; Pride & Prejudice fabric by eSheep Designs
Opposite side view...

As for the final result, Wendy said, "I fancy Lady Catherine de Bourgh wouldn't turn up her nose at wearing this!" I totally concur!

Hat by Wendy Dudley; Pride & Prejudice fabric by eSheep Designs
Rear view...

Interested in knowing a bit about millinery and how to make hats? Well, first, I suppose it helps to have the right equipment... like this antique wooden hat block.

Wooden Hat Block
Wendy's hat block...

For this hat in particular, the first step was to mold something called buckram — which is apparently a sort of woven interfacing that can be creased to hold a specific shape — over the hat block. This was then covered with the fabric. A product called crin (horsehair) is used to create the wrapped "turban" effect. Oh, and — woe is me (given the confession that I shared last week about this) — apparently everything is hand sewn!

Wooden Hat Block
Hat block covered with buckram...

A bit of background about the hat's creator... "I consider myself a beginning milliner and enjoy creating hats as a hobby; after all, one can never have too many hats! For the past several years I have been making hats and taking classes to expand my knowledge. Before I started making hats, I collected them and now have close to 80 hats (mostly vintage, some new) in my (ever growing) collection... There's a lot of hard work that goes into making them, so it makes me feel good to know people like my hats."

Hat by Wendy Dudley; Pride & Prejudice fabric by eSheep Designs
Top view...

Oh, and see what I mean about the text being very legible in this polyester version of the fabric?

Pride & Prejudice Text (in Black) fabric by eSheep Designs
Close-up of text on the top of the hat...

Back to my first statement above, it never occurred to me that it would be such a "high" to see my own fabric be brought to life as a functional item by someone else. All along, I had been anticipating that it would be cool for me to make something out of my original fabric. In hoping for actual sales, I also knew that people who buy fabric often buy it just to have it. (Yes, all you terrible fabric hoarders can admit to that!) So to have someone purchase the fabric and then make something so stunningly original out of it — in a span of a month — is totally mind-blowing.

This journey of mine continues to amaze me in ways I never could have imagined.

Thank you so much, Wendy, for making a dream that I didn't know I had come true in such an astonishing way! And of course, best of luck in the competition... :-)


UPDATE Sep 14: News from Wendy: "I just found out... I came in 2nd place in the contest! Lucking out & finding your fabric must have spilled over into the judging." WOW! Double wow!


To everyone else reading, if you like what you see, please show some love for Wendy and leave a comment. She'll be lurking in the background here, I'm sure.


Saturday, 5 September 2015

Taking Off With A New Flight Bag

Betz White Flight Bag crafted by eSheep Designs
My version of the Flight Bag by Betz White...
A while back, I gave my initial impressions of Creativebug, the crafting website that's more or less in the same internet space as Craftsy. Today, in celebration of "back to school" for the kiddies (yay!) I'm going to show you what I made with a lesson found on their site.

In June, Creativebug offered a free one month subscription without requiring a credit card, so naturally, I jumped in and did some browsing.

Unfortunately, I was away more than I was home for much of June, so I did not have as much time to keep exploring as I wanted to, but before my preview expired, I grabbed the Betz White Flight Bag class as my "keep forever". (For each month that you are a paid up subscriber, you earn the right to select one class to keep in your personal library forever, regardless of whether or not you remain a subscriber.)

Betz White Flight Bag Class on Creativebug.com
Image courtesy of Creativebug.com...

For those of you who are not familiar with Ms. White's catalogue of patterns, this Flight Bag is a variant of her Jet Pack Bag, which is a convertible backpack/shoulder bag. With a little bit of creative thought, it wouldn't be hard to add the required bits to turn the Flight Bag into a backpack, but backpacks are not my thing. I was, on the other hand, looking for an alternative to the Professional Tote for a travelling companion and really felt compelled to tackle this project for that reason (if not for the simple fact that this was a freebie and it would be a shame not to take advantage and spread the good word).


So one weekend, I printed the pattern templates for the Flight Bag and spent the rest of the first day cutting, interfacing and pinning (as the video class played in the background). There are a lot of pieces. Maybe it's just that I haven't done a project this involved in a long time, but I really felt overwhelmed by the amount of prep work! It's no wonder that I have a fondness for quick and simple projects, although I totally appreciate that to make something like this, you need to put in the hours.

Anyway, at the end of day one, here is what I had... all pieces cut out with Robert Kaufman Satsuki (black cherry blossom) as the main fabric, a Jysk duvet cover as the lining and some black cotton twill for the accent trim.

Flight Bag pieces
Reminded of what I don't like about taking on big projects... so much prep!

I managed to make major headway on the second day, getting to the point of completing the entire outer body and attaching the interior pocket to one of the lining pieces.

Betz White Flight Bag crafted by eSheep Designs
Making tremendous progress on day two...

The third (half) day, I completed the lining, the strap and all of the painful hand sewing required to secure the lining to the zipper. (I hate sewing by hand and came away with a sore middle finger and a bandaged thumb for my efforts, despite using a thimble.)

Betz White Flight Bag crafted by eSheep Designs
Back and side views...

As is my preference when I can get away with it, I did not go out and purchase any supplies for making this bag. The project called for woven interfacing for the lining and while I'm sure that it would have made the lining look and feel more "fabric-y", I just used my supply of Decor Bond. (Yes, it tends to do that "wrinkly thing" but it's a lining and I can live with it.)

Betz White Flight Bag crafted by eSheep Designs
Interior of the bag with a divided patch pocket on one side...

The zipper was supposed to be a metal zipper but I was intrigued by one of the zippers I had in my collection and decided to use it, particularly as the colour highlights the red in the main body fabric. The interesting part is that it's a double-ended zipper normally meant for outerwear; for instance, so that you can unzip a jacket from the bottom. I figured that if I use it on this bag, then I can open it from either side. Instant added functionality!

Betz White Flight Bag crafted by eSheep Designs
With this zipper, I can unzip from either side of the bag!

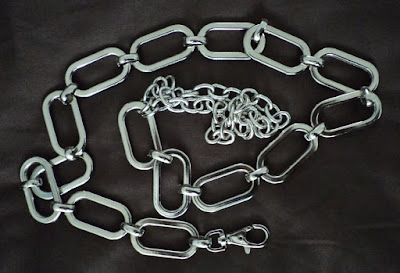
In terms of hardware, the twist lock came from a set of ten that I purchased on eBay (I have eight more!) and the two rectangular rings were taken from this chain belt:

Repurposing a chain belt
This belt is going to yield some more rectangular rings!

How's that for re-purposing?? There are fifteen more rings, a length of chain and a lobster clasp to be harvested from this item! (Am I excited about this find from my closet? Given that Walmart charges $2.97 for a set of two rectangular rings, what do you think?)

Betz White Flight Bag crafted by eSheep Designs
This gives you an idea of the size of the bag...
The strap was supposed to be an adjustable strap with a slider; however, I wasn't convinced — since this bag is for me — that I needed it to be adjustable. So I just chose a length that worked for me for regular over the shoulder use (but that was also long enough for occasional crossbody wear if I were running through an airport for instance) and used what has become a favourite method for me to secure to the bag: snap fasteners. (To tell the truth, I wanted a strap that I can switch off for other bags and this does the job for me.)

Verdict on the final result?

I really like it. Actually, I'm surprised I like it as much as I do. It's simple, yet entirely functional. The exterior back slip pocket provides convenient access to a magazine or travel documentation. The front pocket provides secure storage for passports and such. The interior lining pocket can be customized to hold whatever you want; I sized them to accommodate my e-reader and some pens. And of course, with the wide zippered top opening, everything is kept safe inside.

Not only do I think this bag is a good size for an airplane carry on (even though I haven't used it as such yet), it could also do double duty as a work bag. Some of you may recall that I recently agreed to go back to work on a part-time basis; I've taken this bag on my trips downtown for meetings, since I no longer have a briefcase sort of thing to tote around. This makes a good alternative without being too big. While it won't accommodate larger laptops, my little netbook computer has no problem fitting inside, even horizontally. (And of course, for anyone wanting it to be a laptop bag, a simple resizing will do the job.)


For those of you who may be interested in the class, I will be back in a couple of weeks with a complete review. If you don't want to wait, click on the above link or here to sign up for your free 14 day Creativebug trial, which provides unlimited access to all premium content, along with the ability to keep this (or any other) class forever. [Or, if you're reading this sometime in October, click here and use the promo code HALLOWEEN to get one month free access!]