-->
DISCLOSURE: This blog contains Google Adsense ads and affiliate links to Creativebug via which potential commissions are earned when visitors click through.

Search This Blog > > >

Showing posts with label things to sew for travel. Show all posts

Saturday, 12 October 2024

Load-it-Up Laptop Slipcase Revisited

Load-it-Up Laptop Slipcase by eSheep Designs
My third laptop slipcase...
Back in the spring of 2017, I came up with an idea for a laptop slipcase. I presented the general instructions here as a freebie tutorial, and later released a pattern for it with additional features.

As with most of my creations, the slipcase came about as a result of personal need... to cart around hubby's laptop.

This past March, its fan stopped working. The unit tended to run hot, so he was worried about it overheating. With good deals available on refurbed laptops, we decided to spring for a "new" computer. With this one being just slightly bigger than the old one, however, the old slipcase was no longer able to accommodate.

So several weeks later, I pulled out my pattern and got to work.



Was I ever so slow!

Y'know how I had indicated that I might sew more with all the free time that I'd have at my disposal after calling a halt to blogging regularly? Well, whether or not I actually had a lot of free time is up for debate, but the only sewing I did between January and April was for my junk journal (which wasn't much) and cutting and hemming some tea towels for Mom. (Yes, I understand it's now mid-October, and I still haven't done a whole lot of sewing!)

This is a fairly simple, straight forward sewing job, but the need to cut a few long lengths of fabric and interfacing (33" in this case; the pattern provides a custom fit for whatever size laptop you have) drove me crazy in terms of deciding the best way to do it.

Load-it-Up Laptop Slipcase by eSheep Designs
Fixing the bellows pocket to the front of the slipcase...

Yes, I admit it. Cutting fabric causes me anxiety and in this particular instance, it took me a couple of hours to accomplish. 😏

Speaking of fabric, this is from a Craftsy purchase six years ago; part of the Robert Kaufman Remix Metallic collection by Ann Kelle. Some of this yardage was featured on the exterior of my origami-ish basket from last year. The remainder was completely used up for this project, with the exception of a 10" x 3" piece.

Load-it-Up Laptop Slipcase by eSheep Designs
Exterior side is on the left, lining (with zippered pocket) is on the right...

The main body of the slipcase was done to spec according to my pattern, but I had to adjust the bellows pocket and grab handle to accommodate the fabric that I had. (The fabric for the bellows pocket was about a half inch shorter.) In the case of the grab handle, I used an existing segment from a faux leather purse that I harvested for various parts years ago. It wasn't the right length, but I added some fabric to the ends to make it work.

It's somewhat weird to follow a pattern of your own creation to make something, particularly from a distance of many years. There's an obvious sense of familiarity to it, but also a vague alien-ness that's hard to describe. At any rate, it certainly wasn't a case of I know exactly what to do; I had to read.

Load-it-Up Laptop Slipcase by eSheep Designs
Finished view of back...

That said, I had no complaints to make to myself about how I wrote the pattern, so that's good! (It would have been unsettling had I encountered anything that made me wonder, whaat...?)

Load-it-Up Laptop Slipcase by eSheep Designs
Flap open with laptop inside...

To reiterate, this slipcase is custom fitted to a specific laptop, so it's not one of those projects that you'll make just for the sake of making. You'll need to have measurements for the actual computer in order to achieve a proper fit.

Load-it-Up Laptop Slipcase by eSheep Designs
Interior zippered pocket keeps small items like USB sticks secure...

Note that the advantage of this design is that it is an "all in one" storage solution. Sleeker looking sleeves and bags usually don't have a place to hold the power cable and "brick" (it's called that for a reason), not to mention mouse and other peripheral devices. In this case, USB sticks and memory cards have a separate, secure home in the zippered lining pocket.


Check out crafty classes at Creativebug!

[affiliate link]


The paid version of the pattern also includes instructions to add a pen and notepad slip pocket inside the bellows pocket. I didn't have enough fabric for it, so I left it out.

Load-it-Up Laptop Slipcase by eSheep Designs
Closeup view of handle made from recycled piece of vinyl...

As is usually the case whenever I work with this fabric, its luxe factor impresses me. You can see in these photos how the gold is truly a shimmery gold. Love it!

Load-it-Up Laptop Slipcase by eSheep Designs
A laptop slipcase with a place for everything... 

If you need a laptop case, this is a quick sew. (Don't let the story of my slowness in cutting fabric deter you!) Again, the freebie tutorial is here; pattern for sale is here.

I'd like to wish a Happy Thanksgiving to any fellow Canucks who may be reading. With all that's going on around the world – and even at home – I hope there's stuff in your life that you're thankful for, because things can always be worse. 

And speaking of things being worse, I sure wish I had the ability to control the weather like some people claim can be done, because I certainly wouldn't be choosing to throw out hurricanes everywhere. (My thoughts go out to those suffering a horrific hurricane season down south.) 

'Til next...

Saturday, 21 September 2024

New PDF: Passport & Travel Document Keeper

New PDF by eSheep Designs
New PDF for the Passport & Travel Document Keeper...
From way back in 2016, I had a conundrum regarding choosing what to sew.

Since I wasn't making things to sell, I would very often ask myself what I would do with the finished project if I were to undertake the making of it.

The best outcome, of course, is  to make something that is both useful and will be used. In that respect, today's new PDF is for something that I've used on every airplane trip since 2019... of which – since Covid happened shortly afterwards – there have been all of two such occurrences!

You likely missed the original post about my search for a passport folder/holder that would meet my precise needs; it appeared in early 2015. I lamented the lack of important features in most of the designs that I had come across, and had already been planning my own solution. It ultimately took another four years for me to finish it and post it here as a quasi-tutorial.


For those of you not familiar with the background that led to the project, here are the features that I deemed to be important when I came up with the idea.

Apart but Together

I never did come up with a super snazzy solution for this requirement, but what I did ultimately works for me and that's fine. (I'll leave it to others to dream up something more elegant for themselves!)

What I'm referring to is that while each individual traveller has his or her own passport holder, it would be nice to be able to keep two or more of them together when not in use.

Passport & Travel Document Keeper by eSheep Designs
One way of keeping a couple of these attached...

For the two that I have, I installed some adhesive velcro "dots" onto the back. When not needed, the two of them stick together as one unit. In the PDF, I show another possible solution for corralling three or more of these.

Holds Boarding Pass & Passport

Most other passport keepers out there are either simple book cover type things that hold a passport and little else, or zippered folder style organizers that hold several passports and maybe some important papers.

I've said before that I'm not a fan of the "big wallet that holds everyone's passport" because it's ultimately inefficient. When you step up to board (unless you're a child under a certain age), you are expected to show your own passport and boarding pass. If all you have is a super-sized wallet that carries your family's passports, at some point you're going to have to remove and distribute them to the appropriate people. 

Passport & Travel Document Keeper by eSheep Designs
Must hold both passport and boarding pass...

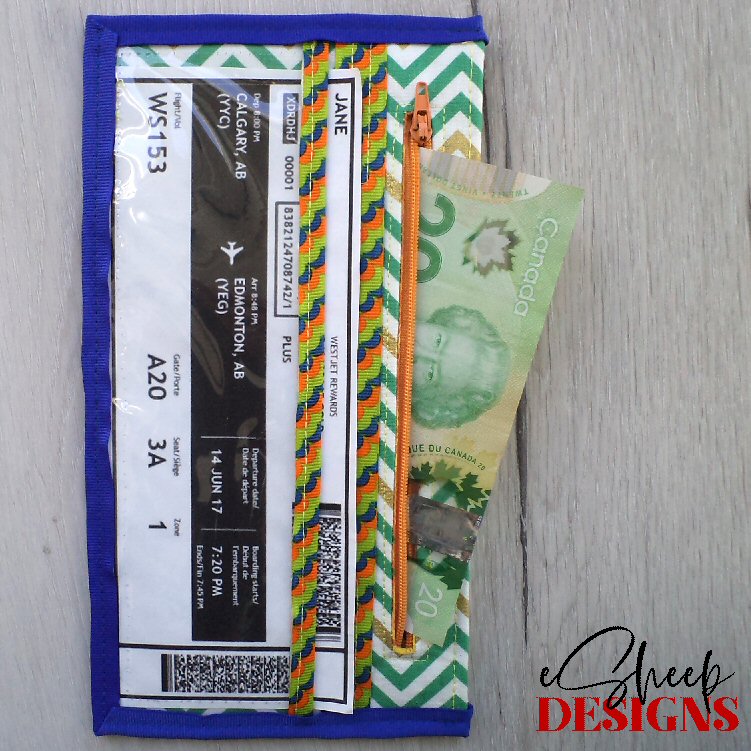
My goal was to keep everything that each traveller needs to have within a single organizer, which meant that a spot for a boarding pass was a must. It has a place here under a vinyl window and can be easily removed when the circumstance requires.

Passport & Travel Document Keeper by eSheep Designs
A bookmark style strip to hold your passport open...

As for the passport, it actually has two homes: a diagonal see-through vinyl pocket on one side and a bookmark style strip on the reverse that keeps the passport open at a specific page.

Holds Travel Documents

I never rely on a cell phone to refer to travel documents (like hotel, tour, and flight confirmations), preferring to keep a hardcopy on me. No matter how convenient our modern phones can be, I find it cumbersome to scroll a small screen looking for a confirmation number. (Also, a piece of paper doesn't require the internet or need electricity to be charged up; yes, I am quite old school that way.)

Passport & Travel Document Keeper by eSheep Designs
A slip pocket for travel docs...

Even if you're a diehard smart phone addict, you might see the advantage of having a (backup) set of documents in paper form. The full width slip pocket in the centre of the unit will accommodate several 8.5" wide folded pages.

Holds Other Valuables

Finally, currency, visas, tickets, memory cards, SIMs and various sundry that need to be kept more securely can be stored in the zippered pocket. 

Passport & Travel Document Keeper by eSheep Designs
Secure zippered pocket...

In terms of difficulty, I'd say that there isn't too much here that's complicated. There is a basic zipper installation but I'm assuming that you've done one before. (Instructions are skimpy for the zipper part.) If you haven't worked with vinyl, it may prove tricky – and sticky – but we all learn by doing.

Passport & Travel Document Keeper by eSheep Designs
A look inside the pockets...

This is an easy to carry solution for all travellers. It can be easily slipped into any backpack, purse or laptop case that you'll probably also be carrying. At your destination, it'll fit into the average hotel room safe without issues.


Check out crafty classes at Creativebug!
[affiliate link]


By the way, this PDF is not merely a copy of the blog post. I found some old photos of the creation process that I added to the mix. I changed up some of the wording in the instructions. And because I was recently cajoled into making a couple for a sister-in-law, there are some new photos as well, such as this one.

Passport & Travel Document Keeper by eSheep Designs
A rush job for one of my SILs...

This is a scrap friendly project that uses minimal fabric and ribbon. The exterior part requires just a single 11.5" x 9.25" (29cm x 23.5cm) piece. Everything else is a lining and not immediately visible, presenting a good opportunity to use up scrappy remnants that may not be your favourites.

Passport & Travel Document Keeper by eSheep Designs
An example of how to make them slightly different for two people...

If you use the same fabric for the whole family, choose different ribbon to tell them apart. For hubby and me, I actually just used different coloured thread along the passport bookmark strip.

To download this PDF free from my shop, use this coupon code: JLW11IR8HG

'Til next...

Saturday, 24 September 2022

Quasi-Tutorial: Mini Notebook Cover With Receipt Pocket

Notebook Cover with Receipt Pocket by eSheep Designs
My new notebook cover with receipt pocket...
I'm a big fan of little notebooks.

You may recall this one that I have in my sewing room.

I have slightly larger ones for travel, with one that was used as a cruise diary, detailing where we were, what we did and what we ate... totally fun to read. (We haven't cruised in over a decade.)


The blue one that you see here is almost out of usable pages. For the past fifteen years or so, it's gone on vacations and road trips with us, creating a permanent record of dates, places, restaurants, expenses, and even Yahtzee scores.

The little inside pocket is useful for keeping receipts, but can only hold so many. You may be able to see that it's being held in place with tape.

Travel notebooks
My vacation notebooks...

Just in time for our annual BC getaway, I figured making a multi-functional cover for the new notebook (that I'd purchased a few years ago) would be a timely project.

Notebook Cover with Receipt Pocket by eSheep Designs
Receipt pocket on back cover...

The cover incorporates a pocket to keep receipts, of course.


I'm going to share some basic instructions using the dimensions that I had to work with, but you can apply the process to any size notebook.

The first step, therefore, is to measure. This particular notebook is 4.5" wide by 5.5" high; the coil is about 3/4". A cover, however, would need to extend at least 1.25" at both ends to wrap back to the inside so it can hold the actual notebook's front and back cover in place.

Notebook Cover with Receipt Pocket by eSheep Designs
Wrap-around extension to keep cover in place...

For the receipt pocket, I decided that a horizontally placed bellows pocket measuring 3/5" x 5" would be a good fit on the back. (At this point, I also knew that a tab of some sort would be needed to keep the book closed and the pocket secure, but size can be determined later.)

Once the physical measurements are accounted for, it's time to add seam allowances; I added 1/4" to all edges*.

For fabric, I looked to my remaining fat quarters of Tim Holtz's Eclectic Elements. The one that I'm using for the exterior is a vacation themed selection called Travel Labels.

Notebook Cover with Receipt Pocket by eSheep Designs
Project fabric selection...

The interior is a piece that came with my Boundless DECOdent bundle, purchased from Bluprint in 2018.

Both pieces were cut to 12.75" x 6" and were interfaced with some SF101. The math to arrive at the dimensions: (4.5" wide x 2) + (.75" width of coil ) + (1.25" overlap ends x 2) + (.25" seam allowance x 2) = 12.75" and (5.5" height) + (.25 seam allowance* x 2) = 6".

The bellows pocket piece is folded in half and then interfaced with SF101 on one half. Then it's sewn up, corners trimmed, and turned right side out. Be sure to leave the turning gap along the bottom. (Throughout this project, I recommend pressing seams open before turning as described in this post.)

Notebook Cover with Receipt Pocket by eSheep Designs
Making a bellows pocket...

A small piece of hook and loop tape is the final add-on.

Make a couple of 1/4" accordion folds along both sides of the pocket piece and press well. (The folds will allow the pocket to expand.)

Notebook Cover with Receipt Pocket by eSheep Designs
Bellows pocket sewn onto exterior panel...

Position the pocket piece on top of the exterior piece at the desired location and pin. (Put the actual notebook underneath so that you can determine the correct placement.) Stitch along the edge of the first fold on both sides. Then, with the second folds flattened down, sew across the bottom, which will also close up the turning gap.


Watch live classes for FREE at CreativeLive! Sign Up at CreativeLive
[affiliate link]


At this point, I did some rough estimating and decided that an 8" long x 1.75" wide strip of fabric would work for the tab closure. (This is based on the notebook being about a half inch thick.)

Simply fold the strip in half with wrong side out, sew around and leave a turning gap along one of the long sides. Trim corners, turn right side out, and topstitch. Attach the other part of the hook and loop tape to one end.

Notebook Cover with Receipt Pocket by eSheep Designs
Make a tab, add velcro and secure to front cover...

Now determine the proper placement for the tab and stitch it in place at the other end of the exterior panel. You can see below what the stitching should look like from the back.

Notebook Cover with Receipt Pocket by eSheep Designs
Pin exterior panel to lining, wrong sides together...

Place the two panels wrong sides together and pin, ensuring that the tab piece is tucked inside and out of the way. Leave the turning gap along the bottom of the cover. (If the fabric is non-directional, this won't be an issue, but this Tim Holtz selection has a definite up and down orientation.)

Sew, trim the corners and turn right side out. Use the notebook itself to determine where the two end folds need to be made. Press well.

Notebook Cover with Receipt Pocket by eSheep Designs
Add some Peltex for structure...

I wanted the cover to have some additional firmness, so I cut two pieces of Peltex to about 3.5" x 5.25" and slid them into place before closing up the turning gap. They should just butt up against the folded edges. (Not that it should matter much, but I put the fusible side against the exterior fabric.)

Once the Peltex pieces are inside, it's time to sew along the top and bottom to finish the cover. Stitch as close to the edge as you can, since the actual front and back cover of the notebook needs to slide into the end openings.

* Which leads to this asterisk. I made this as a Quick Craft Mondays sort of thing, creating on the fly. When I first envisioned the project, I knew that having the ends folded back inside after the whole panel is sewn up would require extra room at the top and bottom of about 1/8" or so in order for the notebook to fit. Unfortunately, when I cut the fabric, I did not add this extra bit to the 6" height. Later when I sewed the panels together, I had a last chance to fix the problem by stitching with a smaller seam allowance and did not remember to do that! (And to answer your question as to why I just didn't rip the seam open and redo it, I had already trimmed the corners.)

Notebook Cover with Receipt Pocket by eSheep Designs
Doesn't fit? Make it fit!

So, I was left to slice away at the top and bottom of the notebook's front and back covers in order to make them fit. If you don't mind this hack, it's a good way to achieve a snug fit, which is important because otherwise the covers might slip out every time the book is opened.

On the other hand, if you think this is hacky and lacks finesse, be sure to add extra room at the top and bottom when you cut the main pieces of fabric.


Check out crafty classes at Creativebug!
[affiliate link]


As shown in one of the images at the top of this post, I usually keep a pen inside the coil of the notebook. The pen still fits.

If you're wondering why I decided to put the pocket on the back, it's because I prefer a less cluttered look on the front.

Notebook Cover with Receipt Pocket by eSheep Designs
Back view...

One of the advantages of making the covers fit by trimming them is that the pages are pretty much even with the cover; i.e., the end result is the same essential size as the original book. (I like it this way rather than having the cover extend beyond the pages.)

Notebook Cover with Receipt Pocket by eSheep Designs
Front view...

Isn't this just the neatest fabric? So much detail to catch your interest and it hides dirt, to boot! (See the "smudges" over parts of the print? Those are part of the design. The notebook was well handled during our recent holiday and shows no signs of wear.)

My original purchase of twenty-five of these Tim Holtz fat quarters from early 2018 is now down to eight (plus assorted scraps). It's somewhat of an achievement that I've actually used seventeen selections, given how I had no plans for the bundle. The Eclectic Elements line is still widely available online (I've seen the Fat Quarter Shop selling yardage at $12.48), even though I think it debuted in 2013.

That's definitely a testament to its lasting appeal. Even simple projects like this one are so much better when done up in Eclectic Elements fabric.

'Til next...

Saturday, 25 September 2021

Things to Sew for Travel [Pt 4]: Small Stuff

Things to sew for travel
Things to sew for travel...
After covering roll up toiletry totes in part 1 of this series, drawstring bags in part 2, passport and documentation organizers in part 3, what's left for part 4 of things to sew for travel?

Small stuff.

These are things that will ease your travels by giving you some of the convenience of home (storage trays), simplifying your needs (mini wallets) and managing things you don't normally have to manage (key cards). The advantage of these things is that they're small and shouldn't take long to sew — and who doesn't appreciate that?

Today's post is set up in the same way as the previous three in this series. I will show you some of my own past projects while introducing similar ideas from fellow crafters.


A Place to Drop Things


When you're at home, perhaps you have a place to hang your keys when you come in the door. At night, you might take off your watch and ring and place it in a jewelry dish.

When you're travelling, those familiar places aren't there. Form a new habit by sewing up a tray that can corral all of your small things and keep them safe. If it can be made to be collapsible, all the better.

One of my earliest tutorials was for such a tray. (Still in use; it's permanently at our home away from home.)

Cutting Corners Collapsible Travel Tray by eSheep Designs
Cutting Corners Collapsible Travel Tray...

Several years later, I incorporated some of the ideas that I had after making the first one to create this second tray. I've given a couple of these away as gifts; one is always packed in my travel bag.

Flat Pack Travel Tray by eSheep Designs
Flat Pack Travel Tray...

By the way, both tutorials are available in PDF format for your convenience.

If you don't like these, do a search online and you'll find several other variations. Here's one that's different.

Hexagon Fabric Tray from A Spoonful of Sugar
image courtesy of A Spoonful of Sugar...

It's a hexagon-shaped tray from A Spoon Full of Sugar. (It's not collapsible, but you could always change it up to be so.)


Watch live classes for FREE at CreativeLive! Sign Up at CreativeLive
[affiliate link]


You Don't Need to Carry Five Credit Cards


Or even three. When you're travelling, don't take your normal everyday wallet, because what if you lose it or have it stolen? Much better that you only need to replace one credit card and an ID in that case than the alternative. (Many of us don't know the exact contents of our everyday wallet, potentially making the replacement chore even more challenging.)

I recommend you make yourself a minimalist wallet to carry when you're away from home. Here are a couple that I made last year, from YouTube tutorials.

The first meets the definition of being minimalist, with only three pockets. However, it can hold coins, cards and cash, and that may be all you need in certain circumstances. As you might guess, it's a quick and easy sew.

Asaco's Craft Memo Minimalist Wallet crafted by eSheep Designs
Minimalist wallet...

Credit goes to Asaco's Craft Memo. (My original post also shows two other small wallets from that YouTube channel.)

This second wallet is not truly minimalist, but is likely still a step down from what you normally carry. With traditional card slots and paper money pocket, this one also includes a zippered compartment for secure storage of coins.

JSDaily Mini Wallet crafted by eSheep Designs
Small bifold wallet...

This project is more challenging to sew than the first (and not just because of the zipper), as I detailed here in my original post. Credit goes to JSDaily.

An online search for the term "minimalist wallet" will usually yield a lot of decidedly masculine options, the vast majority of them leather tooled. If you're looking for a compact wallet for a guy, check out this one:

Mini wallet by SomeRandomnessByMe YouTube channel
image courtesy of SomeRandomnessByMe...

It's from the YouTube channel of SomeRandomnessByMe. Suitable for any kind of non-fraying material, the whole wallet is made out of one piece.


Check out crafty classes at Creativebug!
[affiliate link]


Keep Your Key Card Handy


Just as your car key is now no longer a traditional "key", neither is your hotel room key. So do you reserve a spot in your mini wallet for that or do you keep your hotel room key card in a separate place?

A lanyard is always a convenient option because it can hang around your neck — say you're at the buffet at a beach resort — or you can loop it around the straps of your tote bag or purse while on the go.

It's a truly simple thing to sew, and unless it's also meant to keep ID in view, you don't have to incorporate a see-through component by using vinyl. That said, I used vinyl on mine.

Purse lanyard by eSheep Designs
Purse lanyards made out of scraps of vinyl and ribbon...

For those who want to combine the two into one — i.e., mini wallet and lanyard — here is the perfect combo project from Yoan Sewing Studio on YouTube.

Yoan Sewing Studio Lanyard Mini Wallet
image courtesy of Yoan Sewing Studio...

This little "wallet on a string" has two zippered compartments to protect your small stuff behind the window card slot. Clever design and it even comes with a downloadable PDF pattern. (I recently saw a new pattern for almost the same thing selling for $4.99, so hopefully I've saved you some moolah if this is something you're looking to make.)

Again, if these don't turn your crank, the internet is full of similar takes on the idea. One is sure to appeal to you in time for your next trip.

Happy trails and safe travels, folks!

'Til next...