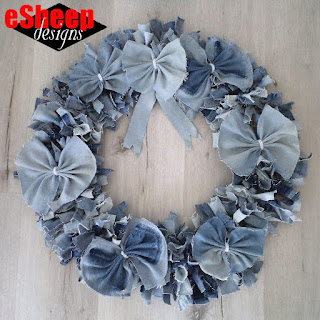
|
| The ultimate denim recycling project... |
This has made it not worth my while to decorate the outside of our door with —
for example — a wreath.
Which is sort of too bad, because I like wreaths, particularly some of
the more elaborate ones that crafty people DIY out of something called
deco mesh. Moreover, our front porch area is covered from the elements, so that if I
were to hang a wreath on the door, it wouldn't suffer much.
Sometime in March, I came across a YouTube tutorial for making a
"designer" wreath. I was fascinated by the work of the crafter (and others
like her) and the fact that some of them were making a decent income selling
these wreaths for mega bucks.
Turns out that people are willing to pay through the nose for these things.
(Maybe not surprising considering my topic from
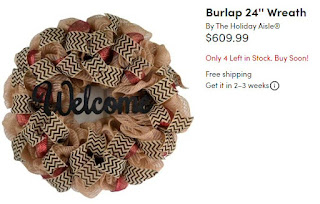
last week.) Take a look at this one that I found on Wayfair. As you may guess, I was originally looking for ideas to use some of my
burlap
to try this out.
I find this particular price point beyond outrageous, considering that these
are actually easy to make. (Not to mention that this is far from the
nicest one that I've ever seen.) While some of the larger and higher quality
selections of deco mesh will cost more, it's entirely doable to complete one
of these wreaths for under $20 with supplies from Dollar Tree.
I'm about to show you how you can make a designer inspired wreath for even
less.

0. BUY AND GATHER MATERIALS
While it was still debatable whether my front door needed a wreath, the idea
of attempting one of these on a "designer" scale was just hard to resist. The
challenge was fully on when I saw large 20" wire wreath frames at
Dollarama selling for $3.50. I bought one, and left it to sit in
my sewing room for many weeks before making a decision on how to proceed.
|
| A lot of cutting involved, but no sewing... |
For a while, my plan was to use the burlap and embellish with some mesh
ribbon. However, the longer I considered, the less interested I was to spend
more money. For something that I didn't need, the real challenge should
be to see what I could do with what I already had.
And what I already had were several pairs of deconstructed denim jeans. The
longer lengths of fabric had been pieced together for the
big boat tote, but I was still left with six pairs of Daisy Duke shorts and several
upper leg portions that were left over due to significant holes in the knee
area.
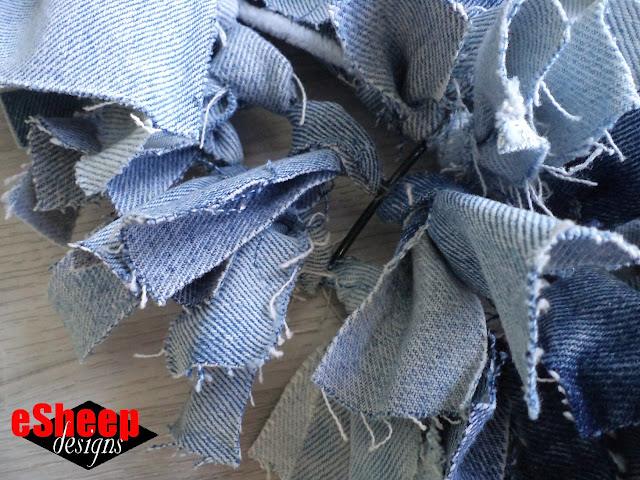
|
| Employing the "rag wreath" technique... |
After searching through YouTube for more ideas, I decided on a rag
wreath format, using strips of fabric secured with girth hitches.
1. CUT STRIPS
Some of the more organized crafters out there will cut their strips to the
same size, all at once. I made my strips anywhere from 1" to 1.25" wide and
anywhere from 8" to 10" long. (They weren't necessarily rectangular, either;
some were wider at one end than the other.) I actually started with a 6"
strip, but this is what happens when it's hitched up:
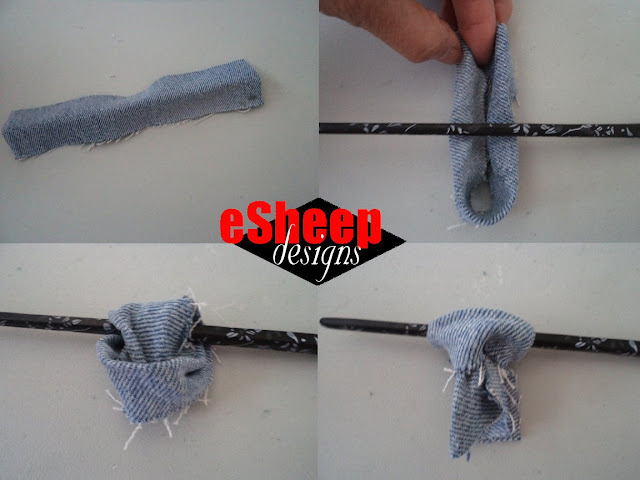
|
| A 6" strip of denim is not quite long enough... |
Regular quilting cotton strips may be fine at 6", but denim is quite thick (at
least mine was) and after it's folded in half lengthwise, the hitch knot
becomes difficult to pull through.
2. TIE STRIPS TO FRAME
If you're wondering why the strip is folded in half first, it helps the ends
stand up. (That being said, I have a few in among the mix that are single
layered.) Some people do a rag wreath by simply tying a knot on the frame with
a single layer of fabric, but the strips can then be floppy on the finished
wreath and I didn't care for that look.
So how many strips did I end up needing? There are six sections to this
four-ringed wreath frame. In each section, I used thirty-five strips, so 35
x 6 = 210. The larger the frame — and the more rings there are — the more
material you'll need, obviously. I believe this is the biggest that's widely
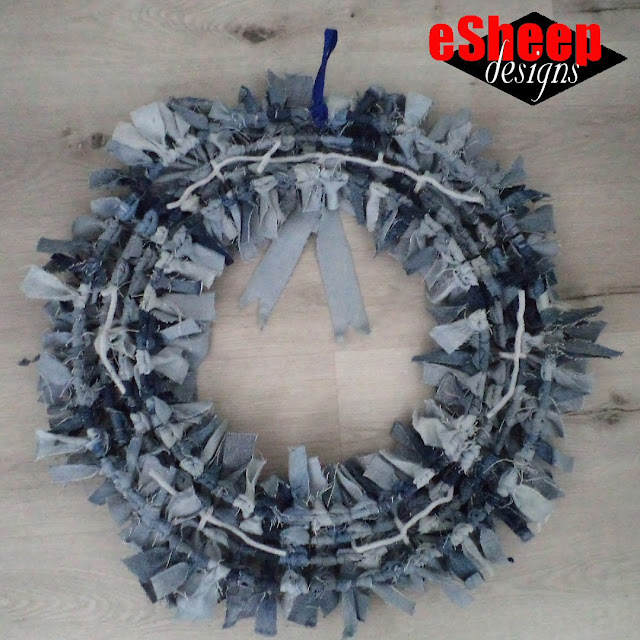
available; my finished wreath is 24" in diameter.

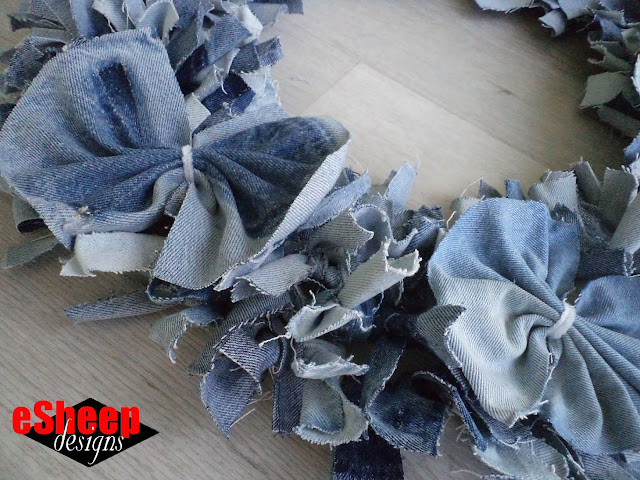
|
| The basic wreath needed embellishment, so bows it was... |
While you can surely cut all of the strips at once, I alternately cut and
tied, attaching one strip to each section so that they would all wind up
with more or less the same distribution of shades of blue. (Tip: always
start tying on the inner most ring.)
If you were here a few weeks ago, you may recall that I said that "when someone in my household gives up on a pair of jeans, they are worn
through and and through. They are noticeably faded in certain areas (i.e.,
knees and seat), and have distressed crease lines in various places." This normally undesirable aspect of old denim turned out to be almost
beneficial in the creation of this wreath, giving it wonderful variations in
colour.
3. PULL APART & "FLUFF" STRIPS
After hitching up about ninety percent of the strips, I arranged them to stand
up straight along the rings. This made the whole wreath look very narrow,
however, so I went back to each of the knots and yanked on the ends, pulling
them apart (and making them tighter in the process). It created a fluffier
appearance, so I was on the right track.

|
| The area under the back pocket creates interesting colour variations... |
4. MAKE & ATTACH BOWS
Still, it needed something more, so I revisited some YouTube videos
and saw how crafters used squares of mesh or ribbon, folding them in some
way and then tying them up to the wreath frames with wire or pipe cleaners.
With mesh, this process is often used to fill in the wreath itself, but it
occurred to me that I could use the same basic technique on the denim — by
employing accordion folds — to make bows.
You can see in the photo above how the gradient that developed on the fabric
underneath the back pocket creates an interesting look when used this way.

|
| A standard pipe cleaner will hold the accordion folds in place... |
As with the strips, I didn't bother to cut the denim pieces to any identical size, nor were any of the edges straight. (Generally speaking, they were approximately 7" x 8".) They were all wonky and I think that approach works in the spirit of making something like this. The imperfection of individual components is what makes the whole uniquely beautiful.
After securing the bows with the pipe cleaners, I tied the ends of the pipe
cleaners around the two center rings of the wreath in the middle of each
section. (Some strips were relocated during this process.)

|
| More or less done... |
I made seven bows, so the extra one got placed between two others to mark
the top of the wreath. As a finishing touch, I cut pieces for tails to
complete the illusion of a bow.
It's typical for the average wreath artiste to add
decorations to their creations at this point. Dollar store embellishments
in the way of signage (think "Home Sweet Home" or "Welcome" like in the
Wayfair wreath), ornaments based on a particular theme (like Easter
or Halloween), or simple floral arrangements are popular additions.
In my case, I was pleased with the result and don't have plans to add more
"stuff".
5. ADD HANGING LOOP
All that was left was to tie something to the top of the frame for
hanging. Another strip of denim will do just fine; I used some skinny
ribbon rescued from a clothing designer tag.

Afterwards, I decided that since I don't want to end up with a spider-webbed, insect infested wreath, this will hang inside our house rather than outside.

|
| Hanging on the front door, but inside... |
At first, this location was the inside of our front door, but then hubby said that it covered up the little half moon window, which would make our foyer darker in the winter. So I moved it a few feet away to another door. It arguably looks better there, without light shining through the gaps.

|
| Final home is another interior door... |
My final tab for this project was $5.50. Aside from the frame, the only other
thing I had to buy was a bag of pipe cleaners for two bucks. (Now left with
ninety-three white pipe cleaners that I don't know what to do with... maybe
I'll have to make more wreaths!)
Of course, I'm now feeling quite satisfied that I was tasked with making that
big boat tote for hubby, because... the wreath!



Love it, it looks amazing
ReplyDeleteThank you so much; I must agree! ;-)
DeleteLooks great. And a great example of using what you already have to create a beautiful wreath.
ReplyDeleteThank you. Yes, indeedy, I was ultimately extremely satisfied that I was able to "make do" that way.
DeleteLove the look and the simplicity with a recycling bonus. I just cleared my stash of material scraps to make way for paper hobby scraps and this would have been a worthy project for some of those bits. Enjoy your beautiful wreath.
ReplyDeleteI'm always amazed at the items you create out of stuff you already own, instead of going out and buying everything you need to complete a project. Your wreath is beautiful.
ReplyDeleteOops, forgot to choose an option from Comment as: The above comment was from me.
ReplyDeleteLOL — I still don't know who you are, but I so much appreciate the kind words. As time goes by, I'm adopting more and more of a "minimalist" attitude and reuse is a priority.
DeleteMy sister has been collecting her old denim and didn't know what to do with it so she gave me the pile to give away. Instead, I am going to make her a picnic quilt and this wreath would be perfect on our home at the farm (our parents left it to us and we rent out the land but maintain the home and yard. Thank you for the idea! I love your wreath.
ReplyDeleteYou're welcome for the idea, and thank you so much for the feedback. I hope your finished denim wreath gives just the right amount of pizzazz for your home!
Delete