|
|
Lost opportunities or "never meant to be"s? |
Then I thought, well, maybe that shouldn't be surprising since so many of us
are looking for alternate sources of inspiration. Obviously, if what I'm
actually tackling on a week to week basis doesn't ring your bell, you'd be
happy to look at what else I might bring to the table.
Which leads to this new series of posts, titled rather appropriately,
nifty things I thought I might make... as in, these are projects from
my computer archives, saved over the past decade for "later". As of this
writing, my
Other Peoples Projects
folder contains 262 items, ranging from folders to PDFs to JPGs.
In truth, the vast majority of these projects likely belong to that "never
gonna make" category, but they differ in that — at some point — I definitely
thought I might attempt them. Maybe they'll turn into "must makes" for you? To
facilitate that, I've confirmed that all of today's projects can still be
found online. I will leave the actual finding part up to you, however, by
providing sufficient information to locate them in lieu of live links. (To
reiterate, I try to use as few external links as possible these days to avoid
future 404s. I am constantly finding them in links throughout the blog from years ago, which then requires me — as a conscientious person — to edit the posts to remove them.)

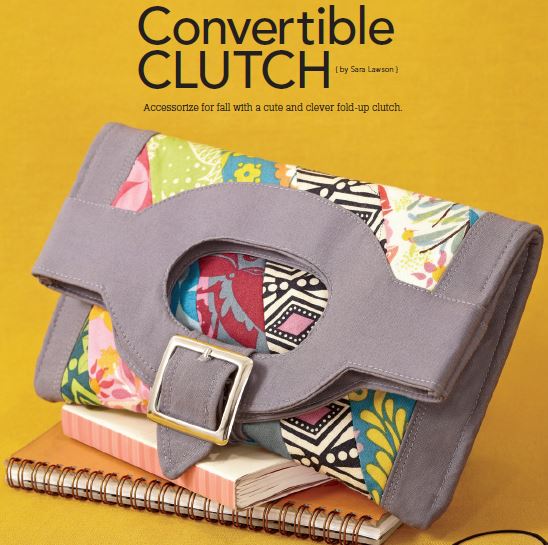
Sara Lawson of Sew Sweetness has released many, many free bag patterns over the past decade (of which I've only made one apparently), with this early one catching my eye, due to its unique look.

|
| Sara Lawson's Convertible Clutch (image courtesy of SewNews.com)... |
The image above is from a PDF released by SewNews.com (the site no
longer exists under that banner). If you check out the current PDF (available
at PellonProjects.com), it has a name added to it — as in, it's now
called the "Caliti" Convertible Clutch — and the tutorial features a version
done up in red, white and blue fabric.
When I first came across this, my thought was that unless I had some nice
fabric to use, I wouldn't be able to do the project justice. At the time that
I downloaded it (May 2013), my fabric stash was pretty much non-existent. By
the time I started accumulating some conventional fabric, I was already
somewhat governed by my
sewing dilemmas
and realized that I really had no need for a clutch like this.
Therefore, did not make. Still think it looks nifty, however.
Watch live classes for FREE at CreativeLive!

[affiliate link]
I found this next PDF in October 2015. (The pattern itself dates back to 2007!) It's an Amy Butler project called Sweet Greetings, a set of small and large portfolios.

I found this next PDF in October 2015. (The pattern itself dates back to 2007!) It's an Amy Butler project called Sweet Greetings, a set of small and large portfolios.
Believe it or not, this project calls for the use of chipboard. Had I
gotten around to it, I would have substituted in some Peltex.
(Otherwise, I have made
similar folders
using cardboard as the foundation.)
Given that I went on to make
this
and
this, I think seeing the possibilities offered by this project definitely
inspired me. However, the tricky thing about a portfolio is that more than
likely, you'll want different types or sizes of pockets (see photo below for
what the large one looks like on the inside). That being the case, it's often
easier to make your own from the start.

|
| Interior of large portfolio (image courtesy of Amy Butler, Art of the Midwest)... |
That said, as is, this would still make a lovely handmade gift set for
someone. I would add a full size slip pocket to the large version above,
however; not having one seems like a lost opportunity for maximum functionality.
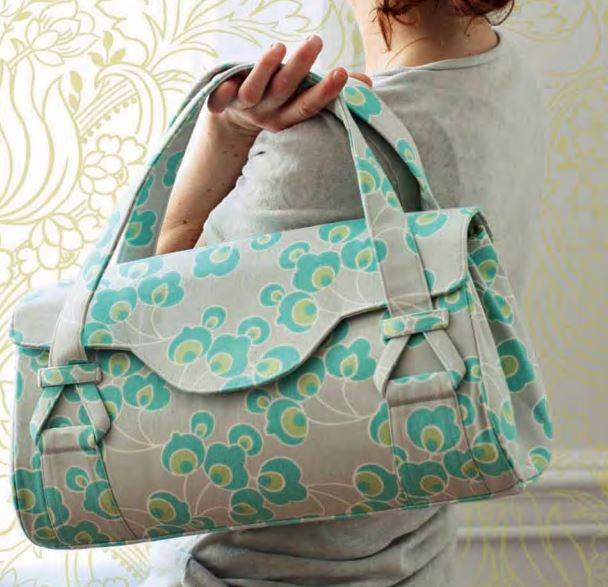
Another Amy Butler design that I have had since May of 2013 is her
Blossom Bag pattern. It was made available for free after the release
of her book, Style Stitches, where it is one of many (mostly ginormous)
bag patterns featured, and from where I found this
small project to make.
Truthfully speaking, this horizontal barrel style doesn't appeal to me. I'm pretty
sure I saved the pattern for reference and learning purposes more than
anything, in that I thought some elements might be worth replicating in other
bags I might make down the road. Oftentimes, just reading through a tutorial
is instructive.

|
| image courtesy of Amy Butler Style Stitches... |
By the way, with the book being published in mid-2010, notice how the bag
looks almost naked with its total absence of exterior hardware. Fascinating
how things have changed in the bag making world over the past decade.
If you want to get your hands on this PDF, you'll have to jump through a
couple of hoops. I recommend that you access the project via
AllFreeSewing. The link from their page is a
Wayback Machine link that takes you to the archives of
SewMamaSew, which — quite surprisingly — has a functional download for
the PDF.
[Speaking of SewMamaSew, it appears to have resurfaced after
having been gone for a few years. However, it's a mere shell of its former self with only nine categories of
(mostly clothing) sewing patterns, the oddest inclusion being
rice heating pad patterns and the most egregious omission being
purse patterns! A rather sad comeback, IMHO.]

Finally, here's a project that I thought for sure I'd end up making: the
Sewing Date Traveler sewing caddy. I found this in January of 2016 at
RobertKaufman.com. (Designer of both the pattern and the fabric line
is Cynthia Frenette, a fellow Canadian who is very active
on Spoonflower these days.)
The layout of this is not entirely clear from the picture, but there is a
divided slip pocket on the inside front, a large slip pocket on the inside
back, a zippered pocket in the middle that acts as a divider for the unit,
and slip pockets divided into three compartments on the exterior front.
Finished size is 12” x 9-1/2” x 6-1/2”.

|
| Image courtesy of RobertKaufman.com... |
The reason for not making this just might be because the year prior, I'd
made
this organizer
which was already functioning as a sewing caddy for me. But oddly
enough, about two years later, I saw a
different sewing caddy and was inspired
to replicate it instead. Don't know why I never got back to this one; I think I just forgot
about it.
In any case, I still like this; it looks to be both simple and highly
functional.
So did I bring anything new to your attention? Might any of these wind up on your "to
make" list this year?
'Til next...


Ugh I can’t change the anonymous part, but I am writing from the bottom of Africa😁👋🏼 I have made the Blossom bag twice (for me & my sister) and absolutely love it. I always meant to make one in a very soft leather…your post have remindid me of it! Thanks! I also made the RK bag, and I really like the Sewing date organiser…might have to make space on thecalendar for it👌
ReplyDeleteNice to have added a potential project to your to do list. And you successfully completed the Blossom Bag... kudos! (I've heard that her instructions are not as comprehensive as can be and I think that was my own conclusion when I flipped through her book.) You've got me stumped with your reference to the RK bag, however. What is that?
Delete