 |
| Front view of my new/renewed Route 66 Ollie Bag... |
If something is going to be repurposed (as opposed to put back together), it's perhaps not important to have that frame of reference; but still, I could have sworn that I took a picture of my foldover J Garden Route 66 tapestry tote bag before having at it with my seam ripper, but there it is. If I did take a photo, it's nowhere to be found.
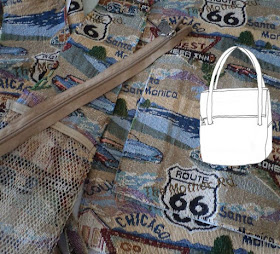
Since that can't be helped anymore, let me just describe it as a slightly tapered rectangular bag with a zippered top that folded down about 5" or so to where straps were attached to the front and back of the body. Along the gusset, one side had a small pocket with hook and loop tape closure and the other side featured a mesh pocket for a water bottle. (My quick sketch of it is shown below in the picture of the fabric.)
By the way, you'd think the internet would yield a picture of this bag, but no luck at all on that front.
 |
| My deconstructed J Garden Route 66 bag... |
I bought it in Las Vegas many years ago, having been drawn to the tapestry print. I'm fascinated by all things Route 66, despite never having actually travelled that highway. (Fun fact: Route 66 manages to skirt "under" Las Vegas and totally miss the state of Nevada.) As with most bags purchased as souvenirs, it was used sporadically. Over time, it was relegated to a back closet shelf.
UPDATE! Almost a year later, I found the photo of the original bag in a random folder... here it is:
 |
| Original bag... |
In the spirit of redoing, renewing and reusing, I pulled it out at least a couple of years ago with the aim of turning it into a totally different bag. Early this year, I took a seam ripper to it. (Yes, it has taken a long time to be reborn.) Today it finally makes its appearance as a customized Ollie Bag (by ithinksew).
Ironically, this is now my third bag project this year, despite having professed no enthusiasm for them. Go figure!

It was during the same $2 Makerist sale when I snapped up ithinksew's Seth Bag pattern that I also picked up this one. Its shape — as defined by the unusual side gusset darts — appealed to me.
 |
| image courtesy of ithinksew... |
By the way, are you sometimes challenged by trying to imagine how big a bag might be even though you're given the dimensions? This seemed to be the case with me. The pattern clearly stated the size as approximately 8" x 8.5", but I was still surprised by the "compactness" of the finished bag.
That said, the interior is roomy, due to the width of the base/gusset. I have no problem fitting my purse organizer into it (the same one that's normally in the Frankenpurse that I'm currently using). It's actually the perfect I want a smaller bag but still need to be able to carry "stuff" size.
 |
| Back view... |
Unfortunately — and this couldn't be helped given the constraints of reusing fabric that's already in pieces — the "Route 66" sign itself appears quite low on both sides of the bag. On the other hand, the strap length is relatively short, so when worn, the famous sign is unmistakable.
Despite the fact that this bag seems quite a bit smaller than my original, the material needs of the various pieces necessitated some cutting choices that I wouldn't have made had I been dealing with new fabric.
 |
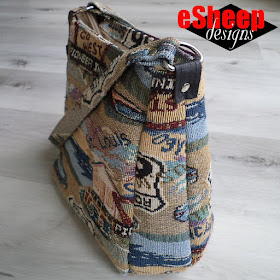
| Side view, checking out the Route 66 zipper pull... |
For example, the (four) side gusset pieces were quite wide at the bottom, leaving me with no choice but to orient the fabric upside down for one half of each side. Even to accomplish that, I was forced to cut the pieces for the main panels with no option for featuring any specific part of the remaining fabric.
My first customization — and I would have done this regardless of what material I was using — was to put an actual pocket under the flap. The pattern calls for a zippered lining pocket at that same location (which I did not make), but no pocket on the outside, even though the flap is real.
 |
| I couldn't have a functioning flap be essentially useless... |
I made the pocket as big as the main panel of the bag in terms of depth and width. With a flap on top, I didn't feel like it needed the additional security of a zipper.
 |
| Another view of the open pocket... |
Normally, I'm not a fan of velcro, but that piece came from the original bag, so I decided to use it. Given what I've said before about disliking flaps, the hook and loop tape at least makes it easy to access the pocket underneath... which further explains why I didn't want the bother of a zipper under there.
The fabric used for the underside of the flap, pocket and zipper end trim is a selection from the DECOdent collection by Boundless (a Craftsy/now Bluprint brand), last seen on the body of my Purl Bee Penguin.
 |
| View of recessed zippered closure... |
The second (and third) customizations had to do with the recessed zippered top and the lining.
 |
| An idea of scale... |
The thing is, a pattern designer won't often go to the trouble of making a separate set of templates for a basic lining, but that doesn't mean that you can't simplify them, especially once you've gained some bag making experience. (In my MIY Bag PDF, I provide the means to create the lining if the exterior has been pleated; other tutorials might just instruct you to pleat the lining as well, which is not only a waste of fabric but a tremendous waste of time.) If a bag has a simple drop in lining, it really doesn't matter that it's not constructed in the same way as the exterior. To extrapolate further, just because the bag's exterior has a gusset, it doesn't mean the lining must have one as well.
This particular bag called for an identically constructed lining, using the two piece format of the main body panels to secure the recessed zipper assembly. I chose instead to install the zipper facings within the top seam, sinking them deeper afterwards by top stitching. This resulted in several thick layers to power through, but since the fabric is loosely woven, it wasn't an issue for my sewing machine.
Speaking of loosely woven... this tapestry stuff is challenging to work with. A pull here, a drag there and it could all disintegrate right before your eyes.
 |
| Fabric that will totally unravel if you're not careful... |
To combat this, as soon as I cut the required pieces according to the pattern's templates, I cut matching pieces of SF101 to fuse onto the back. I even sewed all the way around the pieces at about 1/8" to ensure that they could be handled repeatedly. Even so, my sewing table was littered with tiny threads throughout this project.
 |
| The black nylon pieces used as strap anchors were also recycled from the original bag... |
The final customization was part necessity and part practicality. Much as I loved the look of the grommets for attaching the straps, the grommets I had planned on using were just too large. (This being a recycling project, I didn't want to buy new materials.) The original bag used four small pieces of rip stop nylon to reinforce the straps at the point where they were attached to the bag's body. Two of those pieces ended up as the strap anchors here.
My relatively new supply of rivets provided the finishing touches.

I chose not to reduce the length of the original zipper, even though it's technically too long here. The ends can be pushed down inside easily enough, and as you can see from the photos, the zipper pull can even be pushed through the D ring to provide added security.
As a matter of fact, here's an innovative use for that "longer than necessary" zipper...
 |
| Zipper end makes a handy sunglasses "hook"... |
But the main reason that I kept the zipper intact is that this bag may be a candidate for further recycling down the road and a long zipper is more useful than a short one.
 |
| View of bottom of bag... |
The strap was fine as is. (There's still a second one remaining from the original bag.) It's not long enough for cross body use, but I rarely carry a bag that way. The width is also perfect for the size of this bag; I've mentioned before that smaller bags look odd when made with wide straps.
All in all, I was lucky to have straps made out of the same tapestry material; I've seen other versions of these bags cheapened out with black or beige webbing.
Scraps remaining from this project will definitely be recycled into something else; stay tuned.
What do you think of this renewal concept? Might you have some purses and bags from waaay back whose material you could harvest to create a whole new look?

No comments:
Post a Comment
You have the power to brighten my day. Leave me a comment; I'd love to hear your thoughts... you can even remain ANONYMOUS! And rest assured that I acknowledge all comments, either here or via email. (That is, if you don't see a response from me here, I would have responded privately to the person.) Spam or generic comments with unrelated links, however, are promptly removed... and I may take appropriate action or report you to Google. Thanks for reading! (✿◠‿◠)