|
| My new Retro Reticule... |
Ready to take the fashion world by storm!
Well, one can dream... ;-)
The Retro Reticule is my salute to a simple vintage purse design from yesteryear, with a couple of updates. As I said last week, the word "reticule" refers to a small handbag, typically having a drawstring. Back in the Regency era, elegant ladies carried little cinched up purses matching this description.
The inspiration for my version of the reticule is from a more modern age, the mid-twentieth century actually. In remaking it, I updated the design to accommodate potential twenty-first century accessories such as mobile phones and car keys.

|
| Actual shape of the Retro Reticule... |
The original crescent shaped bags would have been simple, consisting of just one main compartment. It is amusingly reminiscent of a fortune cookie when empty, but takes on more of its actual elongated shape once it's filled with "stuff".
Speaking of "stuff", keep in mind that this bag is not meant to be filled to the brim. I see it as a party purse where you are not likely to be carrying everything you own plus the kitchen sink. Obviously, if you put a big wallet into this, it will no longer be able to bend into its cute shape. (That said, this item would be a good "dual purpose" choice for travel, as you can use its full available size to pack small things — like underwear and socks — and have it be an optional evening purse while at your destination.)

|
| The Retro Reticule is also a fun fortune cookie purse! |
To allow for certain contents to be separated/protected/secured, I added a centre zippered divider partition pocket. In addition to offering secure storage, it also divides the bag into two halves. Although it is not difficult to add other pockets, I believe anything more would result in unnecessary bulk and detract from the crisp lines of the finished project.

|
| Interior of the Retro Reticule... |
Having seen too many projects recently that required turning of straps, the wrist strap of the Retro Reticule is very simply done, yet nicely gussied up with some ribbon. (No turning, I promise! And the technique is something that you can use even if you don't have ribbon.)
The use of ribbon is a throwback to the past, however. Back in the day, when women needed an old dress to have a different look, it was likely dolled up with ribbon.

|
| End view of the Retro Reticule... |
My test bag here is made out of Robert Kaufman's Oriental Traditions collection, Blossom in crimson for the exterior and Weave in gold and ivory for the interior. (I made two of these around the holidays last year and they just seemed very Christmas-y to me.) The other bag that you see at the top of the post is made from an IKEA duvet cover.

|
| Sample pages from the PDF... |
The PDF for this bag pattern is 30 pages long, with full-size templates, detailed instructions and 60 photos to help you create your own Retro Reticule. Measurements are provided in both metric and imperial.
Pattern Tester Bags
As usual, my "master tester" Nekane managed to achieve success with my latest project. Here is her Retro Reticule...

|
| Nekane's Retro Reticule in fab home dec fabric... |
The exterior fabric is a home dec remnant, while the lining is a cotton gingham.

|
| Full view of Nekane's Retro Reticule... |
She apparently took a short cut and found another solution to the strap and loop "problem"... instead of making them out of fabric, she used two types of webbing that matches/complements her exterior zipper!

|
| Interior of Nekane's Retro Reticule with a pop of checkered fabric... |
If I recall correctly, English is one of four languages that Nekane can communicate in (but it's not her first or second language), so she has the hard work and special job of ensuring that my instructions make sense!
When I noticed that Pam of Threading My Way fame was making zippered pouches as though she were on an assembly line late last year, I contacted her about testing this variation for me. (If Daryl over at Patchouli Moon is the queen of zipper pulls, perhaps Pam is the queen of zippered pouches!) Here is her Retro Reticule...

|
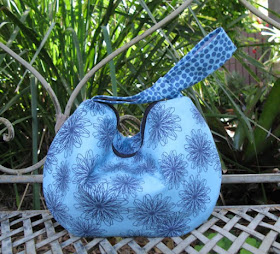
| Pam's bright blue Retro Reticule... the fabric reminds me of Spirograph! |
Notice that she also had some polka-dotty fabric for her strap! (She said that since she didn't think her ribbon was the perfect exterior accent, she opted to use it on the underside of the strap.)

|
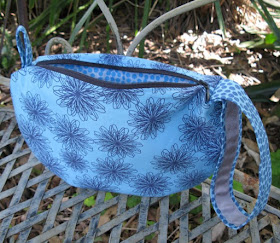
| Pam's Retro Reticule unzipped... |
The polka dots continue through the lining of Pam's bag.

|
| Interior of Pam's Retro Reticule... |
For more about Pam's project, check out her blog here.
My deepest thanks to both ladies for their help with this pattern launch. They both said that they enjoyed the project and how it turned out for them, so it's doubly good!
How Big is this Thing?
The Retro Reticule finishes to an approximate size of 11" wide by 8" high (28cm x 20cm), when laid out flat (as shown in a few of the pictures above). You can see in the photo at right how big the bag actually is in use.
Who is this Project For?
This project is actually a fairly easy "sew" for anyone with previous sewing experience. And I’m not talking extensive experience... I always like to say that if you’ve been able to make yourself a lined, zippered pouch, then this project is not beyond your capability.
Scared of zippers? Check out the free tutorial for the mini version of this project if you want an idea of what is involved.

|
| Big sister and little sister Retro Reticules... |
If you don't like curves, the large curved edge along the bottom may pose a bit of a challenge, but it's a fairly lazy curve! And if the interior divider pocket strikes fear in your heart, you can always leave it out and make your own choice of pockets in the lining instead.
How Long Will this Project Take?
Even allowing for cutting the fabric and applying the interfacing, the average sewer should be able to finish this project in a day.
What do I Need to Make this Project?
Requirements for this project:
- 1 fat quarter equivalent of mid weight fusible interfacing like Decor Bond
- 1 fat quarter equivalent of fusible fleece like Pellon 987F
- Equivalent of 3 fat quarters quilting cottons in coordinating patterns
- 2 x 8" (20cm) or longer regular zippers
- Thread, pins, clips, seam ripper, scissors, ruler, rotary cutter and mat, iron, etc.
- 1/2 yd or metre of 1" (2.5cm) wide coordinating ribbon
check your SPAM folder if not in receipt after that time.


Thank you, Rochelle, for trusting in my work!! This pattern is great!!
ReplyDeleteFunny Rochelle that I am knitting a very similar style bag right now, only no zipper, but the handle is similar. Once knit it gets felted. It's called the Lucy Bag: http://twooldbagspatterns.com/
ReplyDeleteThanks for asking me to test for you, Rochelle. I thoroughly enjoyed the process. The Retro Reticule is a great pattern. I'm about to do my blog post - running a little later than I wanted.
ReplyDeleteThe queen of zippered pouches lives much closer to you...
Deletehttp://suddenlysandra.blogspot.com.au/
Really? I'll have to take a look and see if she's worthy of the regal title!
DeleteMy sister-in-law is looking for a special occasion bag in a black satin type material. I am going to give this a try and to see if a card fits in it.. Special bags are usually so small. I will try first with regular cotton..
ReplyDeleteI just tried and can fit a 8" x 5" card into mine, but of course, the bag will need to stay as a flat pouch. If that's not an issue, make sure when you fit the top zipper that you maximize the size of the opening.
DeleteBlack satin would be gorgeous! Good luck with it (and I would love to see the results)!