|
| Origami inspired coin purse made with ribbons... |
I wasn't intending on making anything for her this year, but I was doing some maintenance on my project folders on the last day of April and ended up at Sew4Home. Then — of course — I started to browse. (Danger, danger! Time waster!) I came across this tutorial for what they call a Vintage Coin Purse made out of ribbons.
It seemed a nifty little item — a throwback to origami (which I've always found very fascinating) — and looked like a fun project.
Except for the part about the ribbons.

|
| A cute way to keep your coins or small jewelry... |
Here's the truth: at first, I thought — there's no way in bleepity-bleep that I'm going to go to the trouble of making this with ribbons! There must be a way to do it with fabric! Just seeing the pictures of the strips being laid out tediously one by one and then being sewn individually onto the interfacing looked liked a whole lot of work that I wasn't prepared to do.
But then I reconsidered, particularly since I had recently picked up some spools of ribbon for no particular purpose. With no plans for said ribbon, why not try this in the manner in which it was meant to be? After fishing out a scrap of that black and white duvet cover fabric that I used for the lining of my waxcloth bucket bag, I decided to give it a go... the next day.

|
|
Actually, after I printed out the pattern piece, it occurred to me that
it wasn't going to require a ridiculous number of ribbons to cover... |
Refreshed from a good night's sleep, I was quite productive the next morning and feeling less antagonistic towards ribbons. ;-)

|
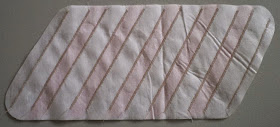
| In this case, eleven strips of ribbon are pinned onto the non-fusible side of the interfacing... |
I tried gluing instead of pinning the ribbon, but the glue I had didn't take. No biggie. Pinning is preferable anyway since the ribbons may shift a bit as you sew them on, so it's advantageous to be able to adjust them.
By the way — and this is an important "by the way" — if you cut your interfacing as they describe, you will need to cut your lining with the pattern piece REVERSED. I have finally learned my lesson about any shape that's not rectangular or circular: when cutting from a single pattern piece, if you need one for "the other side", reverse it!

|
| Reverse the pattern piece when cutting the lining! |
Now this isn't how the tutorial describes how the ribbon should be sewn down, but this is how I did it: I zigzagged the ribbon edges, effectively joining two adjacent ribbons together with each pass. Here I'm showing you the back so you can better see the stitching.

|
| I did a zigzag stitch on the edges of the ribbon to secure them to the interfacing... |
And even the most experienced seamstress finds it a hassle to keep a perfect seam allowance around lazy curved corners. A few instances of "connect the dots" does the job for me.

|
| I can sew along a line much better than I can "imagine" a line... |
Trimmed, turned, fused and ready for topstitching...

|
| The interfacing is now fused to the lining... |
The folding part can be a bit confusing...

|
| Since it's origami, now it's time to fold... |
Attach snaps...

|
| I used the "feel and press" method of positioning the snaps... |
And here it is loaded with some loonies and toonies and other coinage...

|
| Hope Mom likes her Mother's Day present! |
And I must say, it was a quick and easy project after all. My zigzag method cut down on the amount of time spent attaching the ribbons, and I don't think the final look of the item suffers from it. I would not hesitate to do it again that way.
So I did. Here is a second one, with the "order" of the ribbons reversed. (The lining on this one started life as a Walmart tea towel.) Instead of snap fasteners, I used a couple of buttons as trim...

|
| I have nice buttons that I want to use for items like this... |
... and added a hook and loop closure underneath...

|
|
These adhesive hook and loop "dots" are not recommended for fabric but
they're holding like crazy! (I will still hand sew around them, however...) |
By the way, my ribbons were 7/8" and 5/8" and I think that combination works quite well, considering the size of the finished item. (And if you're wondering about the colours, they are more or less as you see them: light pink with a taupe-y grey. Since this was originally posted, I've also made a couple more with different ribbons.)
Wanna know something? I'm now inspired to re-make my wallet with this ribbon as the exterior...
And of course, Happy Mother's Day to all the moms out there. If you haven't yet found a gift for your mom — or yourself — check out Craftsy's latest sale with "up to $20 off" classes. I found some interesting new ones (working with oilcloth and more organizers from Annie Unrein).

Very nice Rochelle. I love the Sew 4 Home page!
ReplyDelete